A few months ago, I posted a series of photos I took of the Ohio River bridge in Beaver, Pennsylvania. I have an obsession with this bridge — in full daylight, it doesn’t look like much, but I have captured some amazing sunrises over this bridge. I make it a habit to drive a few blocks out of my way every morning on the way to work, just so I can photograph it. Without further ado, here are the photos I’ve taken since my last post.
*all photos except the last two were taken with my iPhone 4S and edited with ProHDR. The last two were taken with my new iPhone 5s, also edited with ProHDR
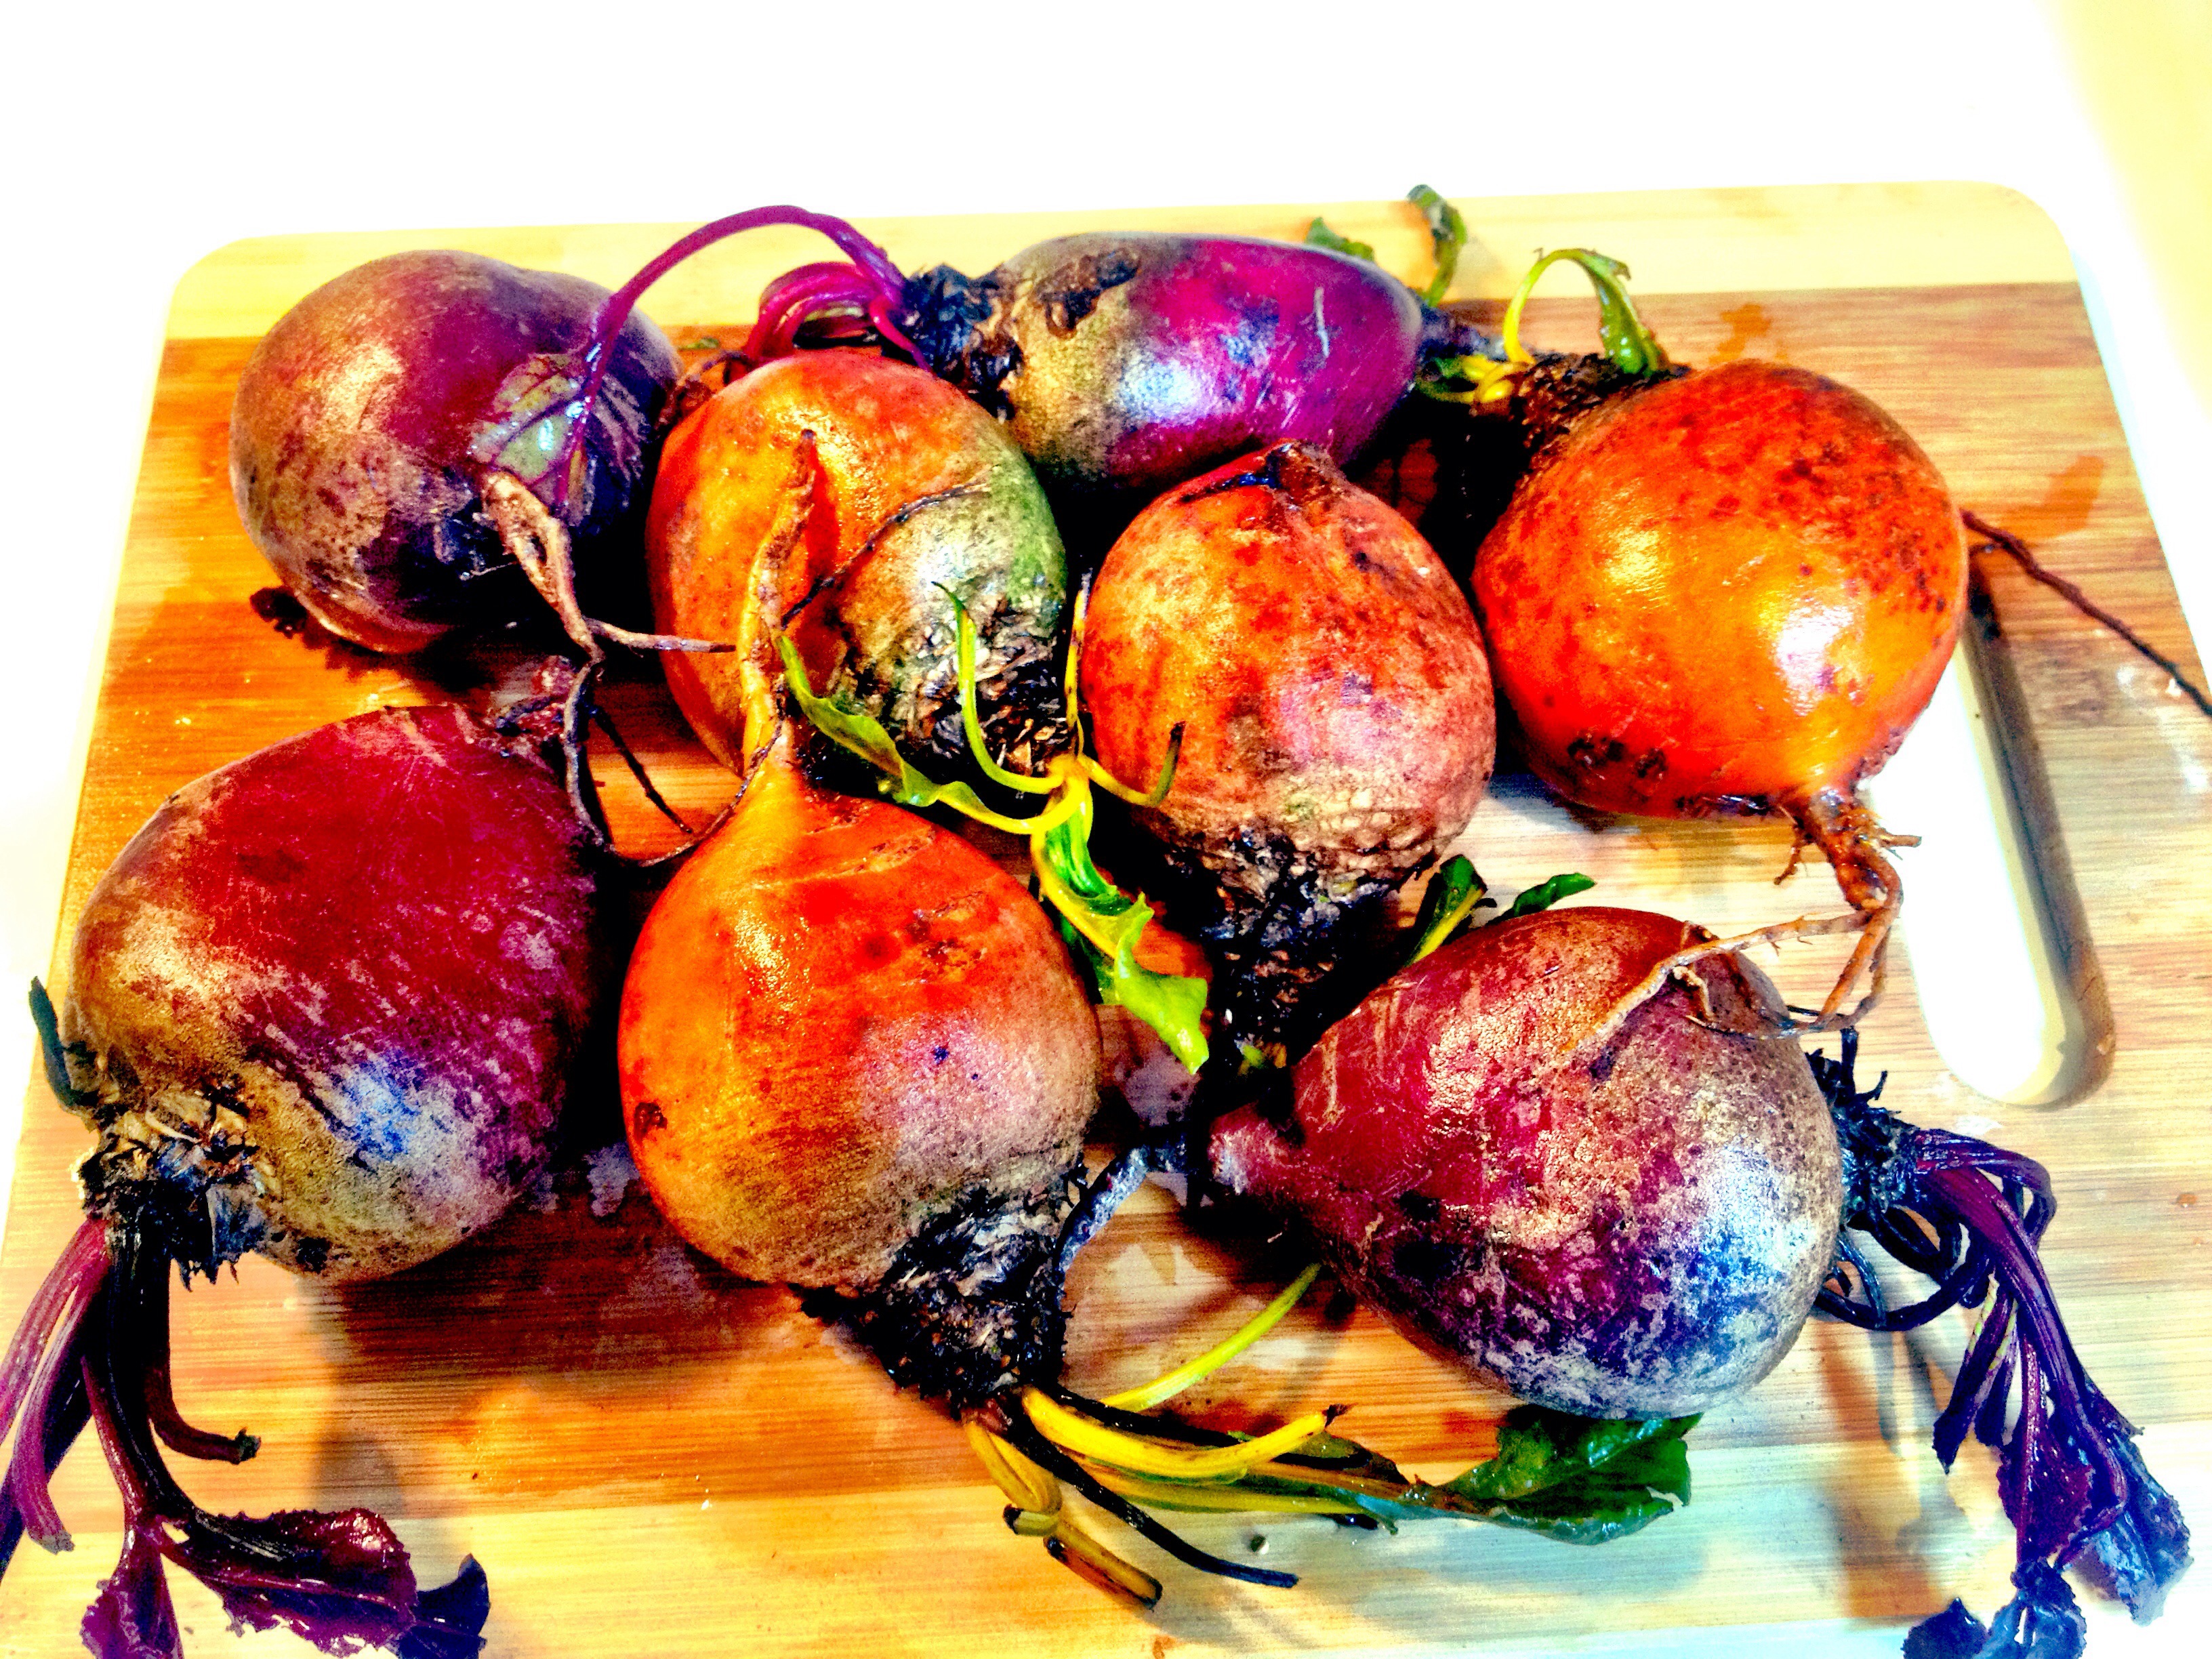
Welcome to the fourth installment of the Virtual Vegan Potluck! I’m so excited to be a part of this fun event! I hope you have enjoyed all the amazing recipes you’ve seen so far. This is my first time participating and I am honored to take my place in the lineup. This fall’s potluck has a new twist — a featured ingredient — the glorious beet! I wanted to come up with something that was a little out of the ordinary. We’ve all seen or heard of beet salads, pickled beets, brownies with beets, beet ice cream, beet soup, and the like. I wanted something a little bit different.
I used to despise beets. My mom would serve canned beets at dinner when I was growing up and I couldn’t stand them. I quickly learned that if I didn’t put a few on my plate, my mother would give me a huge spoonful and I would have to eat them all. It was easier to choke down a few than the giant spoonful! Once I left home for college, beets never came across my plate again until a few summers ago. My CSA boxes started arriving with bunches and bunches of beets. The first few weeks, I either gave them away to a friend, or ashamedly threw them away. It was a waste. I finally decided that I had to force myself to like them.
It turns out that fresh beets are much more flavorful than the horrible canned things. Roasted and drizzled with balsamic and maple syrup, served over greens with walnuts, dried cranberries, and avocado, I finally began to appreciate them. I found initially that I preferred golden or chiogga beets better than the standard red ones because the flavor isn’t as “beet-y” but I can now definitely eat them and actually enjoy my meal without feeling tortured!
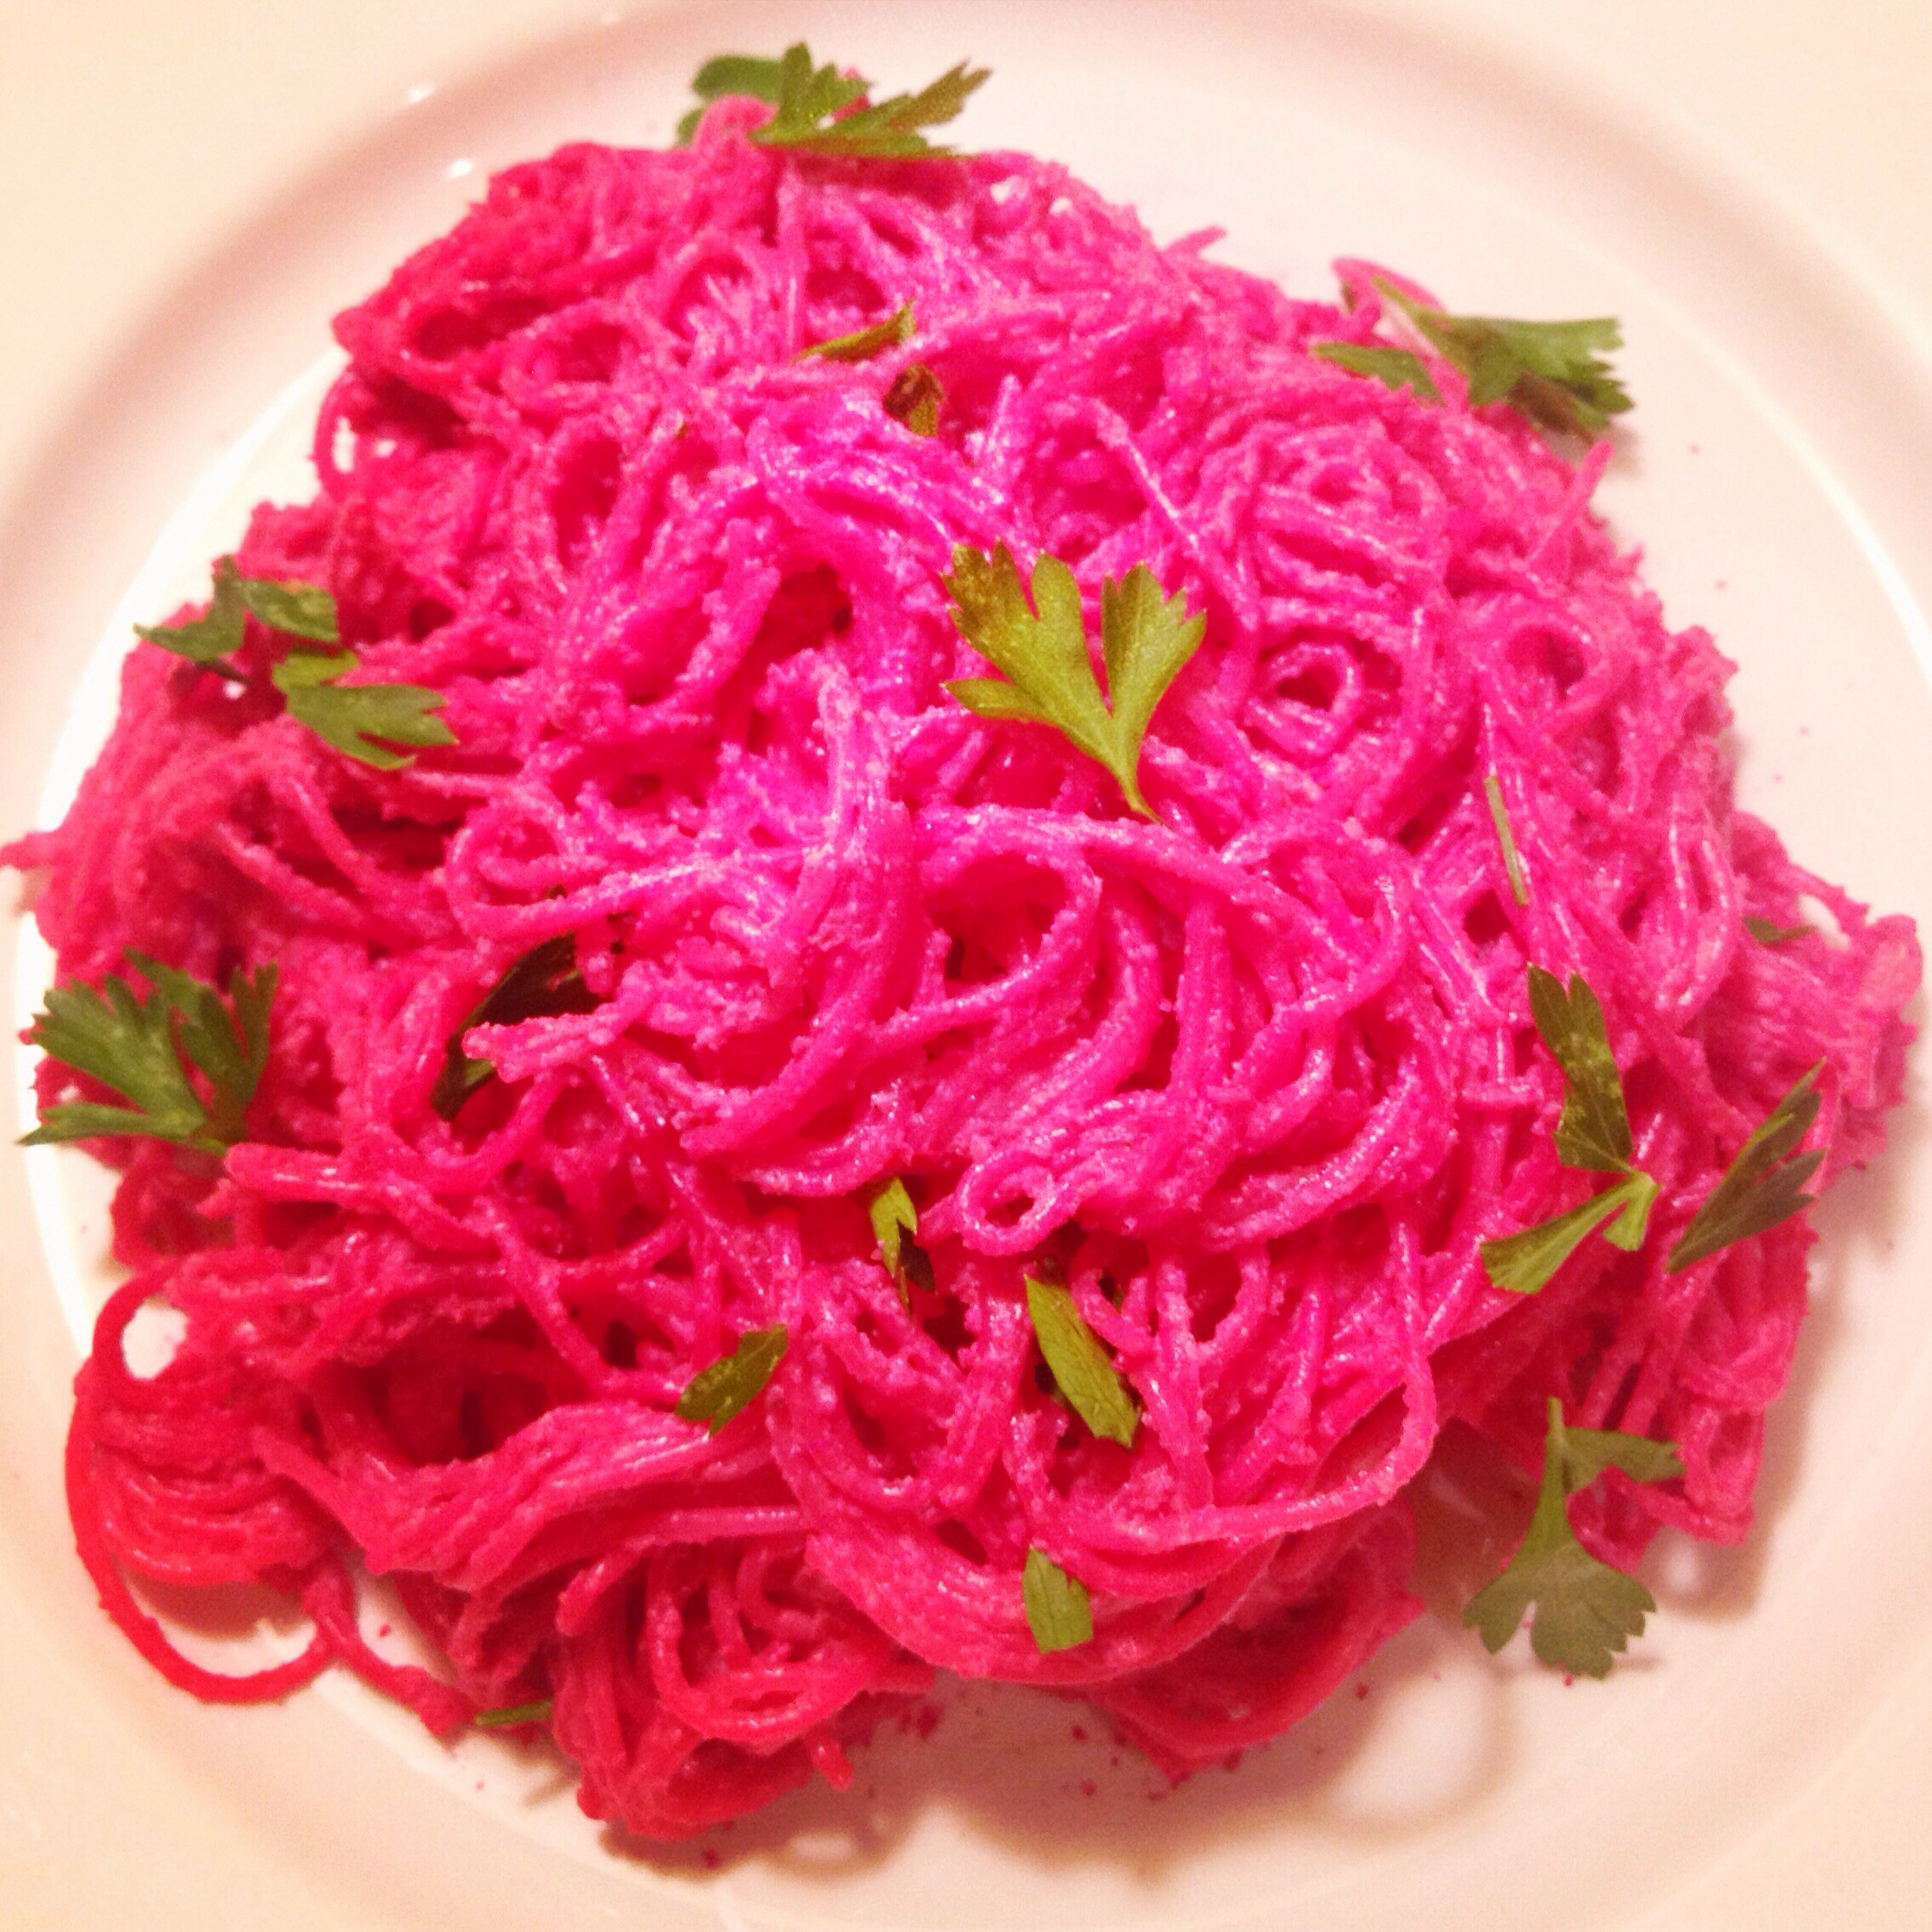
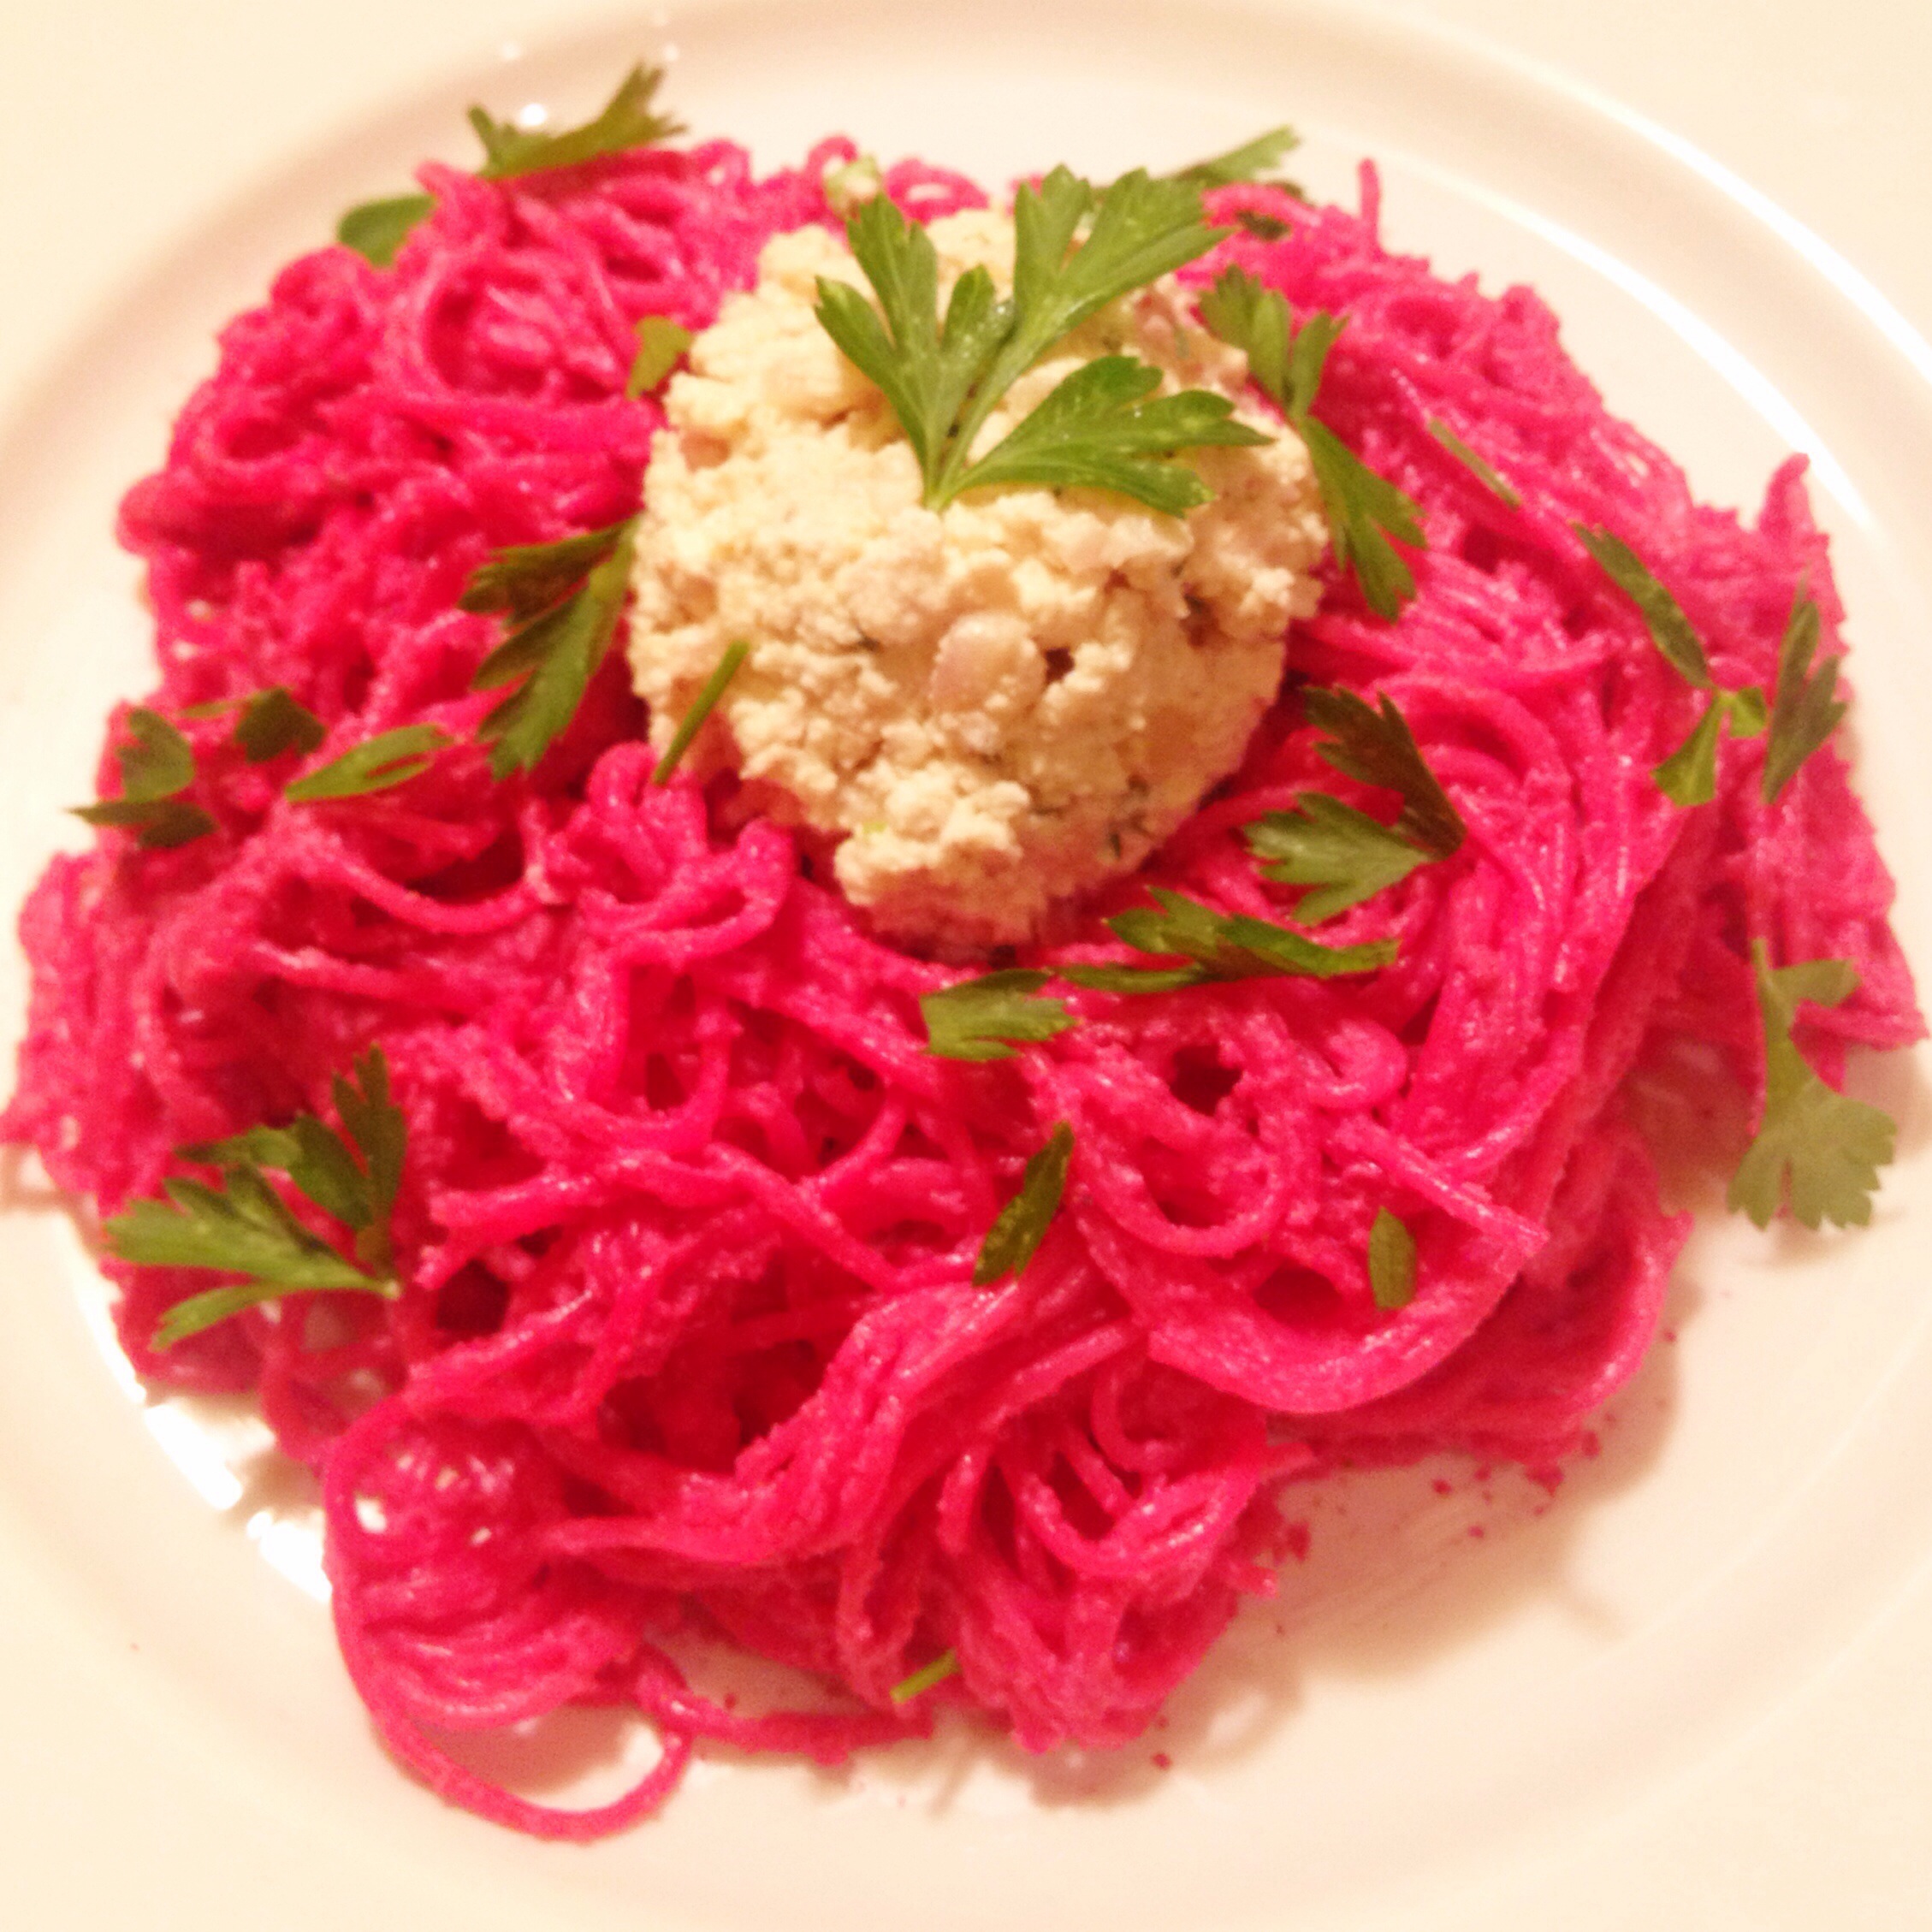
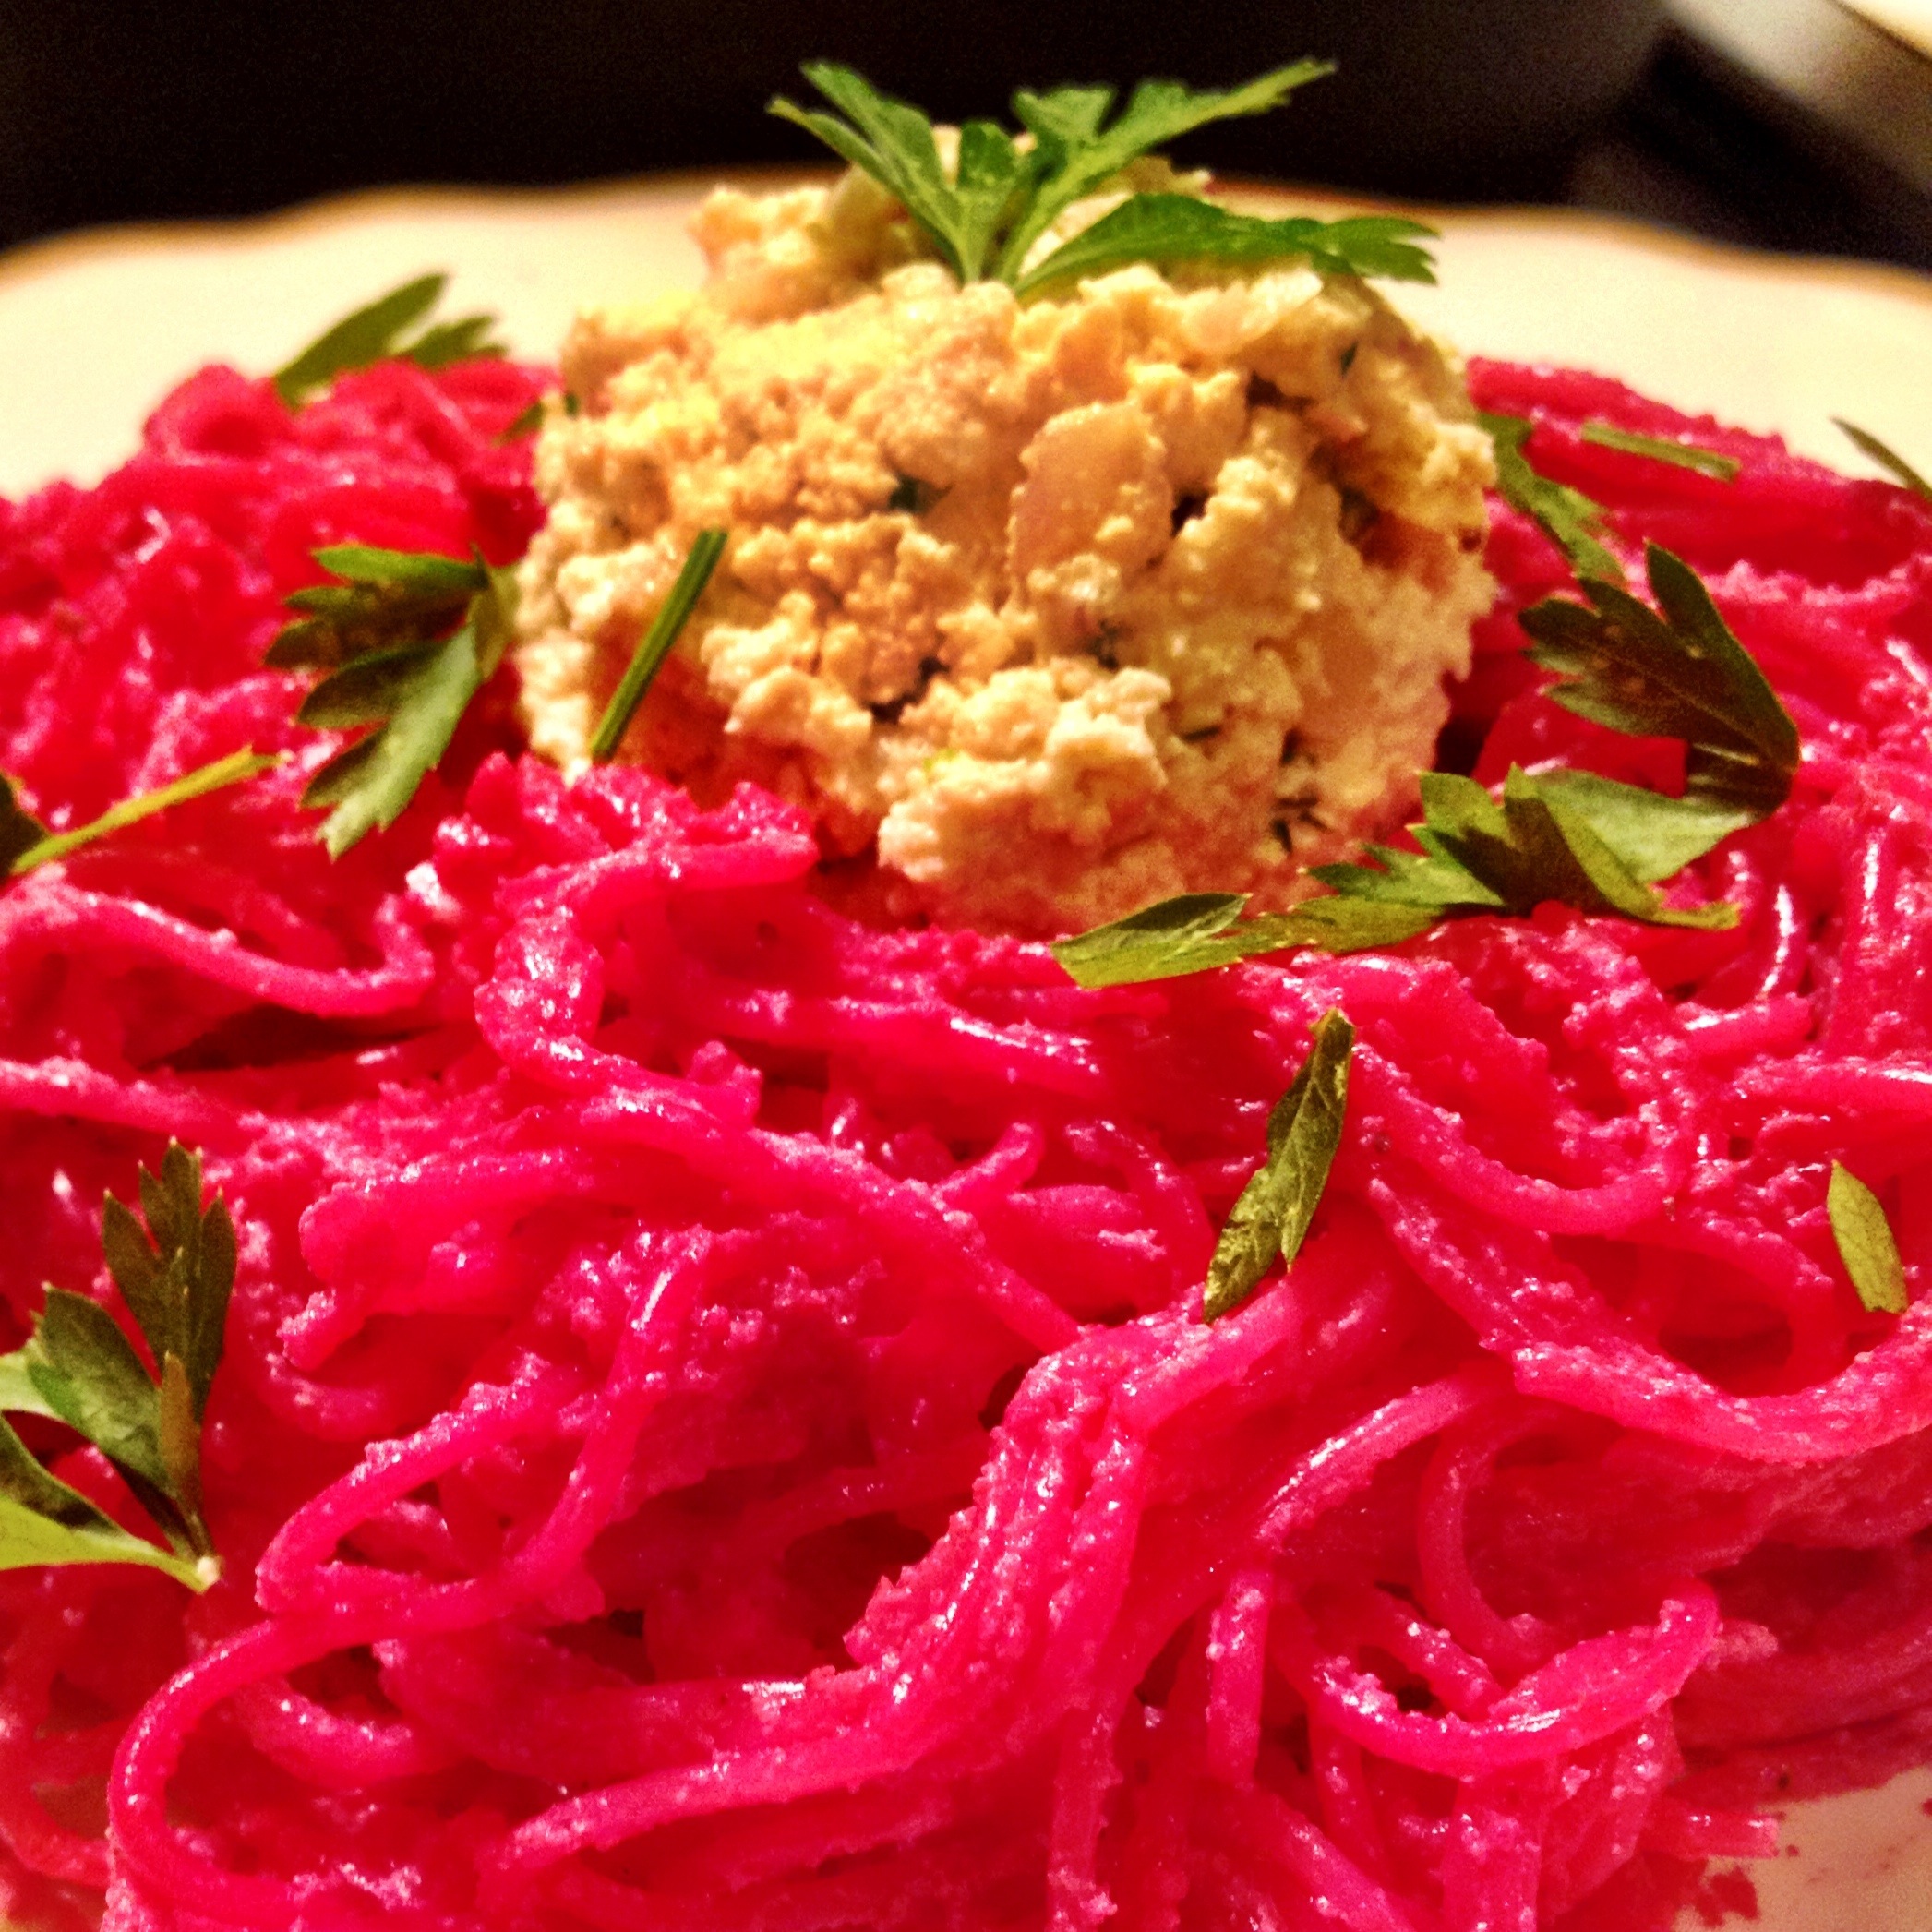
So what to make for the potluck? I initially planned to make a recipe I stumbled across in a meal plan I subscribe to on my iPad. It was for beetroot, lentil, and brown rice patties, topped with sliced tomato, sautéed mushrooms, and smashed avocado. It looked interesting, but each time I set about to make it, I never really felt inspired and ended up making other things instead. Then all of a sudden, a few weekends ago while I was blog surfing, I happened upon a picture of a bowl of vibrant pink pasta. I knew instantly that this was the start of what I would make for the potluck.
I turned to my trusty recipe file (i.e. Google) and finally settled upon this recipe for beet pesto, but I needed to find a substitute for the goat cheese. One of the many beet recipes I looked at mentioned topping the pasta with ricotta cheese so I decided to see if I could find a simple recipe for making tofu ricotta. I decided upon this recipe because I find the combination of miso and tahini so intriguing — it’s a flavorful collision of two vastly different world cuisines, two worlds that are both so integral in my food story. (This ricotta recipe, by the way, was so delicious on its own that I could have kept eating it by the spoonful. I’m anxious to see what other dishes I can come up with incorporating this ricotta).
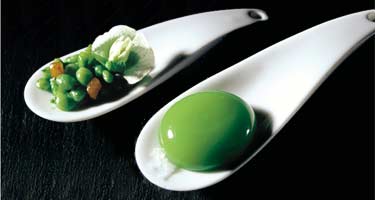
The end result? For starters, this was not a difficult dish to make at all. The ricotta takes about five minutes to measure, chop, and mash everything up. The beets need to roast for an hour, but after that, it’s the time needed to cook the pasta, and a few minutes of food processor magic. (And making sure you don’t turn your clothes and kitchen pink in the process). For something relatively simple to make, this was crazy delicious. I was actually surprised how little beet taste there was in it — I was expecting to be smacked in the face with beet flavor, but the garlic and walnuts must have mellowed it out. It is stunning to look at — I did very little to edit these photos. That really truly is the color of the dish. It is guaranteed to make your dinner guests ooh and ahh when you place this in front of them at the table! It might even make your children eat beets without realizing it — my sister’s kids love pasta with basil pesto, so if they’re already used to green garlicky pasta, I imagine they might be inclined to try bright pink pasta, too.
pasta with beet pesto and tofu ricotta
ingredients
for the pesto
3 to 4 medium-sized red beets, scrubbed clean
6 garlic cloves, unpeeled
olive oil
1/2 cup walnuts, toasted
salt to taste
1/2 cup tofu ricotta (see below)
for the tofu ricotta (makes approx. 2 cups)
1 block extra firm tofu (14 oz), drained and pressed
1 1/2 tbsp tahini
2 garlic cloves, minced
3 tbsp nutritional yeast
a pinch of ground nutmeg
1 1/2 tsp miso paste
1 lemon, juiced
black pepper to taste
1 shallot, finely diced
2 tbsp fresh parsley, chopped
1 pound pasta of choice
directions
Preheat oven to 400˚F. Drizzle beets lightly with olive oil. Wrap the beets (individually) and garlic cloves (together) tightly with aluminum foil and place on a baking sheet. Roast 1 hour, or until tender.
Meanwhile, make the tofu ricotta. In a medium bowl, crumble the tofu with your hands. Add the remaining ricotta ingredients to the bowl and mash with a spoon. Set aside.
Cook the pasta according to directions. Reserve a cup of pasta water before draining pasta. Drain pasta and drizzle lightly with olive oil to keep from sticking and set aside.
After removing beets and garlic from oven, remove foil and let cool slightly. Once cool enough to touch, use a spoon to peel skin off beets and coarsely chop. Squeeze roasted garlic out of the peel.
In a food processor, combine roasted beets, roasted garlic, two tablespoons olive oil, and toasted walnuts. Pulse until smooth and creamy, adding reserved pasta water as needed. Add 1/2 cup tofu ricotta and pulse until combined. Season with salt to taste.
Toss pasta and beet mixture until well combined. Top with more tofu ricotta, if desired.
I hope you have enjoyed my dish in the Virtual Vegan Potluck. Please use the image below to visit the next dish in the lineup!
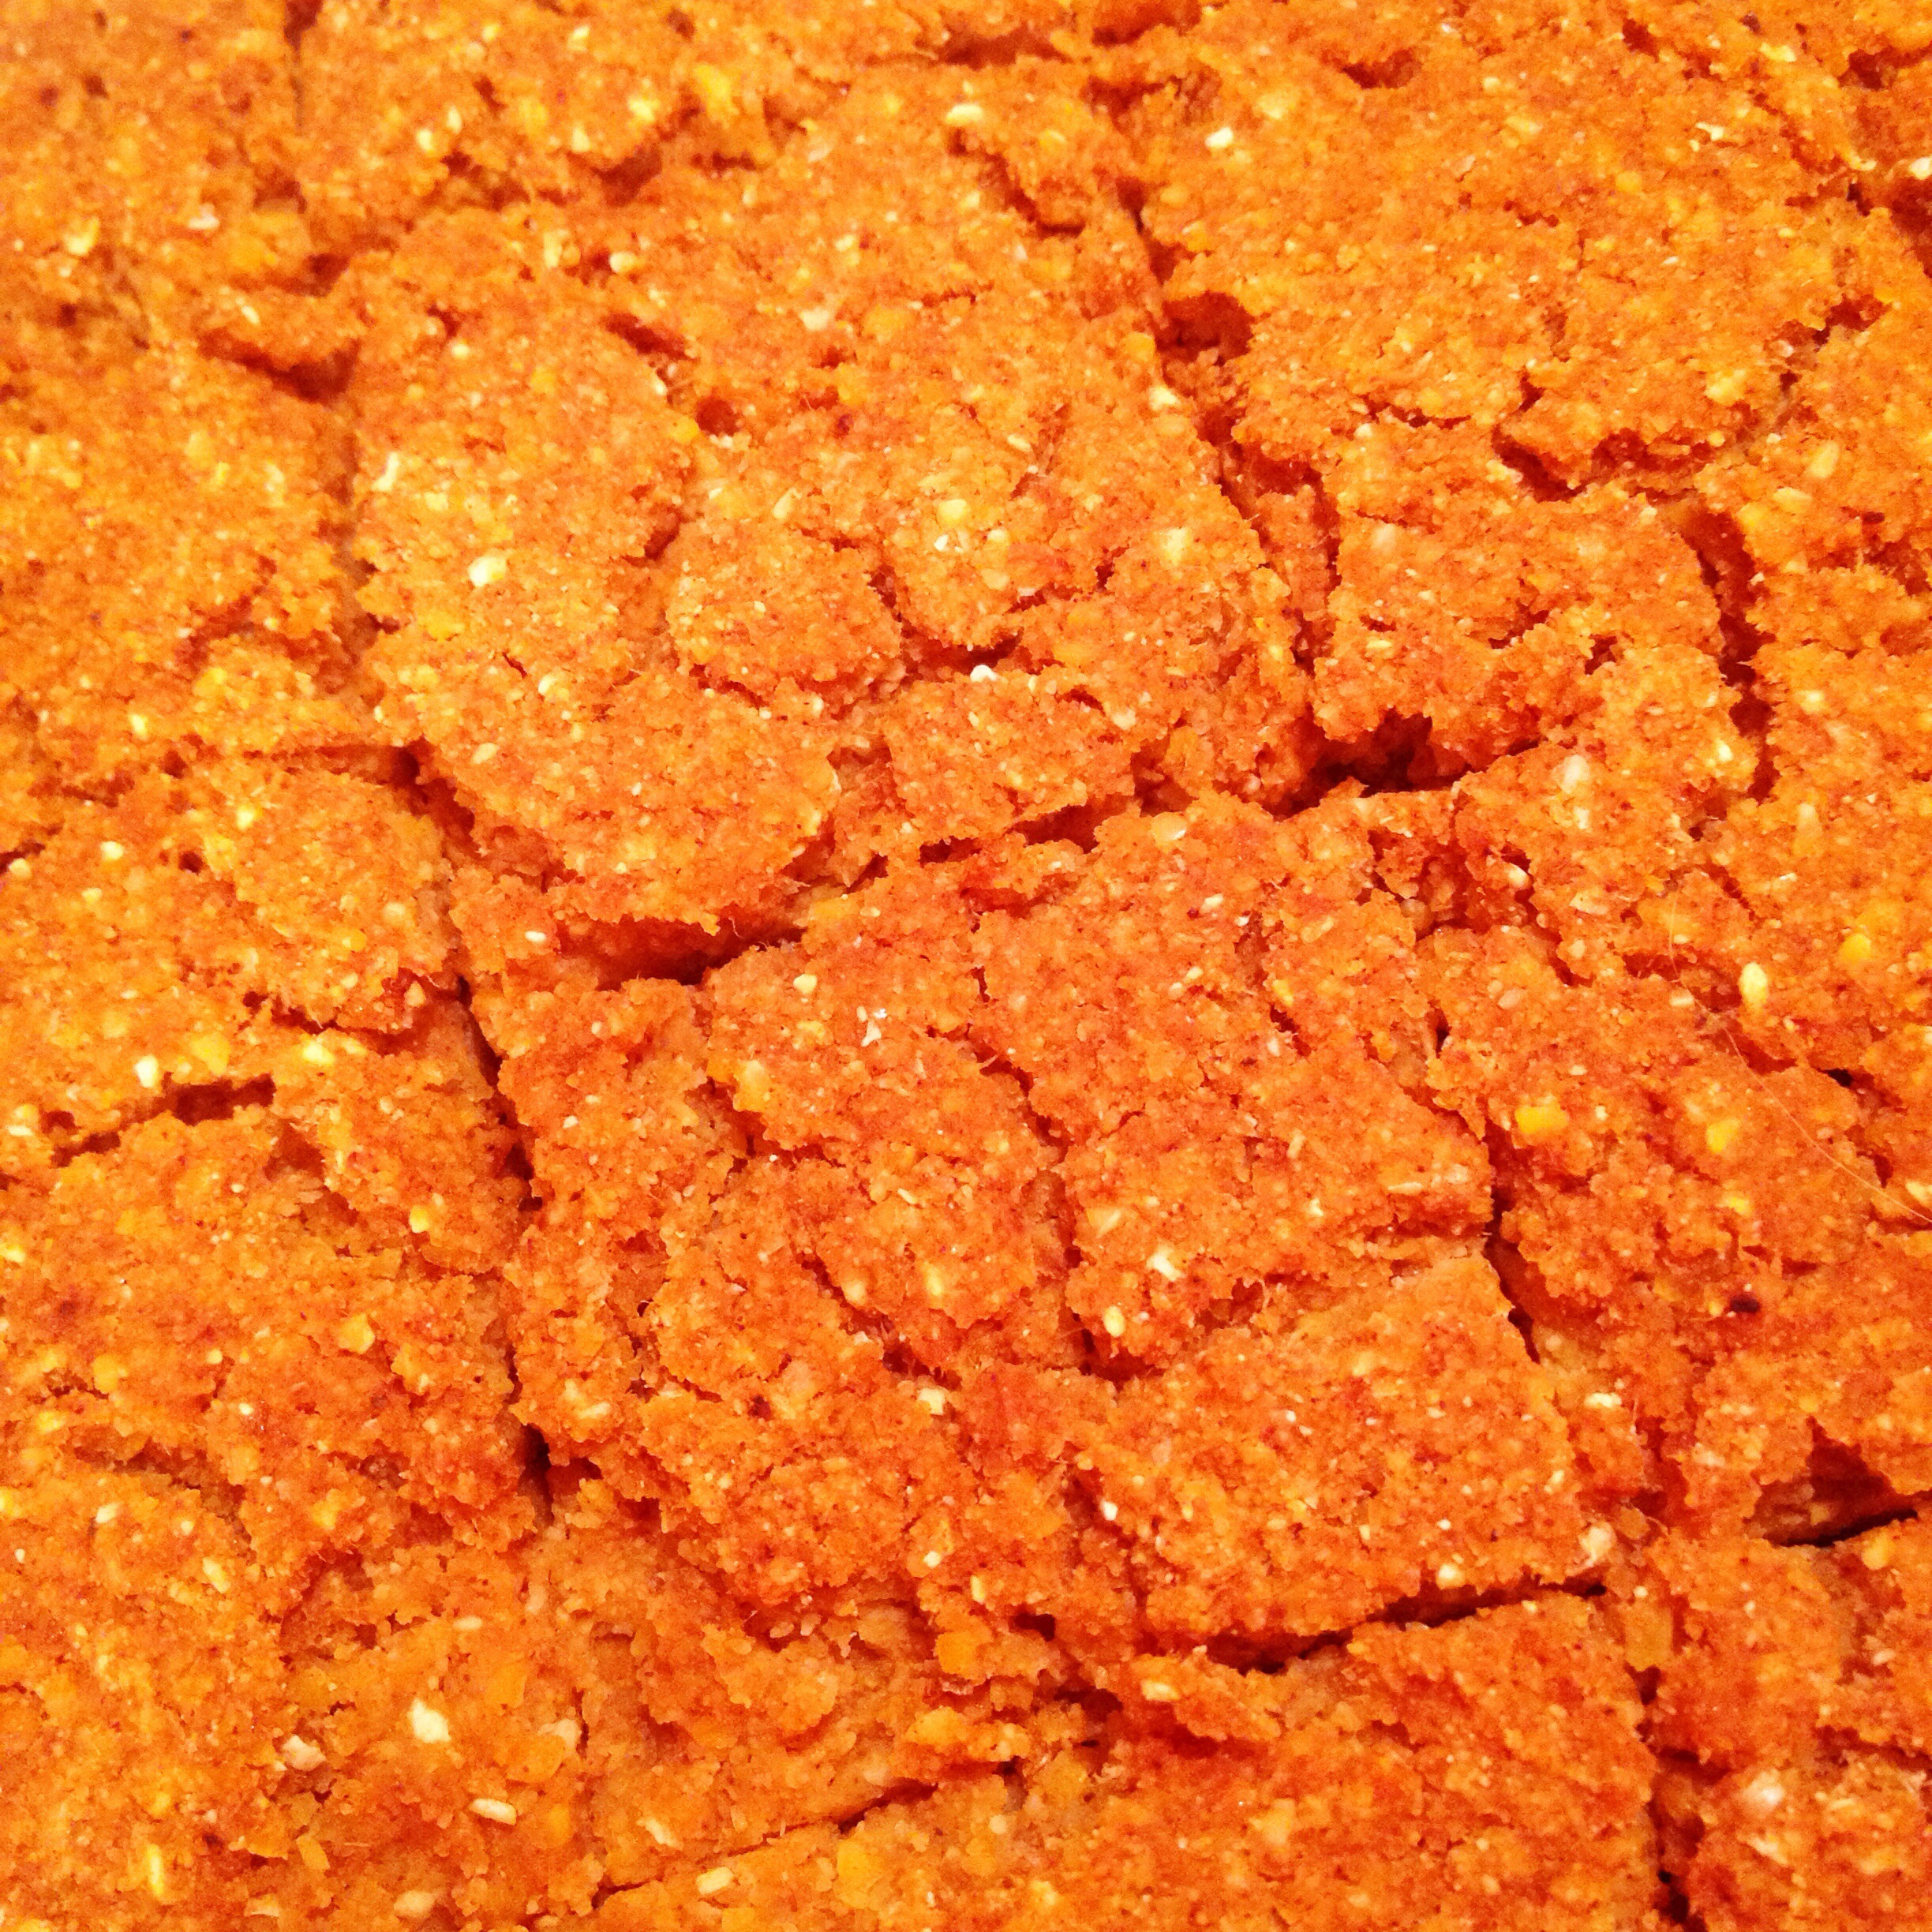
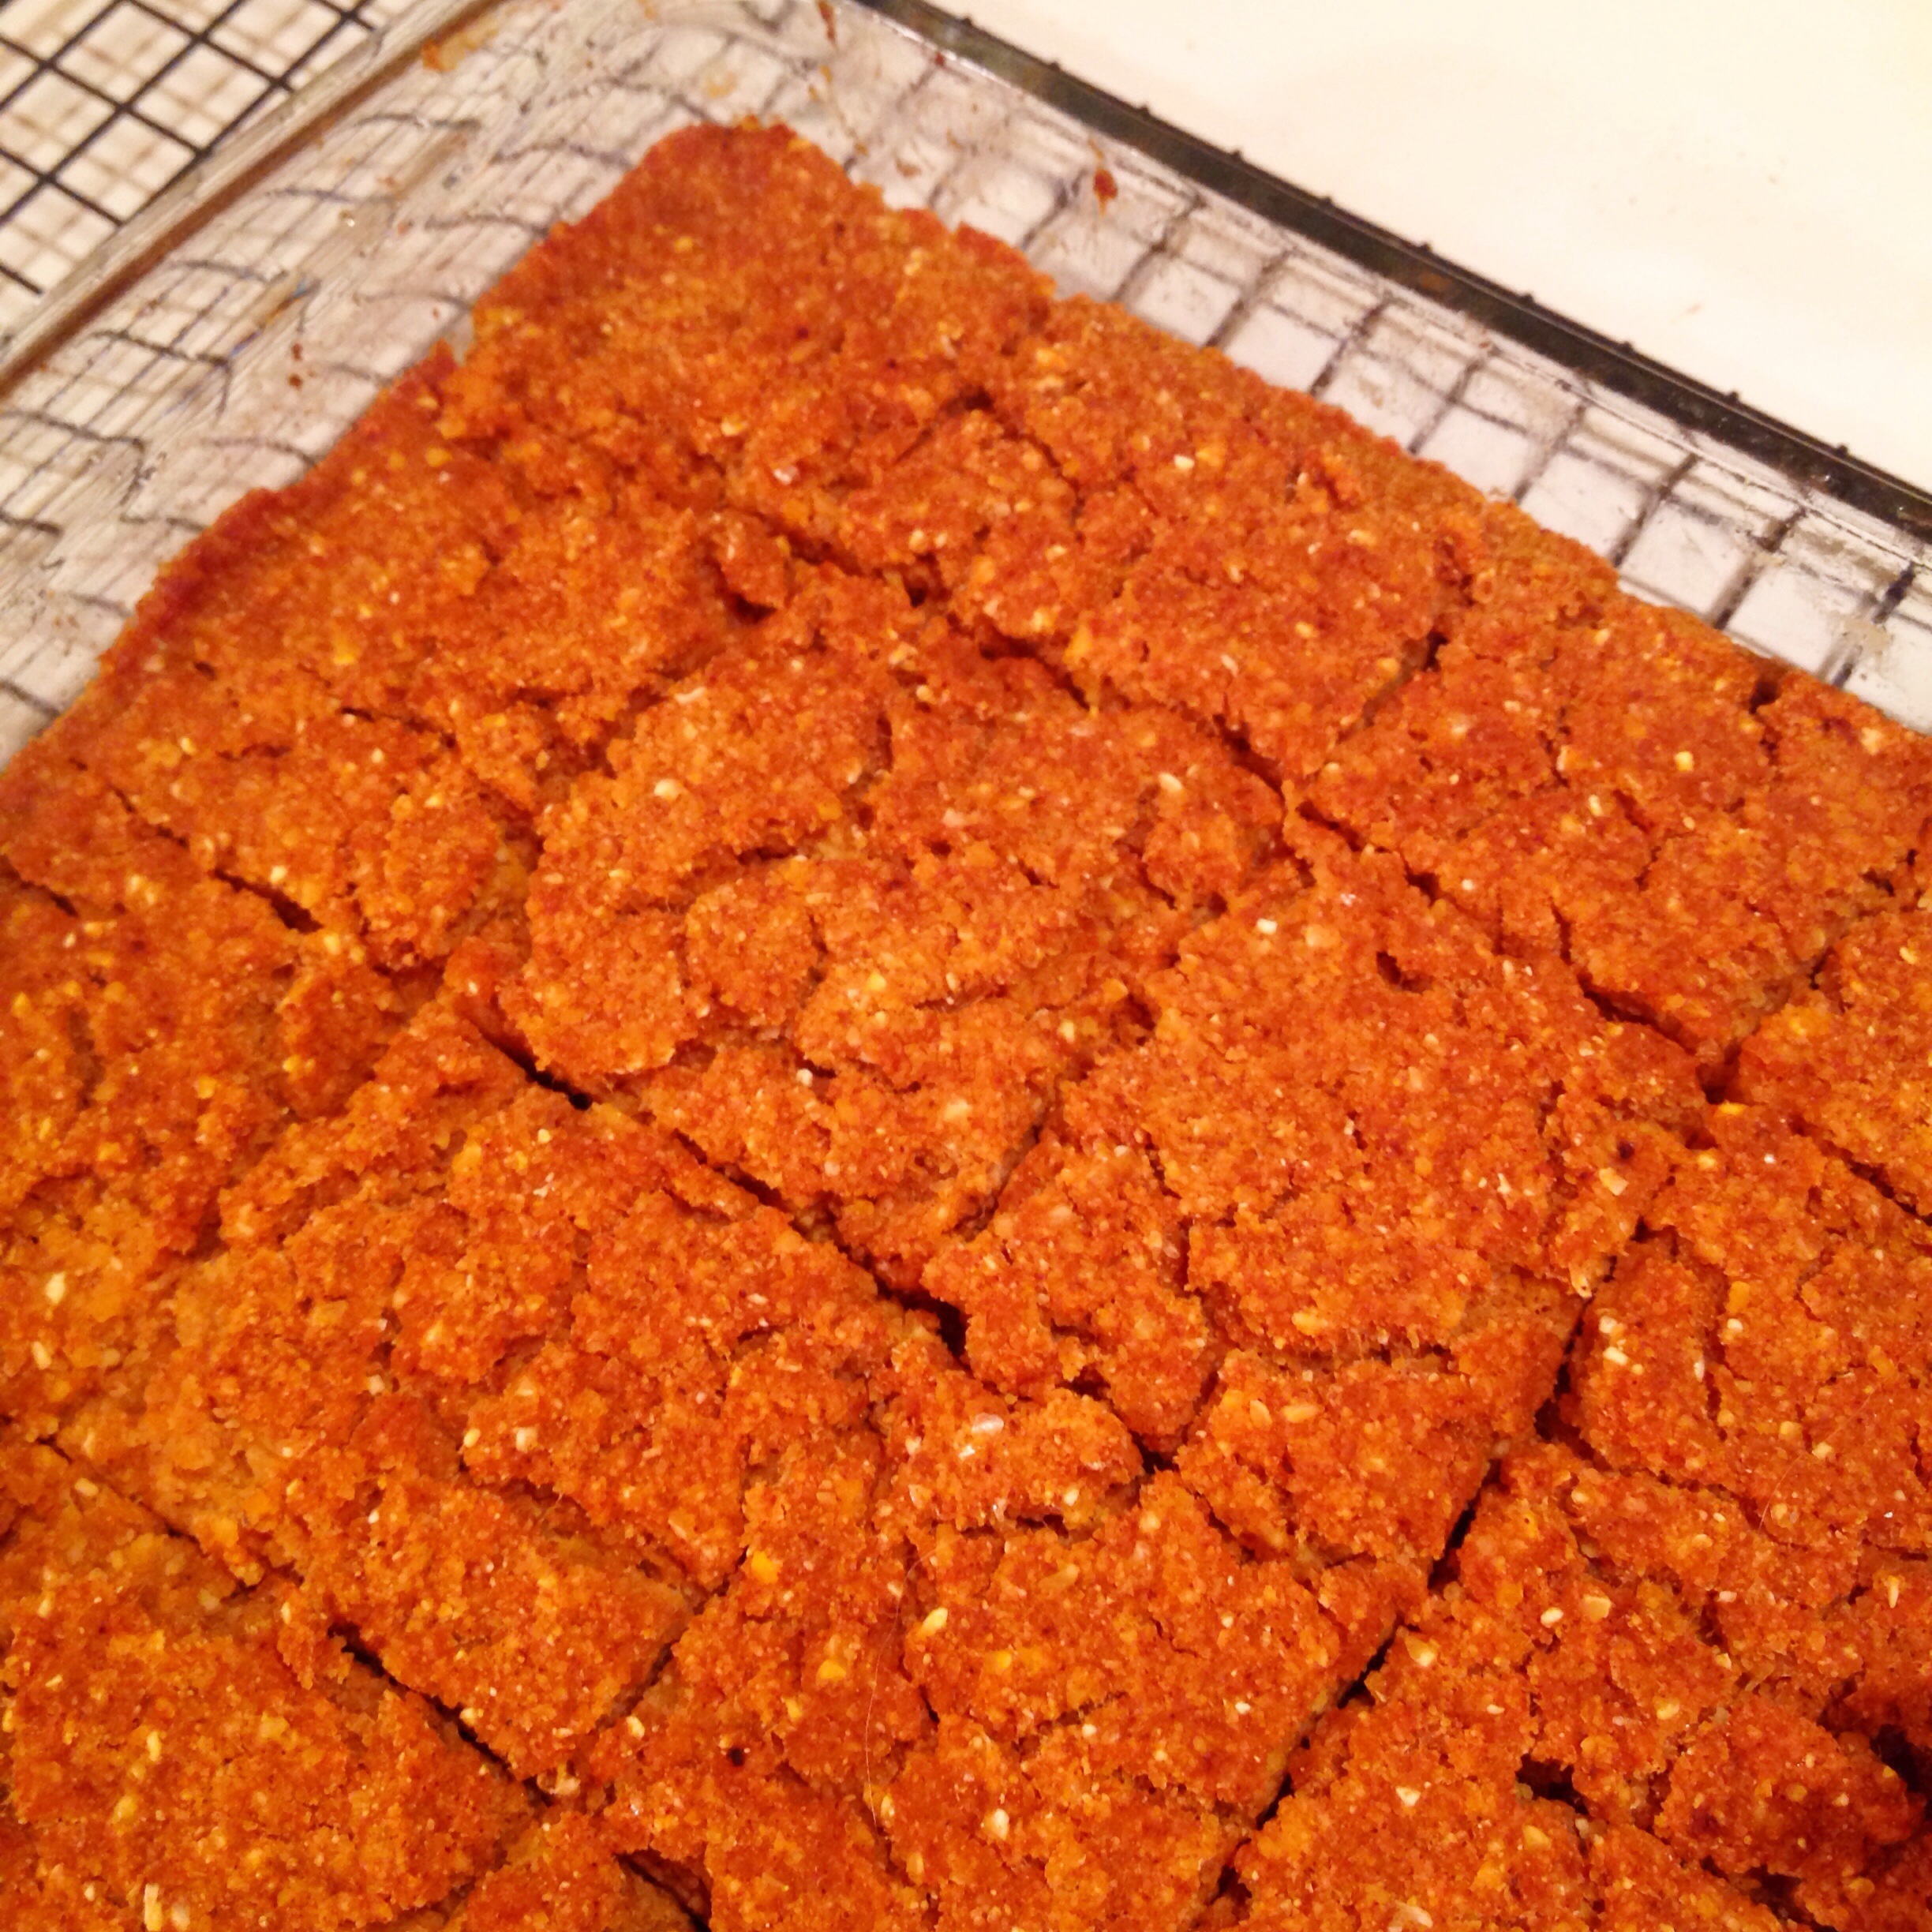
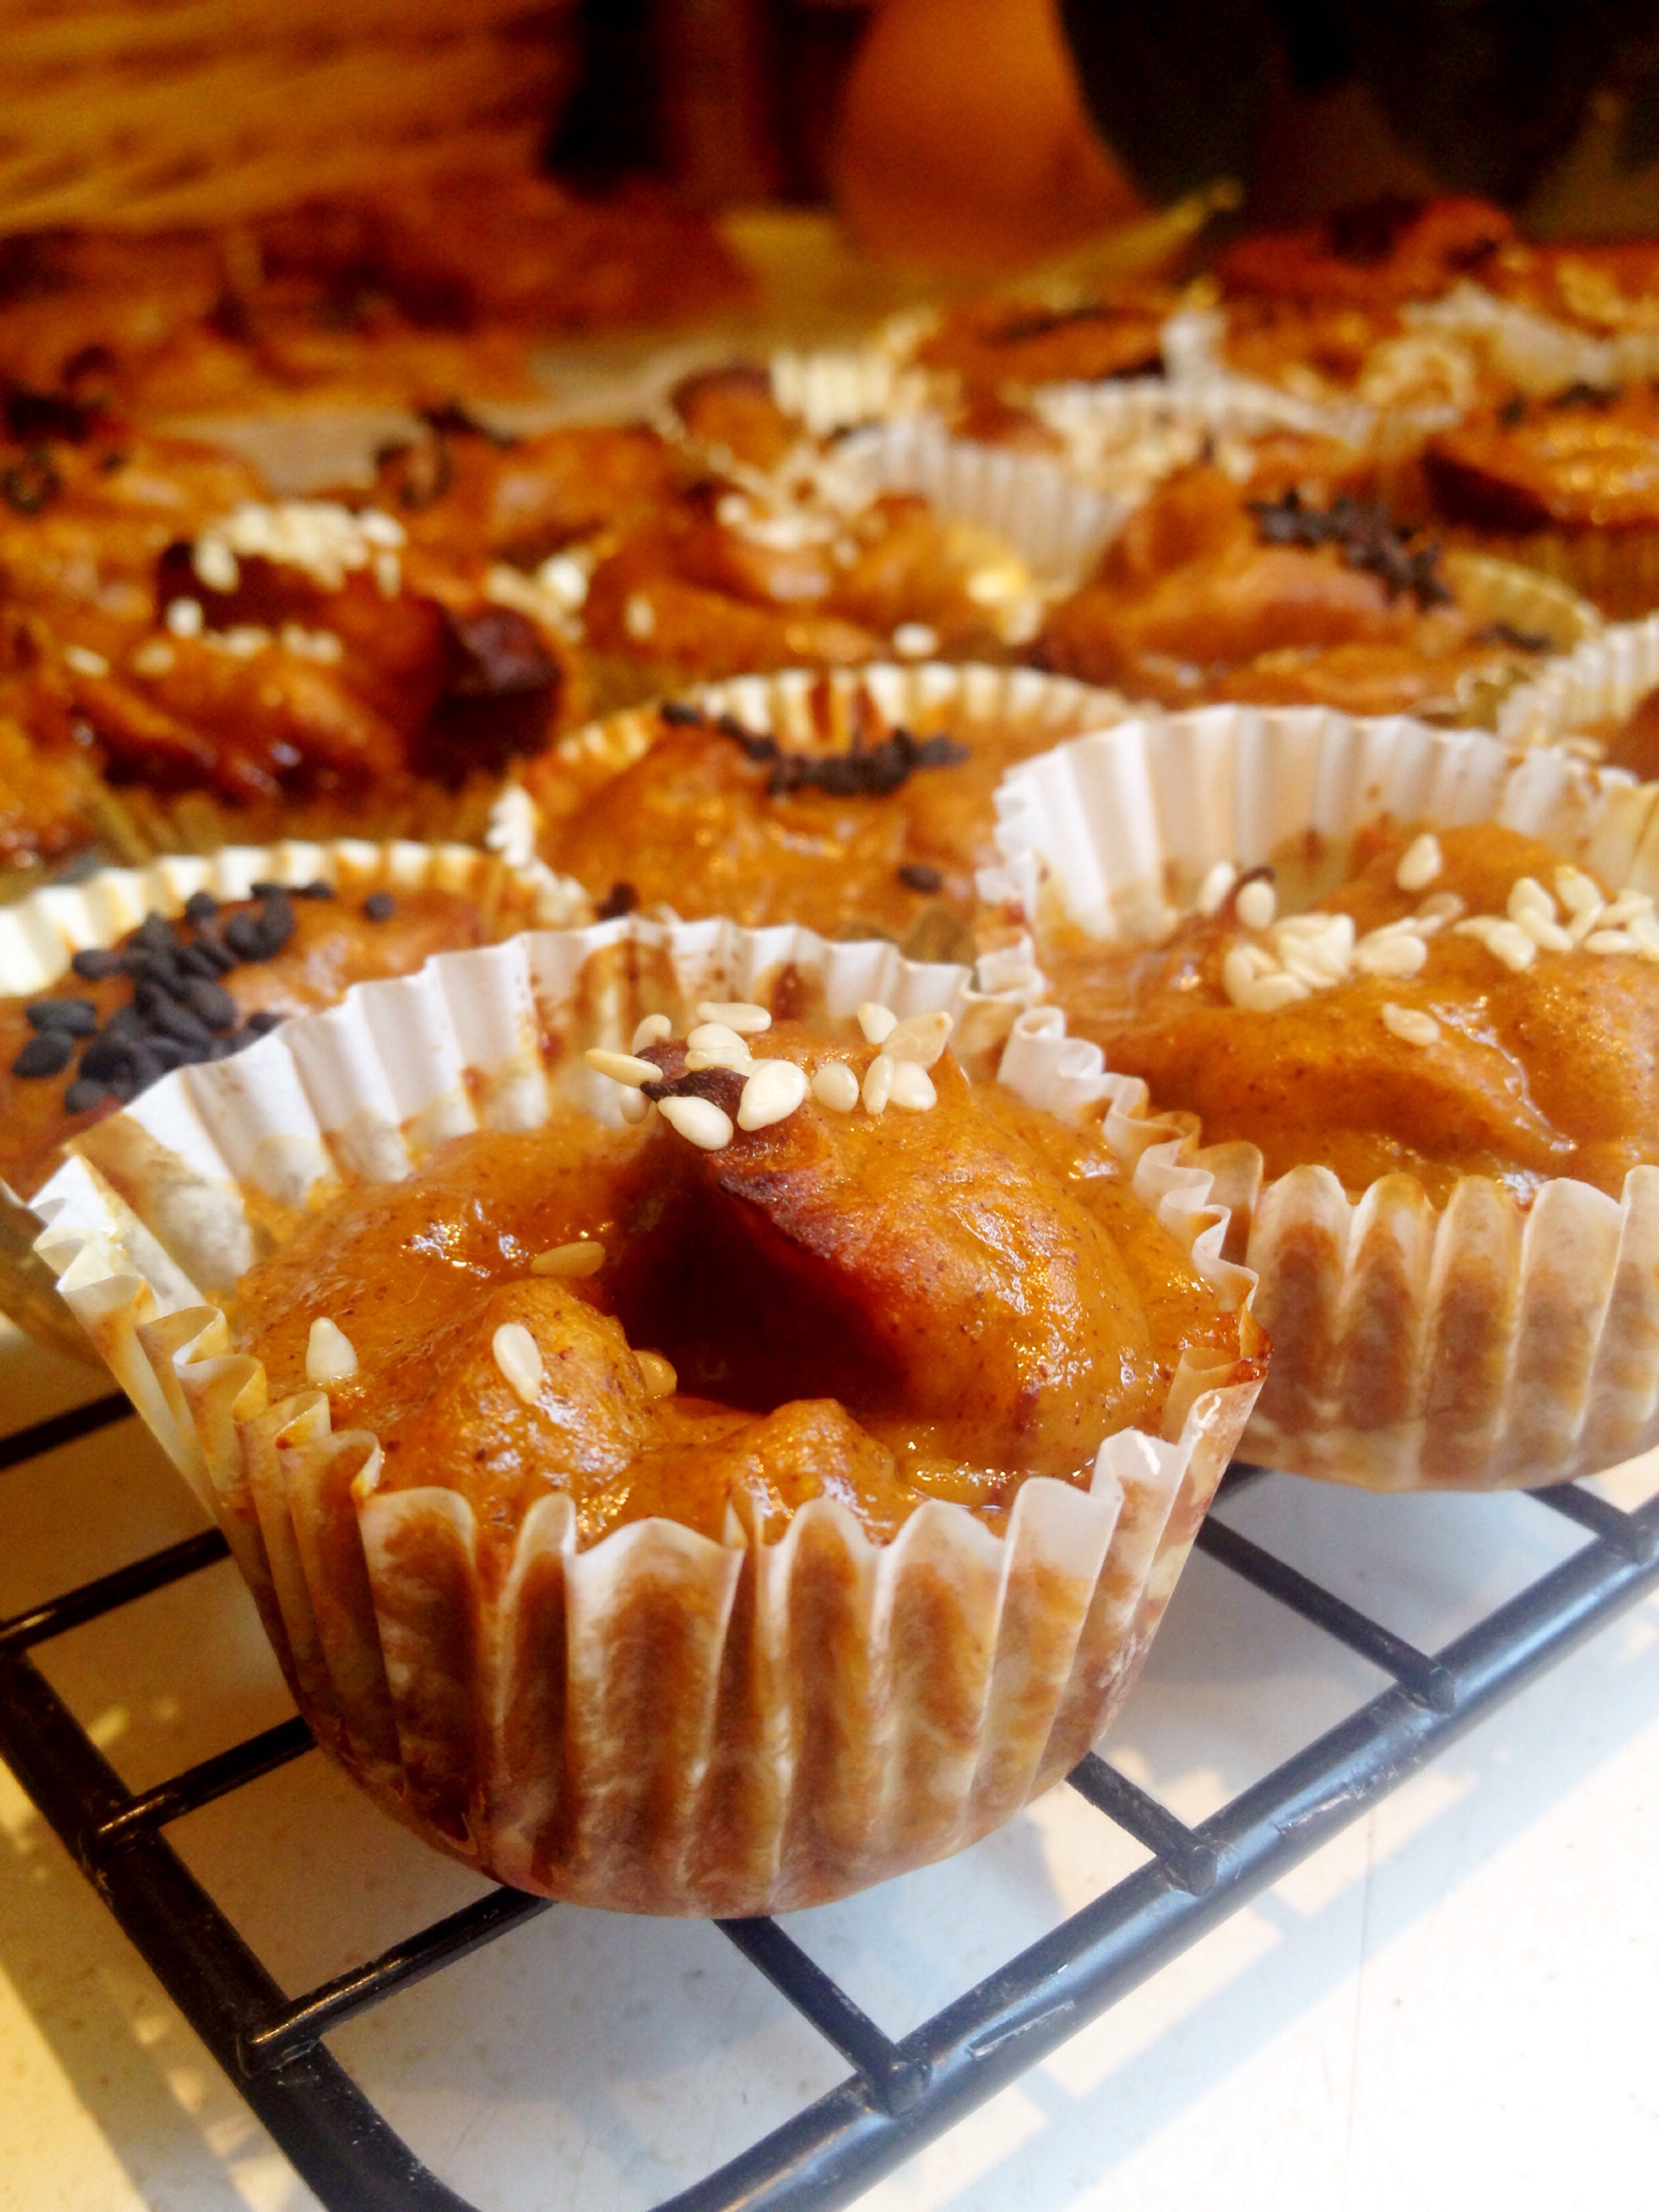
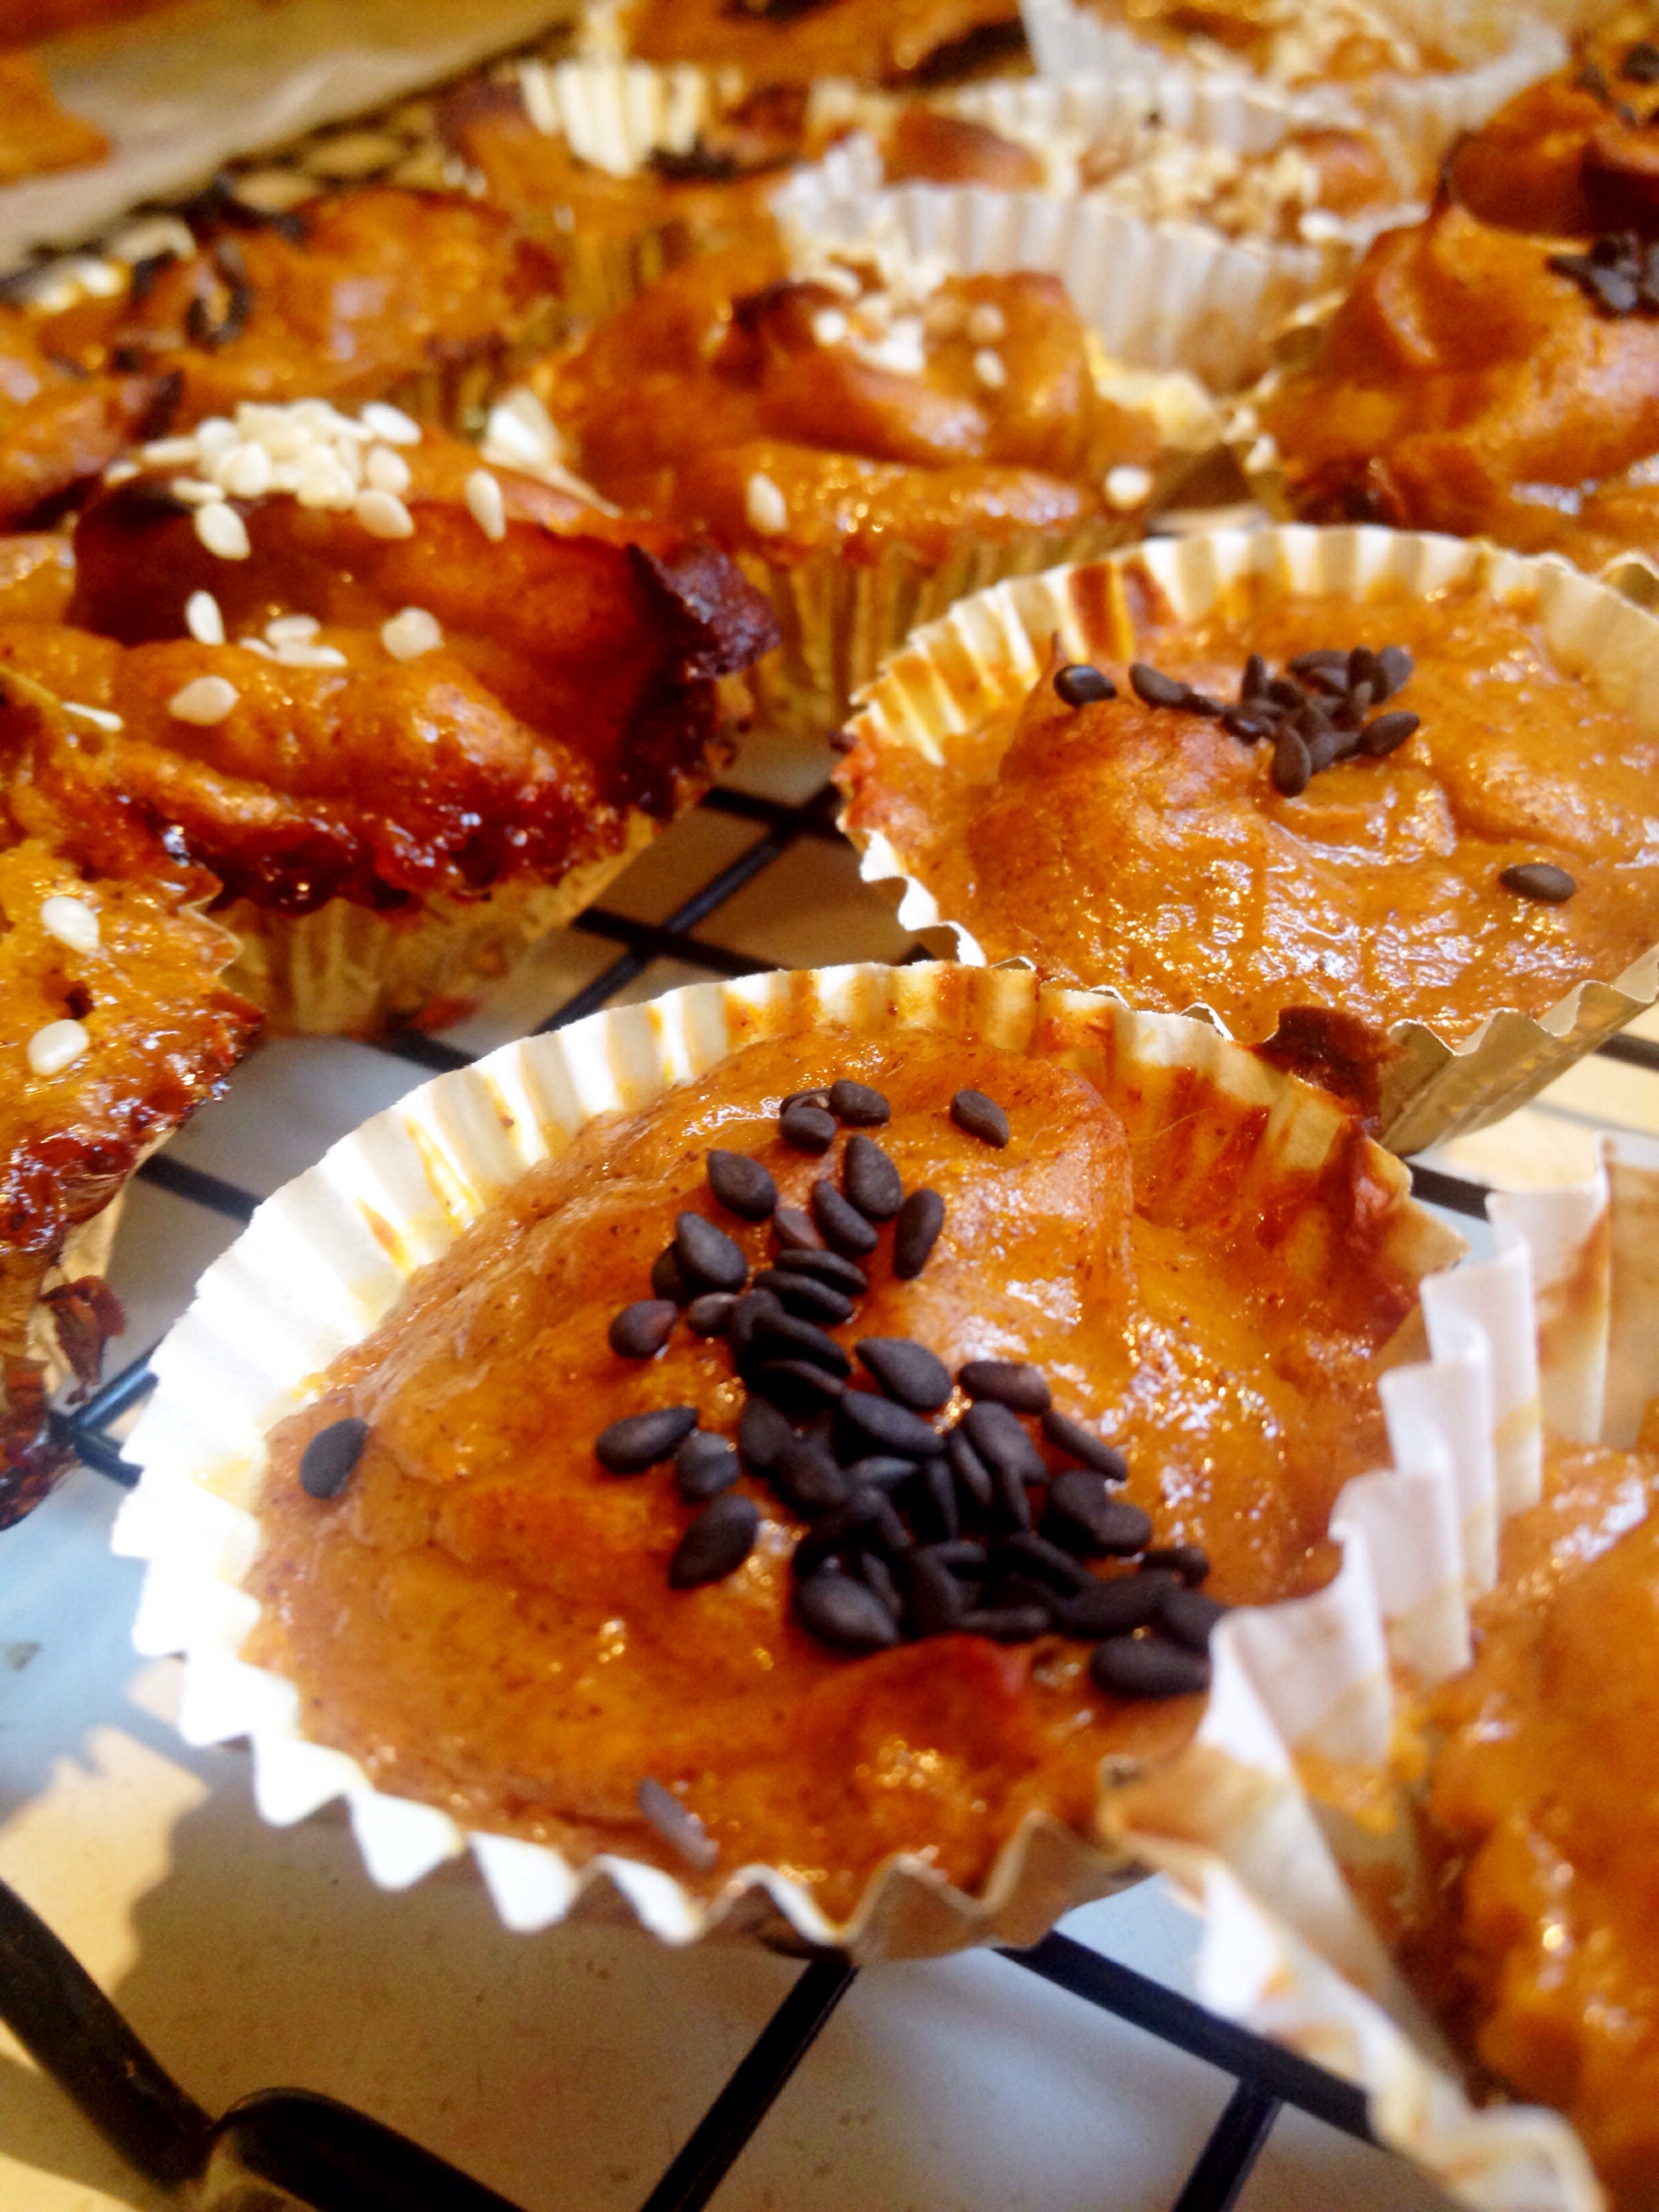
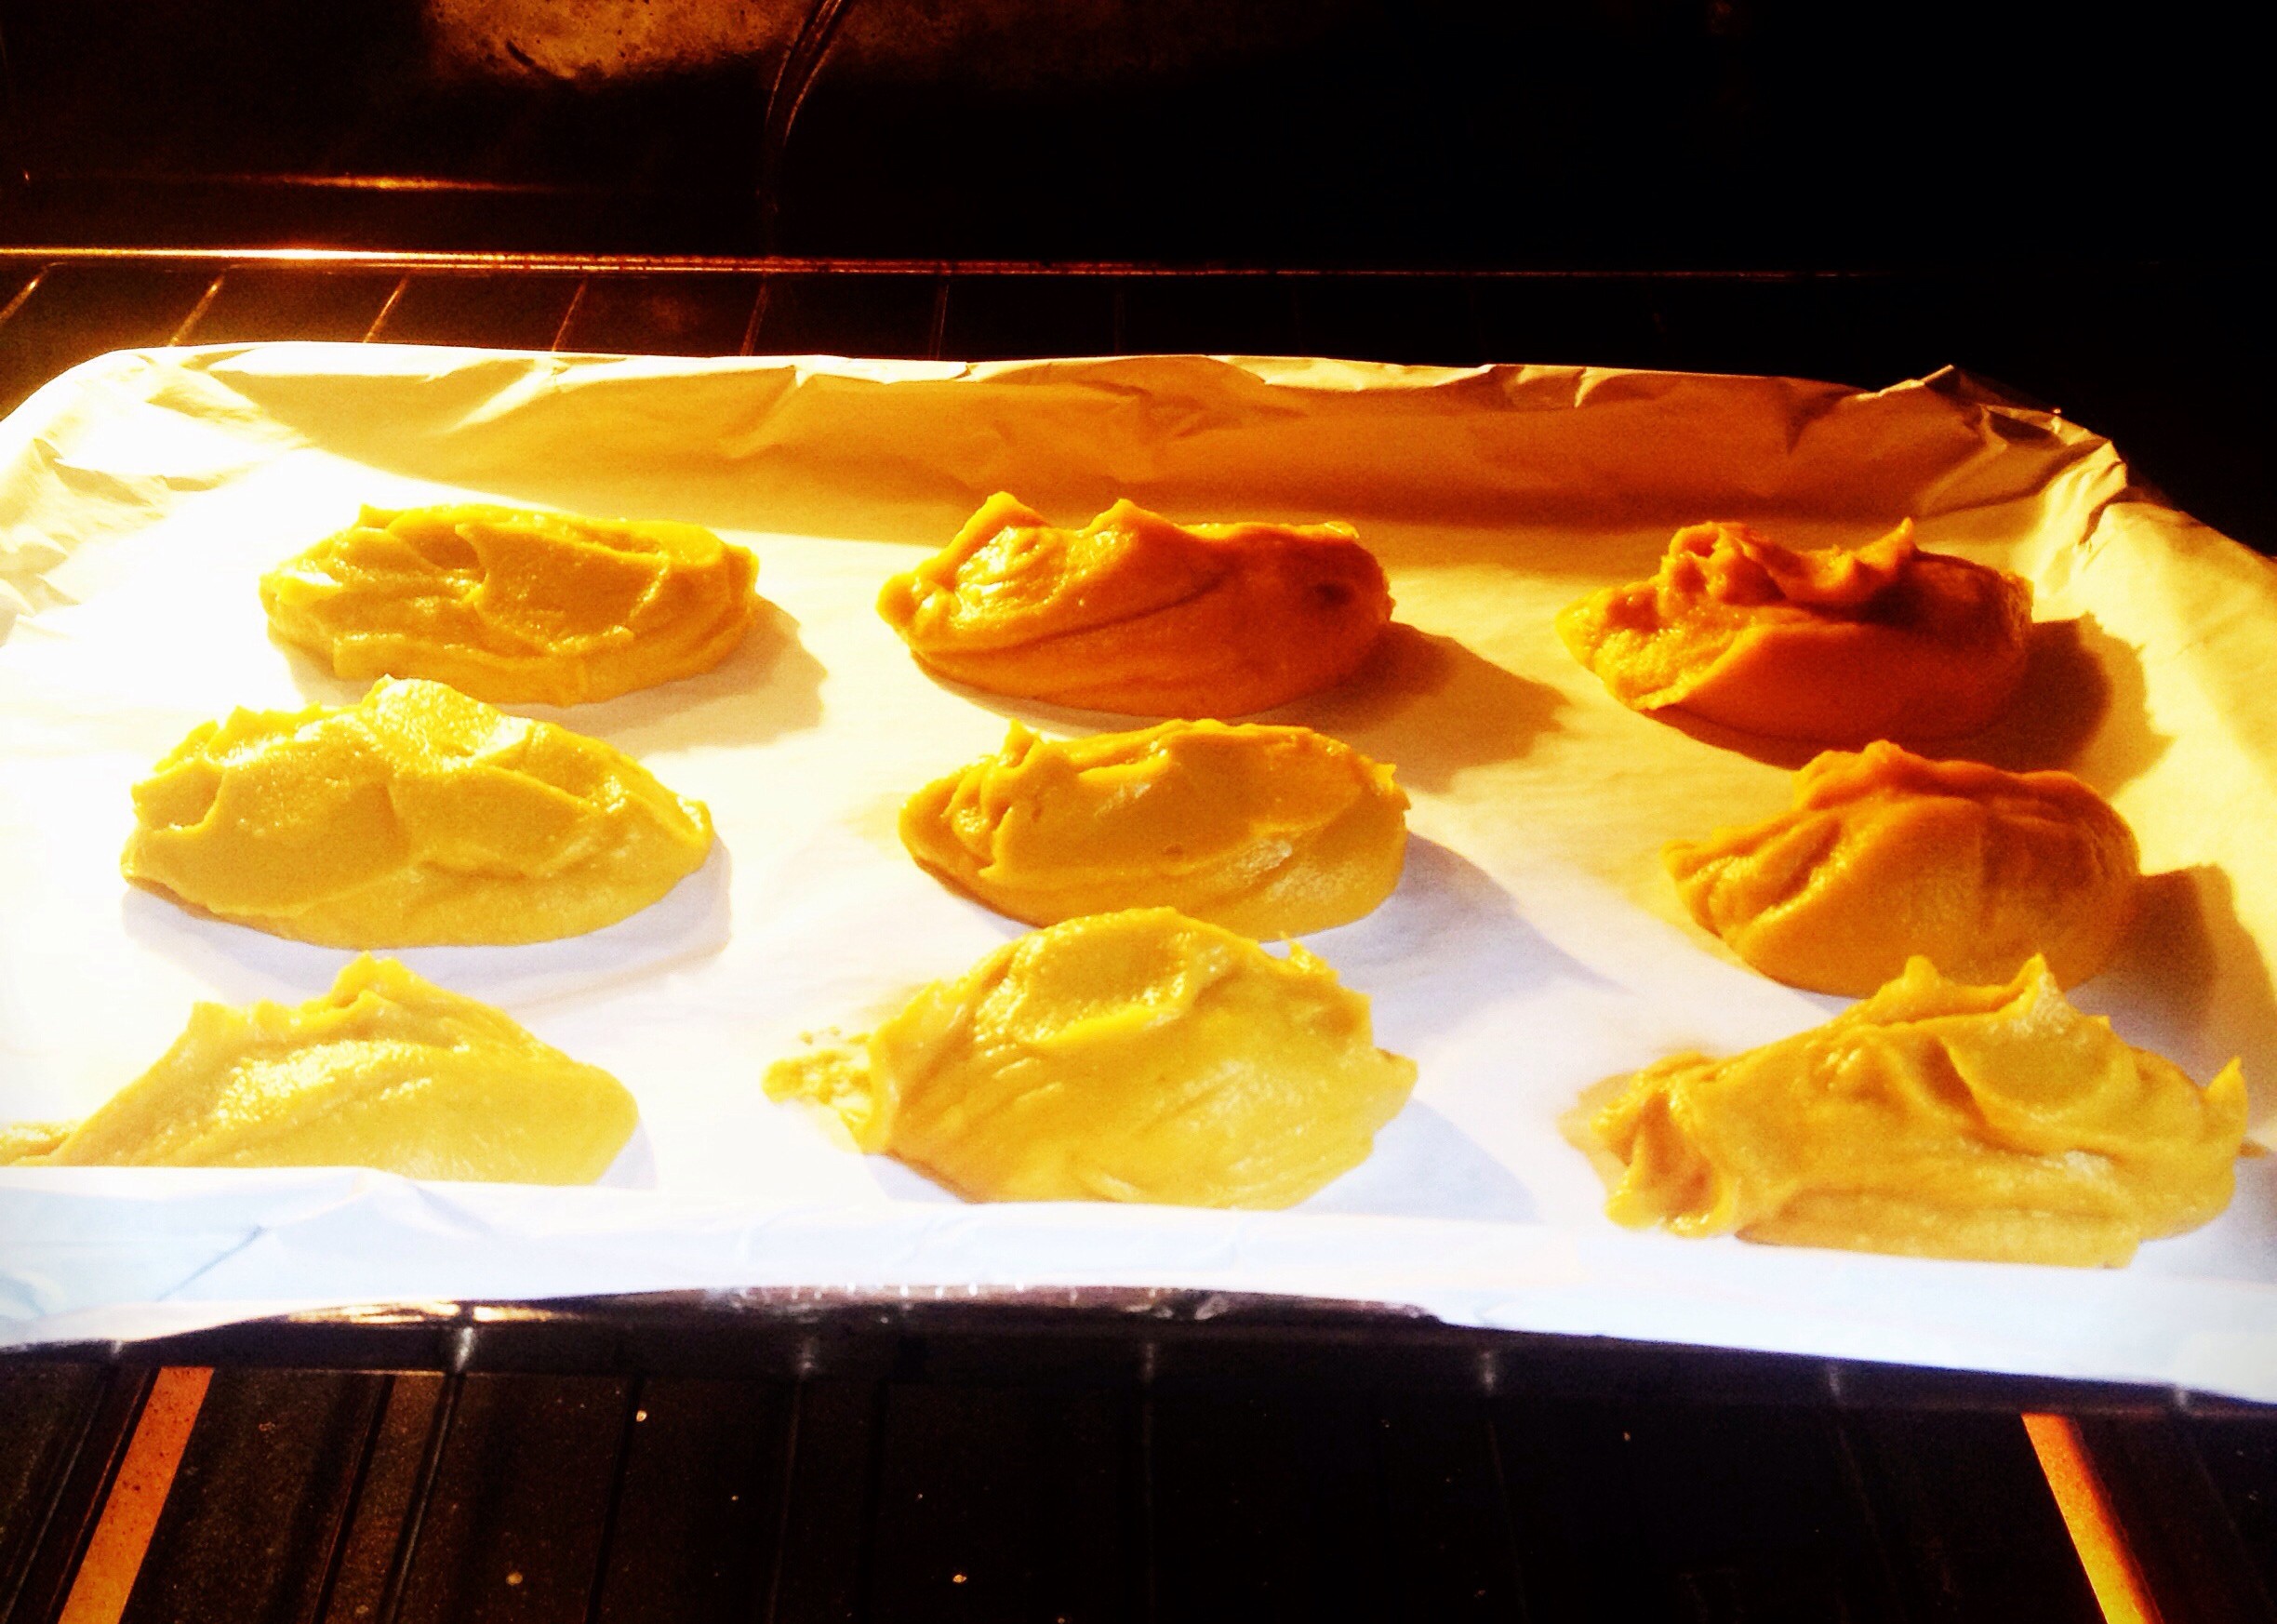
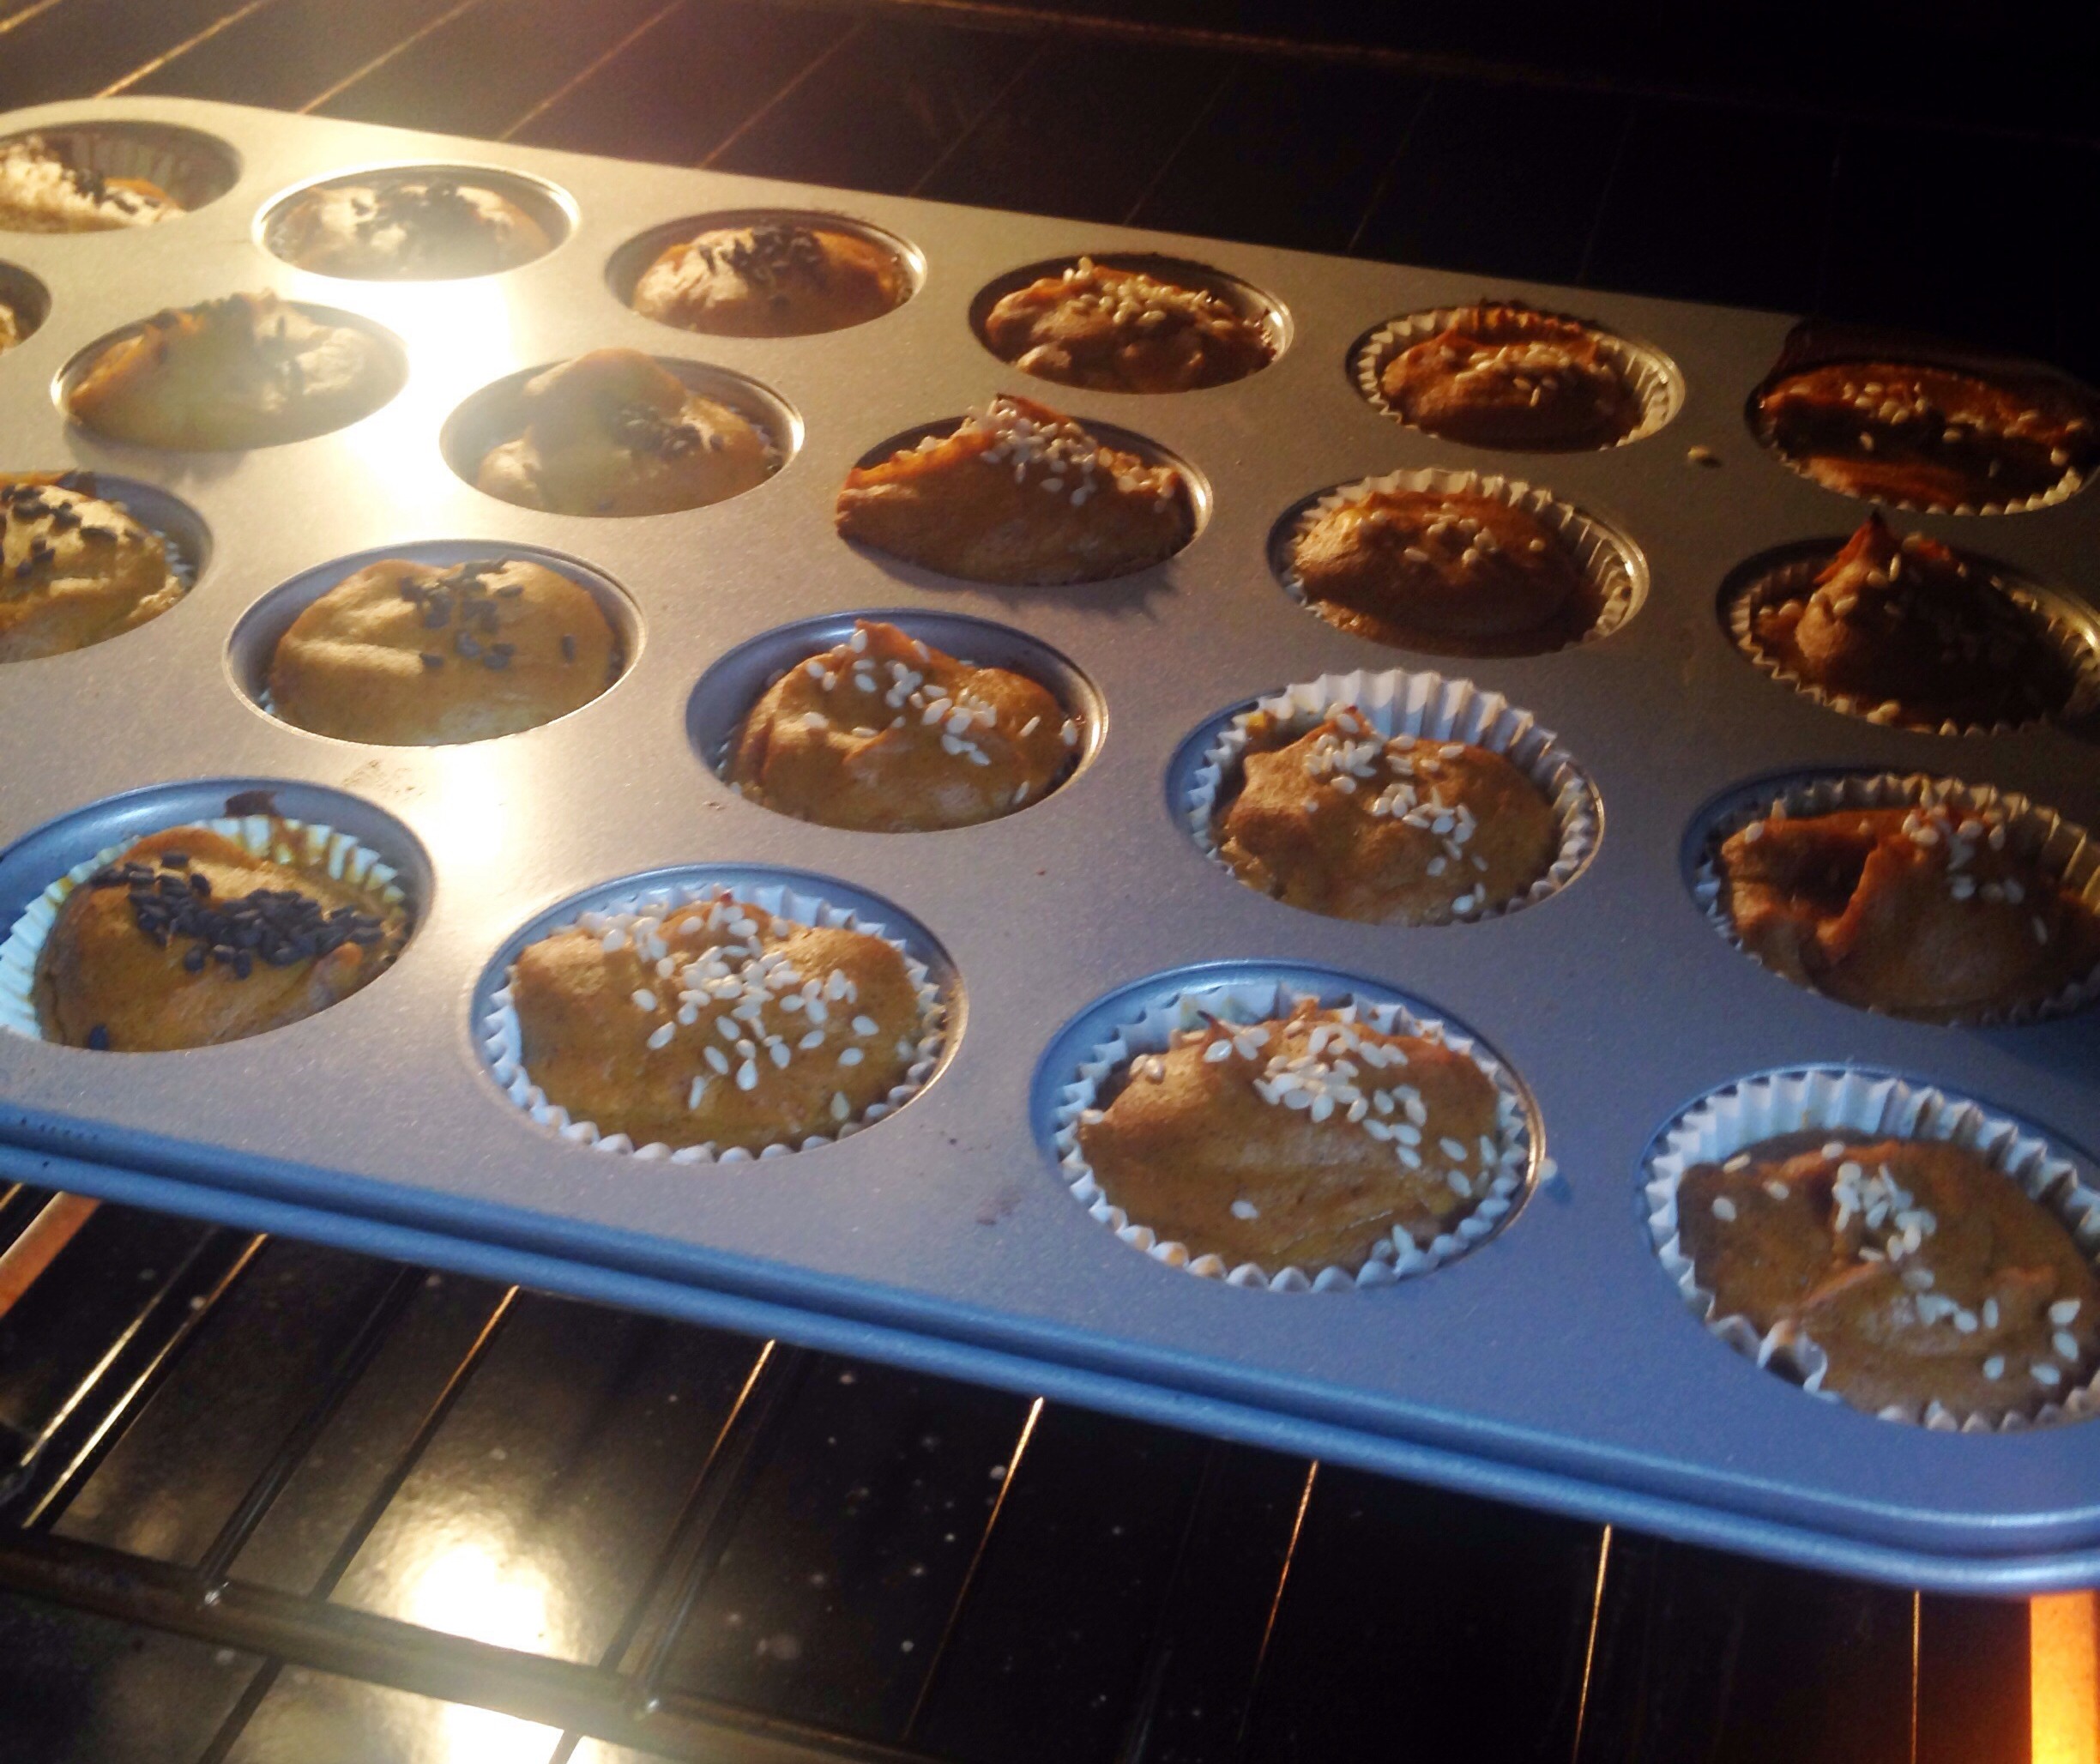
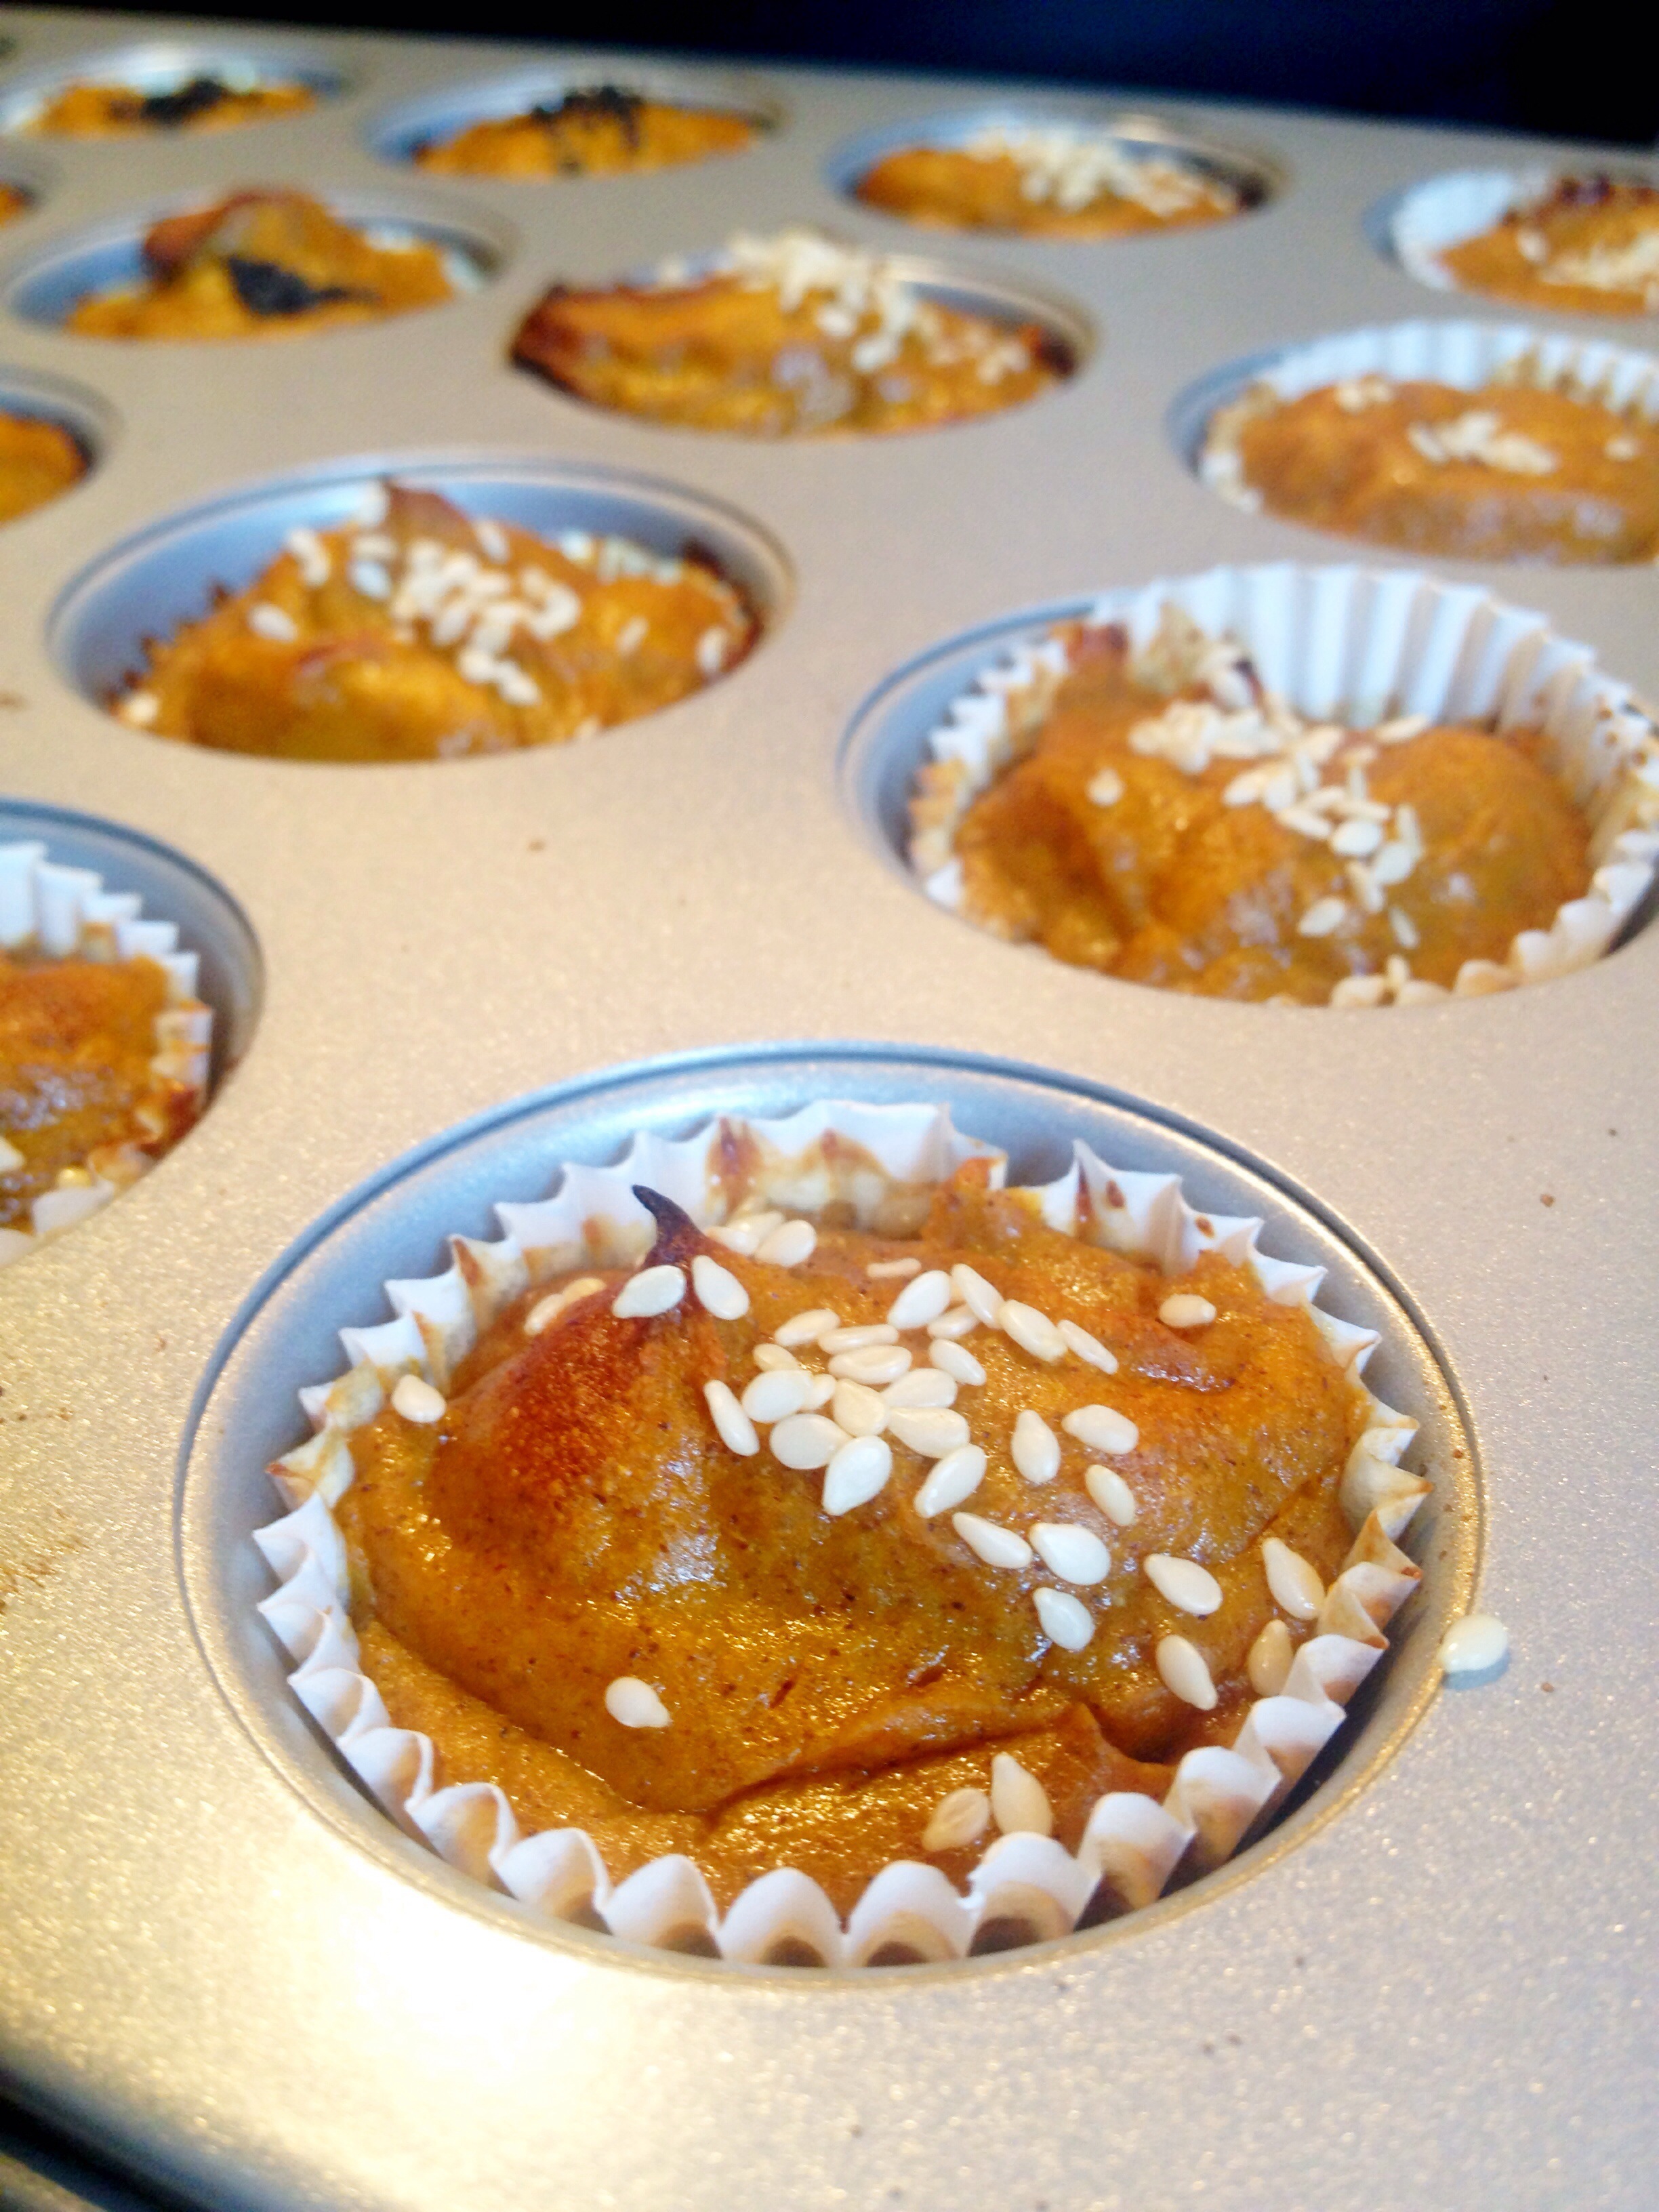
Tis the season — pumpkin season, that is. I have two great pumpkin recipes for you today: pumpkin polenta squares and pumpkin beer bread. These have been my quick grab and go breakfast baked goods for the past several weeks and I’ve really enjoyed them. Both recipes are plant-based which means you won’t find any eggs or dairy in them, and the pumpkin purée eliminates the need for any oil. Also, they both use maple syrup as the sweetener — you could replace this with your favorite sweetener of choice. You’ll have to experiment with the amounts until you find what you like.
You can make your own pumpkin purée if you like, or buy canned pumpkin. Make sure you don’t buy pumpkin pie filling by mistake. At this time of year, I think canned pumpkin is actually harder to find in the store, or at least they keep it well hidden behind the pie filling!
pumpkin polenta squares
ingredients
2 cups polenta or cornmeal
1/2 tsp baking soda
1/2 tsp salt
1/2 tsp ground cinnamon*
1/2 tsp ground cloves*
1/2 tsp ground allspice*
1/2 tsp ground nutmeg*
1/2 tsp ground cardamom (optional)
1/2 tsp ground ginger (optional)
2 cups pumpkin purée
1 cup applesauce
1 cup almond milk (or milk of choice)
1/3 cup maple syrup
directions
Preheat oven to 350˚F. Grease an 8×8 glass baking dish.
In a medium bowl, mix together the cornmeal, baking soda, salt, and spices.
Stir in all other ingredients and mix to combine.
Pour mixture into baking dish and bake for 50-55 minutes.
Remove from oven when it is golden brown and firm to the touch. Place on a cooling rack for at least 10 minutes before serving.
*note: you can substitute 2 tsp. pumpkin pie spice for the cinnamon, cloves, nutmeg, and allspice.
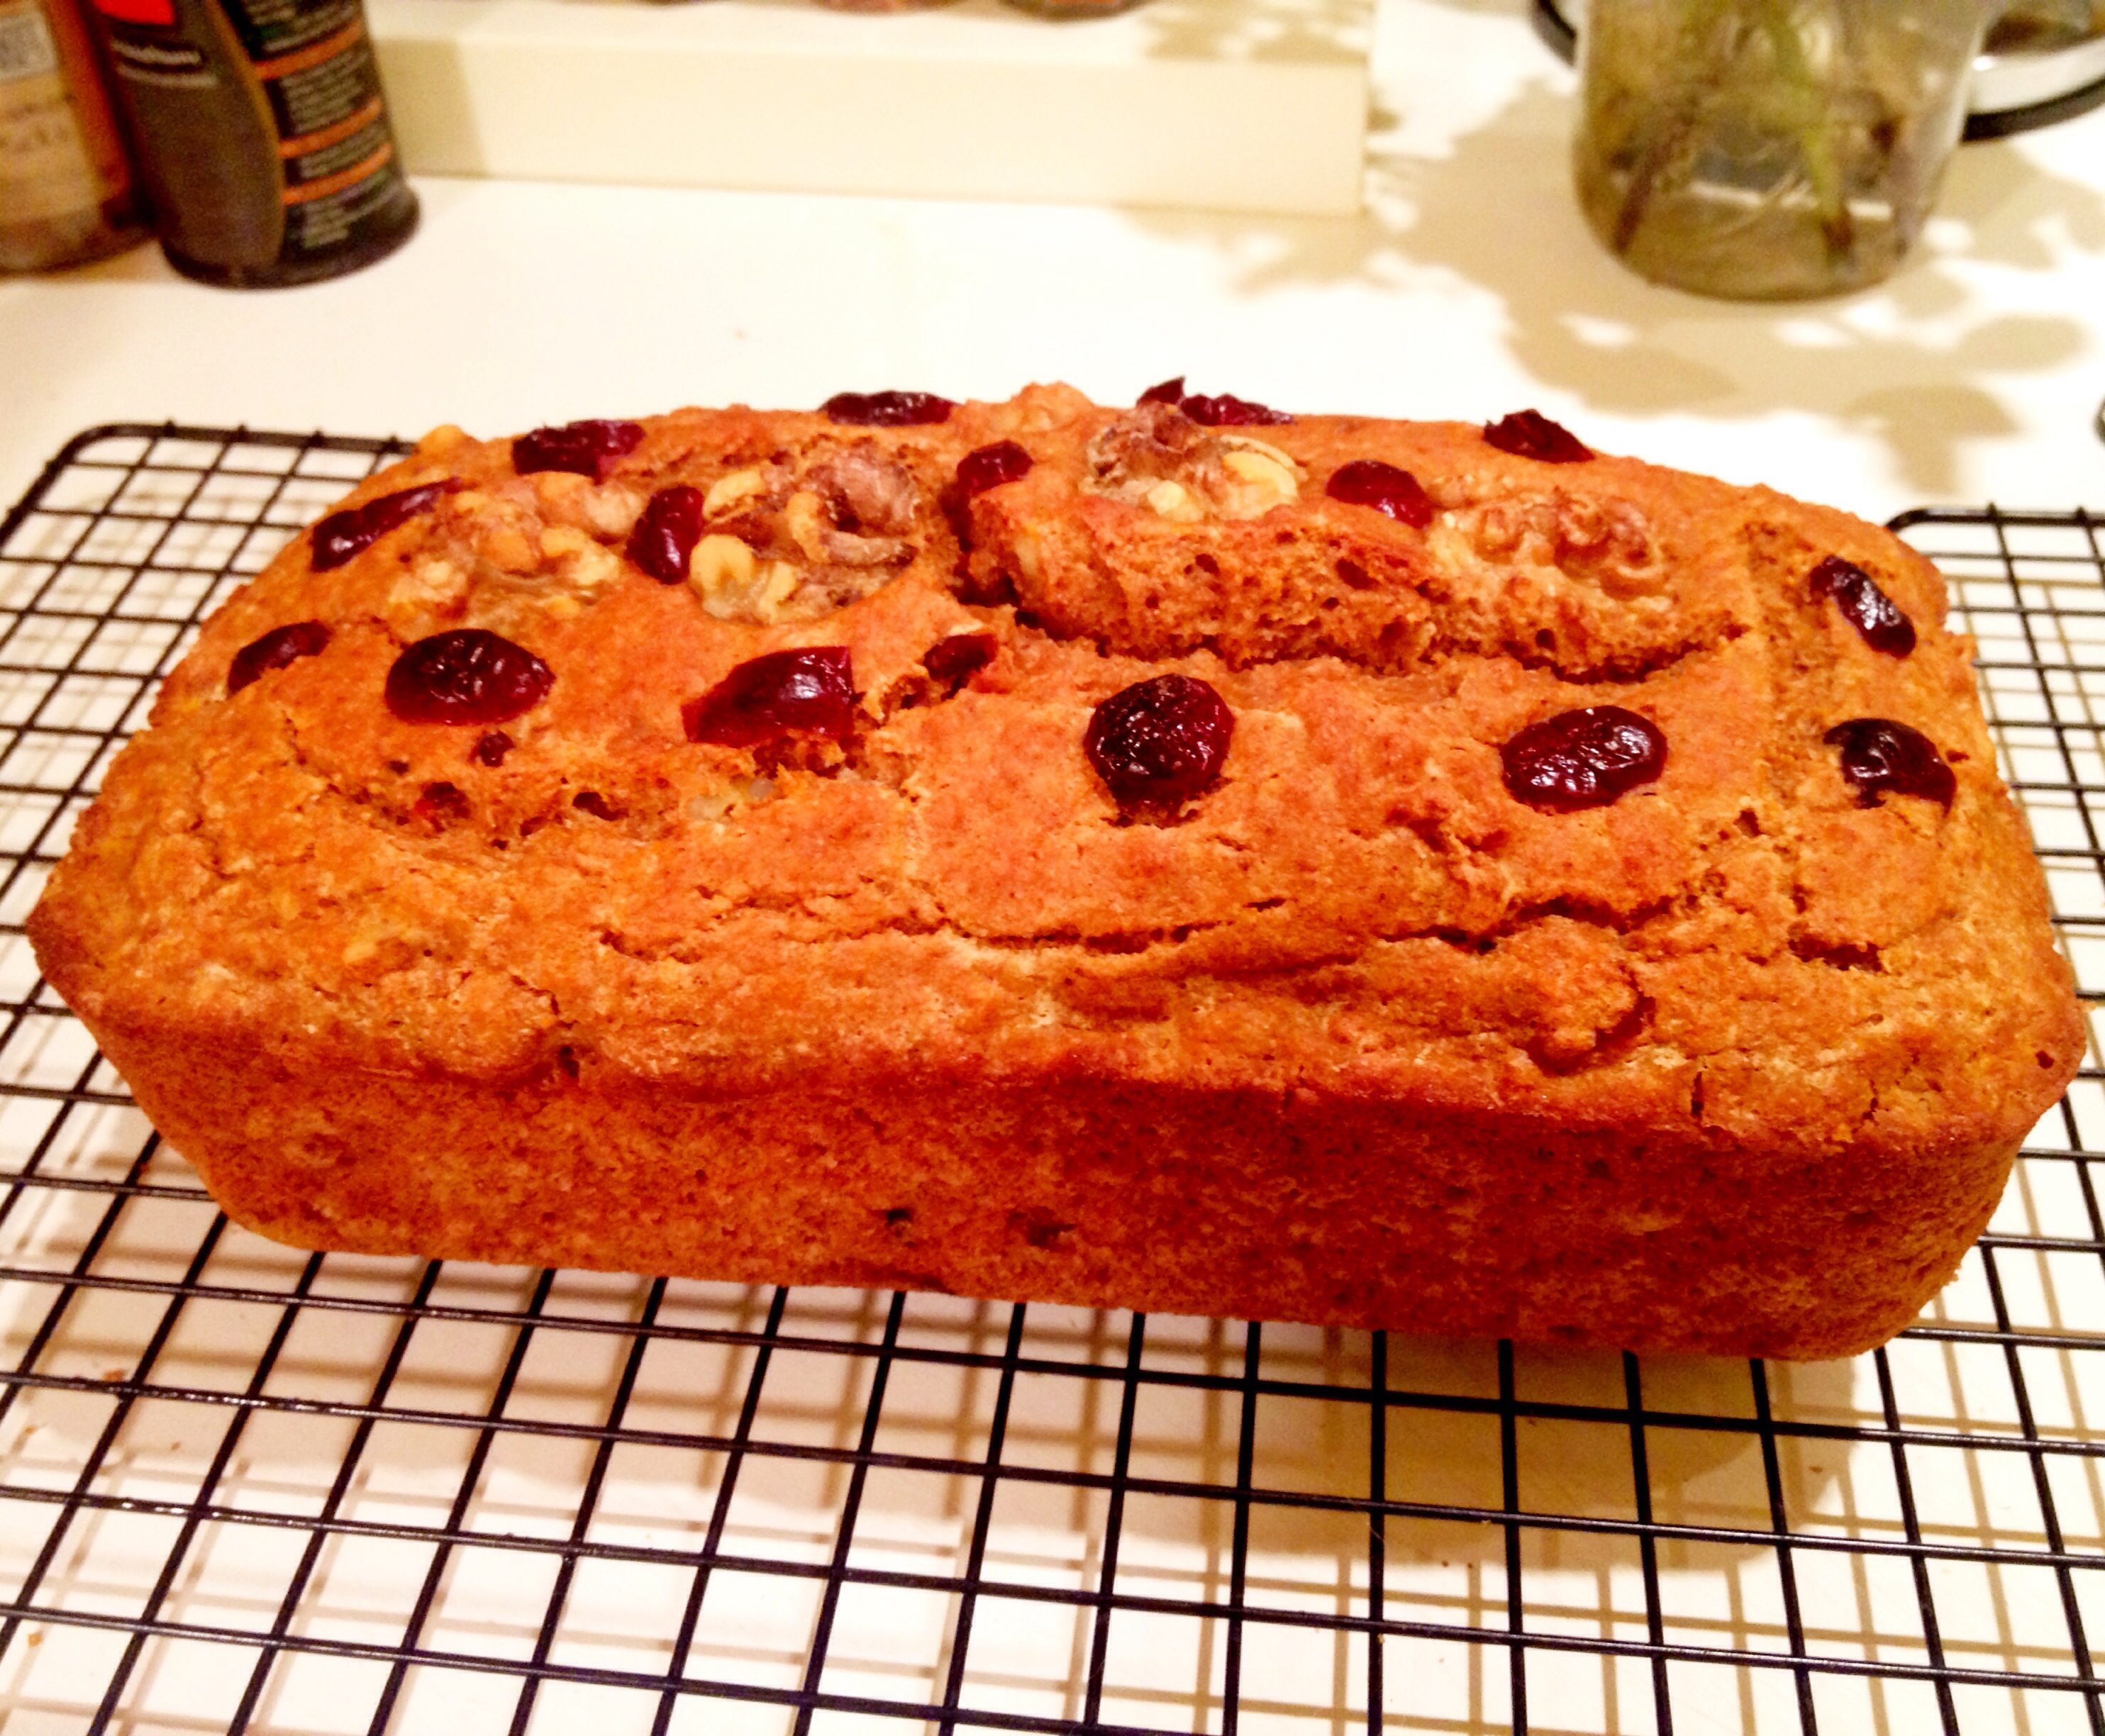
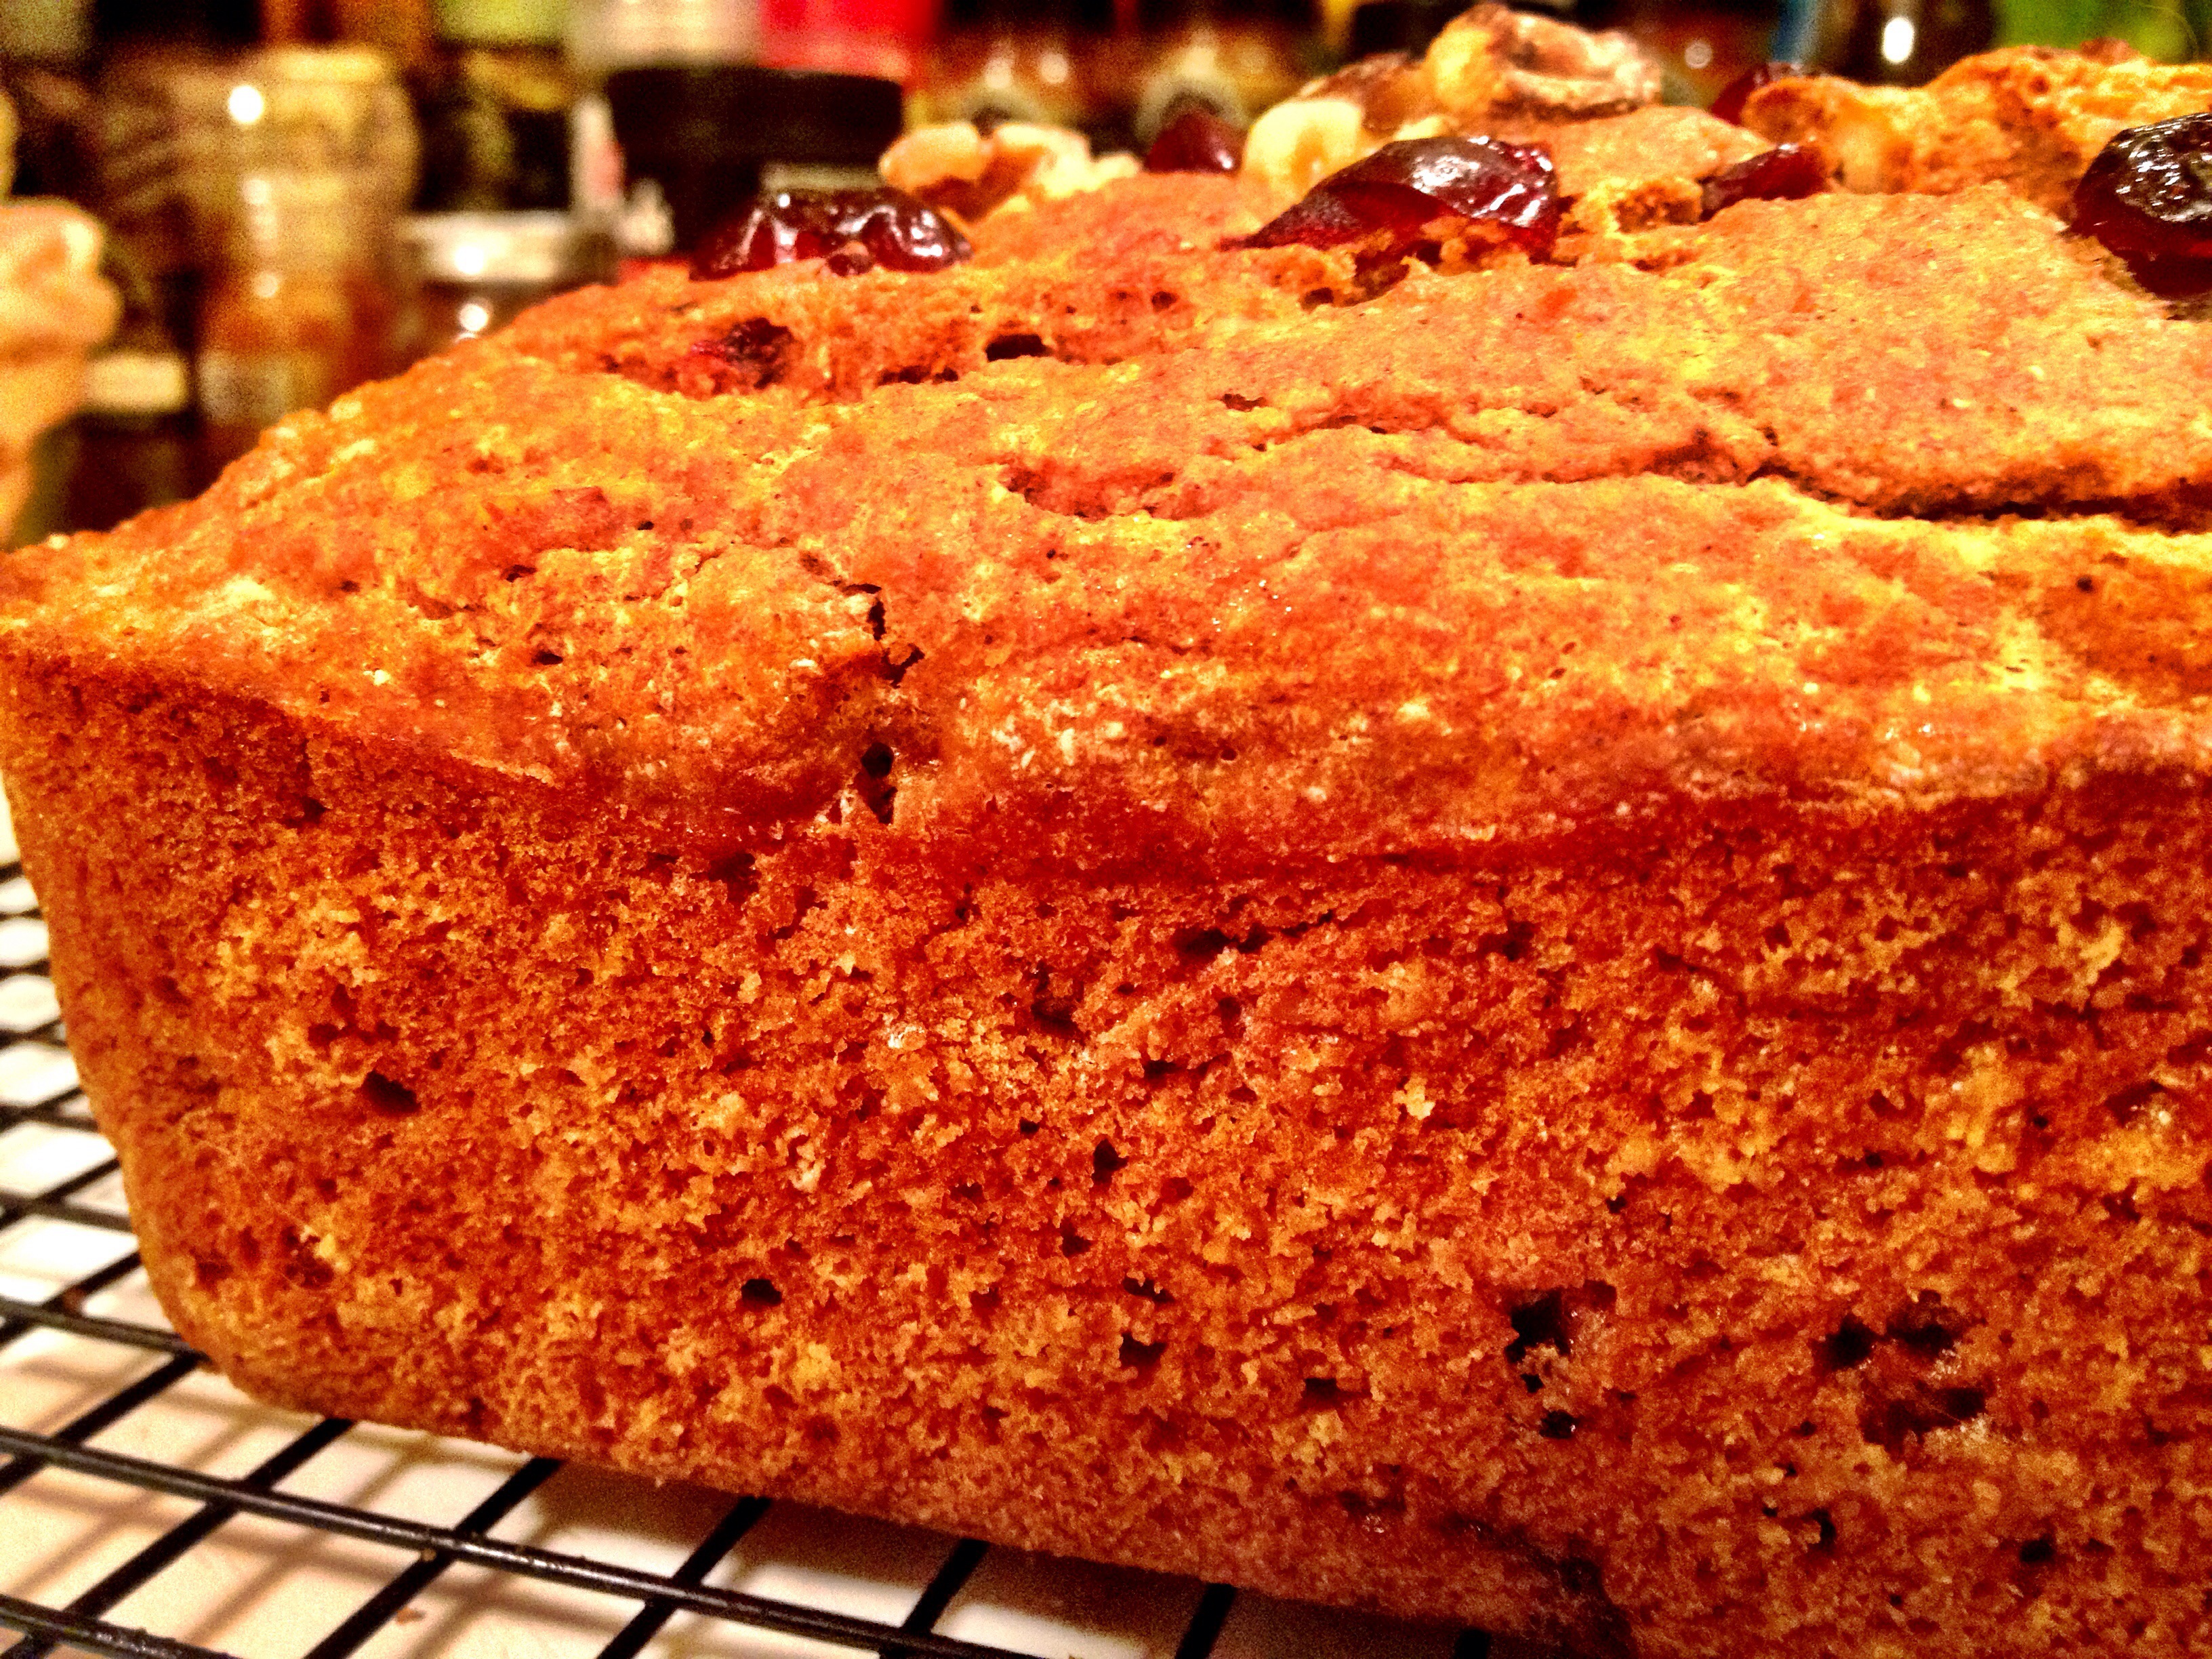
1 12-ounce bottle of beer (I used hard cider instead of beer)
1/2 cup walnuts, toasted and chopped (optional)
1/2 cup dried cranberries (optional)
directions
Preheat oven to 375 degrees. Grease a 9×5-inch bread pan with cooking spray, or line with parchment paper.
Stir flour, baking powder, salt, spices, maple syrup and pumpkin purée together in a large mixing bowl until combined. Slowly add in the beer, and stir until combined and smooth. Stir in cranberries and walnuts, if desired.
Bake for 50-60 minutes, or until a toothpick inserted in the middle of the bread comes out clean. Let bread rest for at least 5 minutes before slicing.
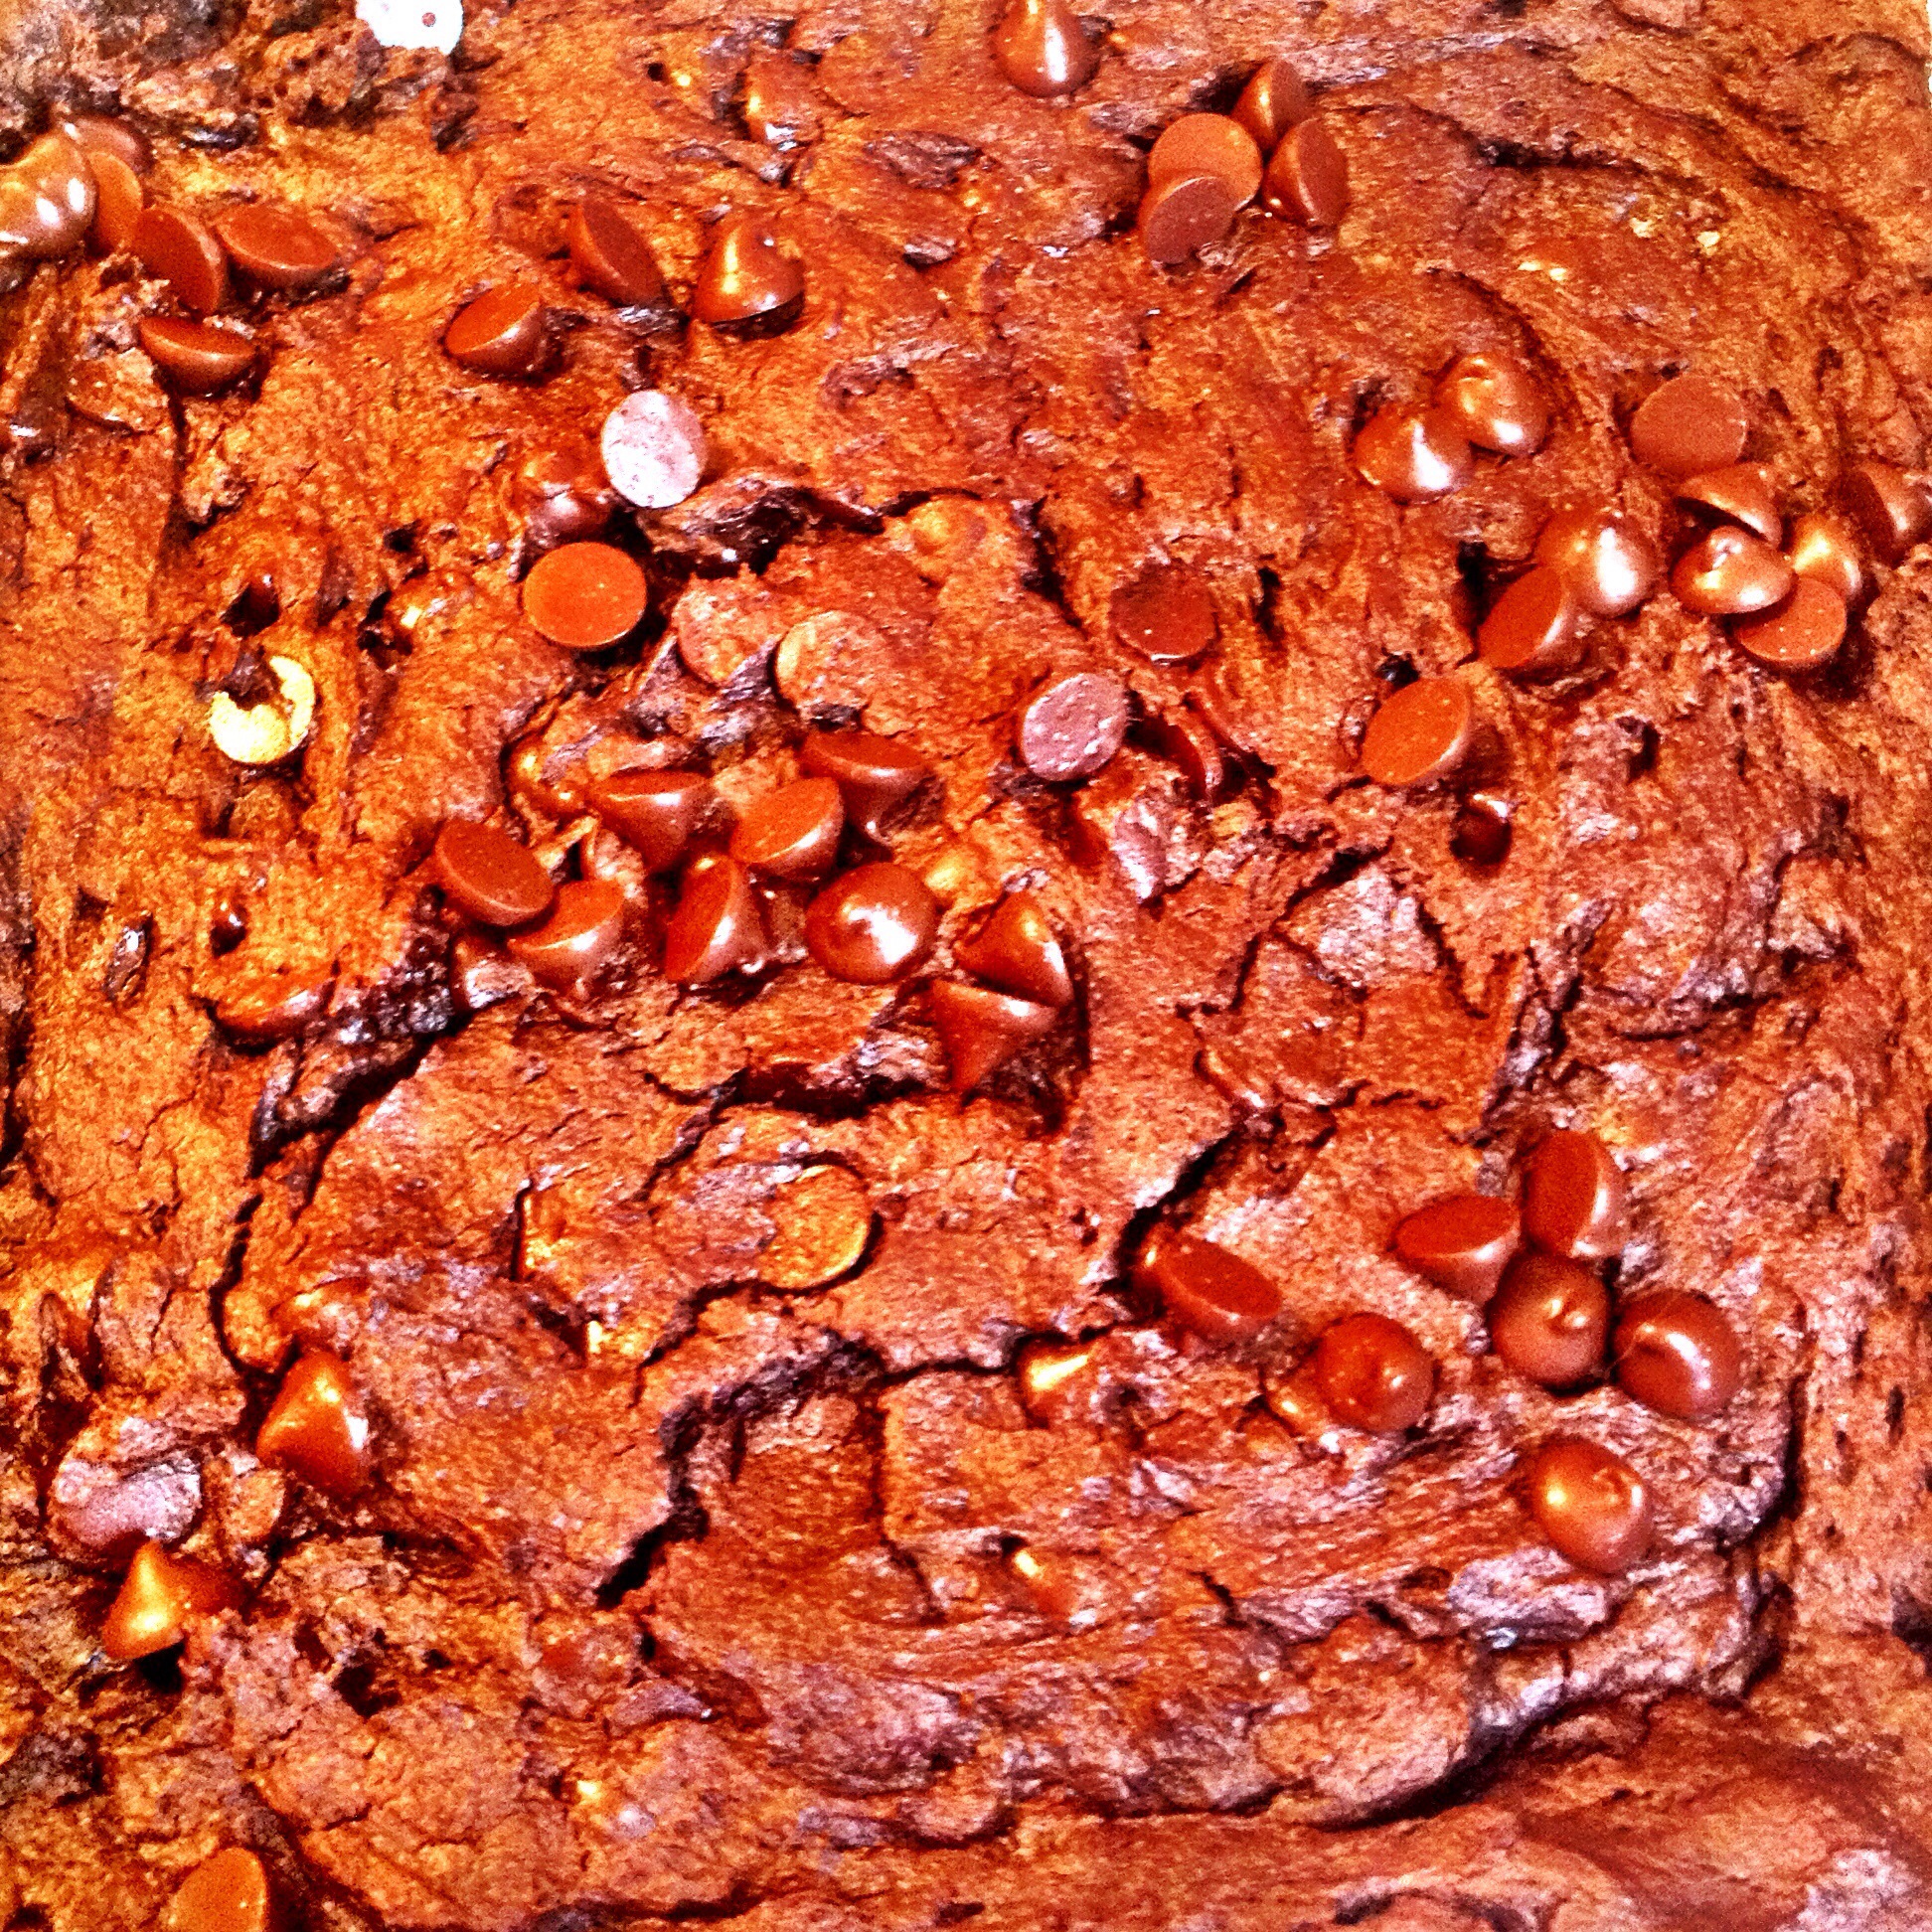
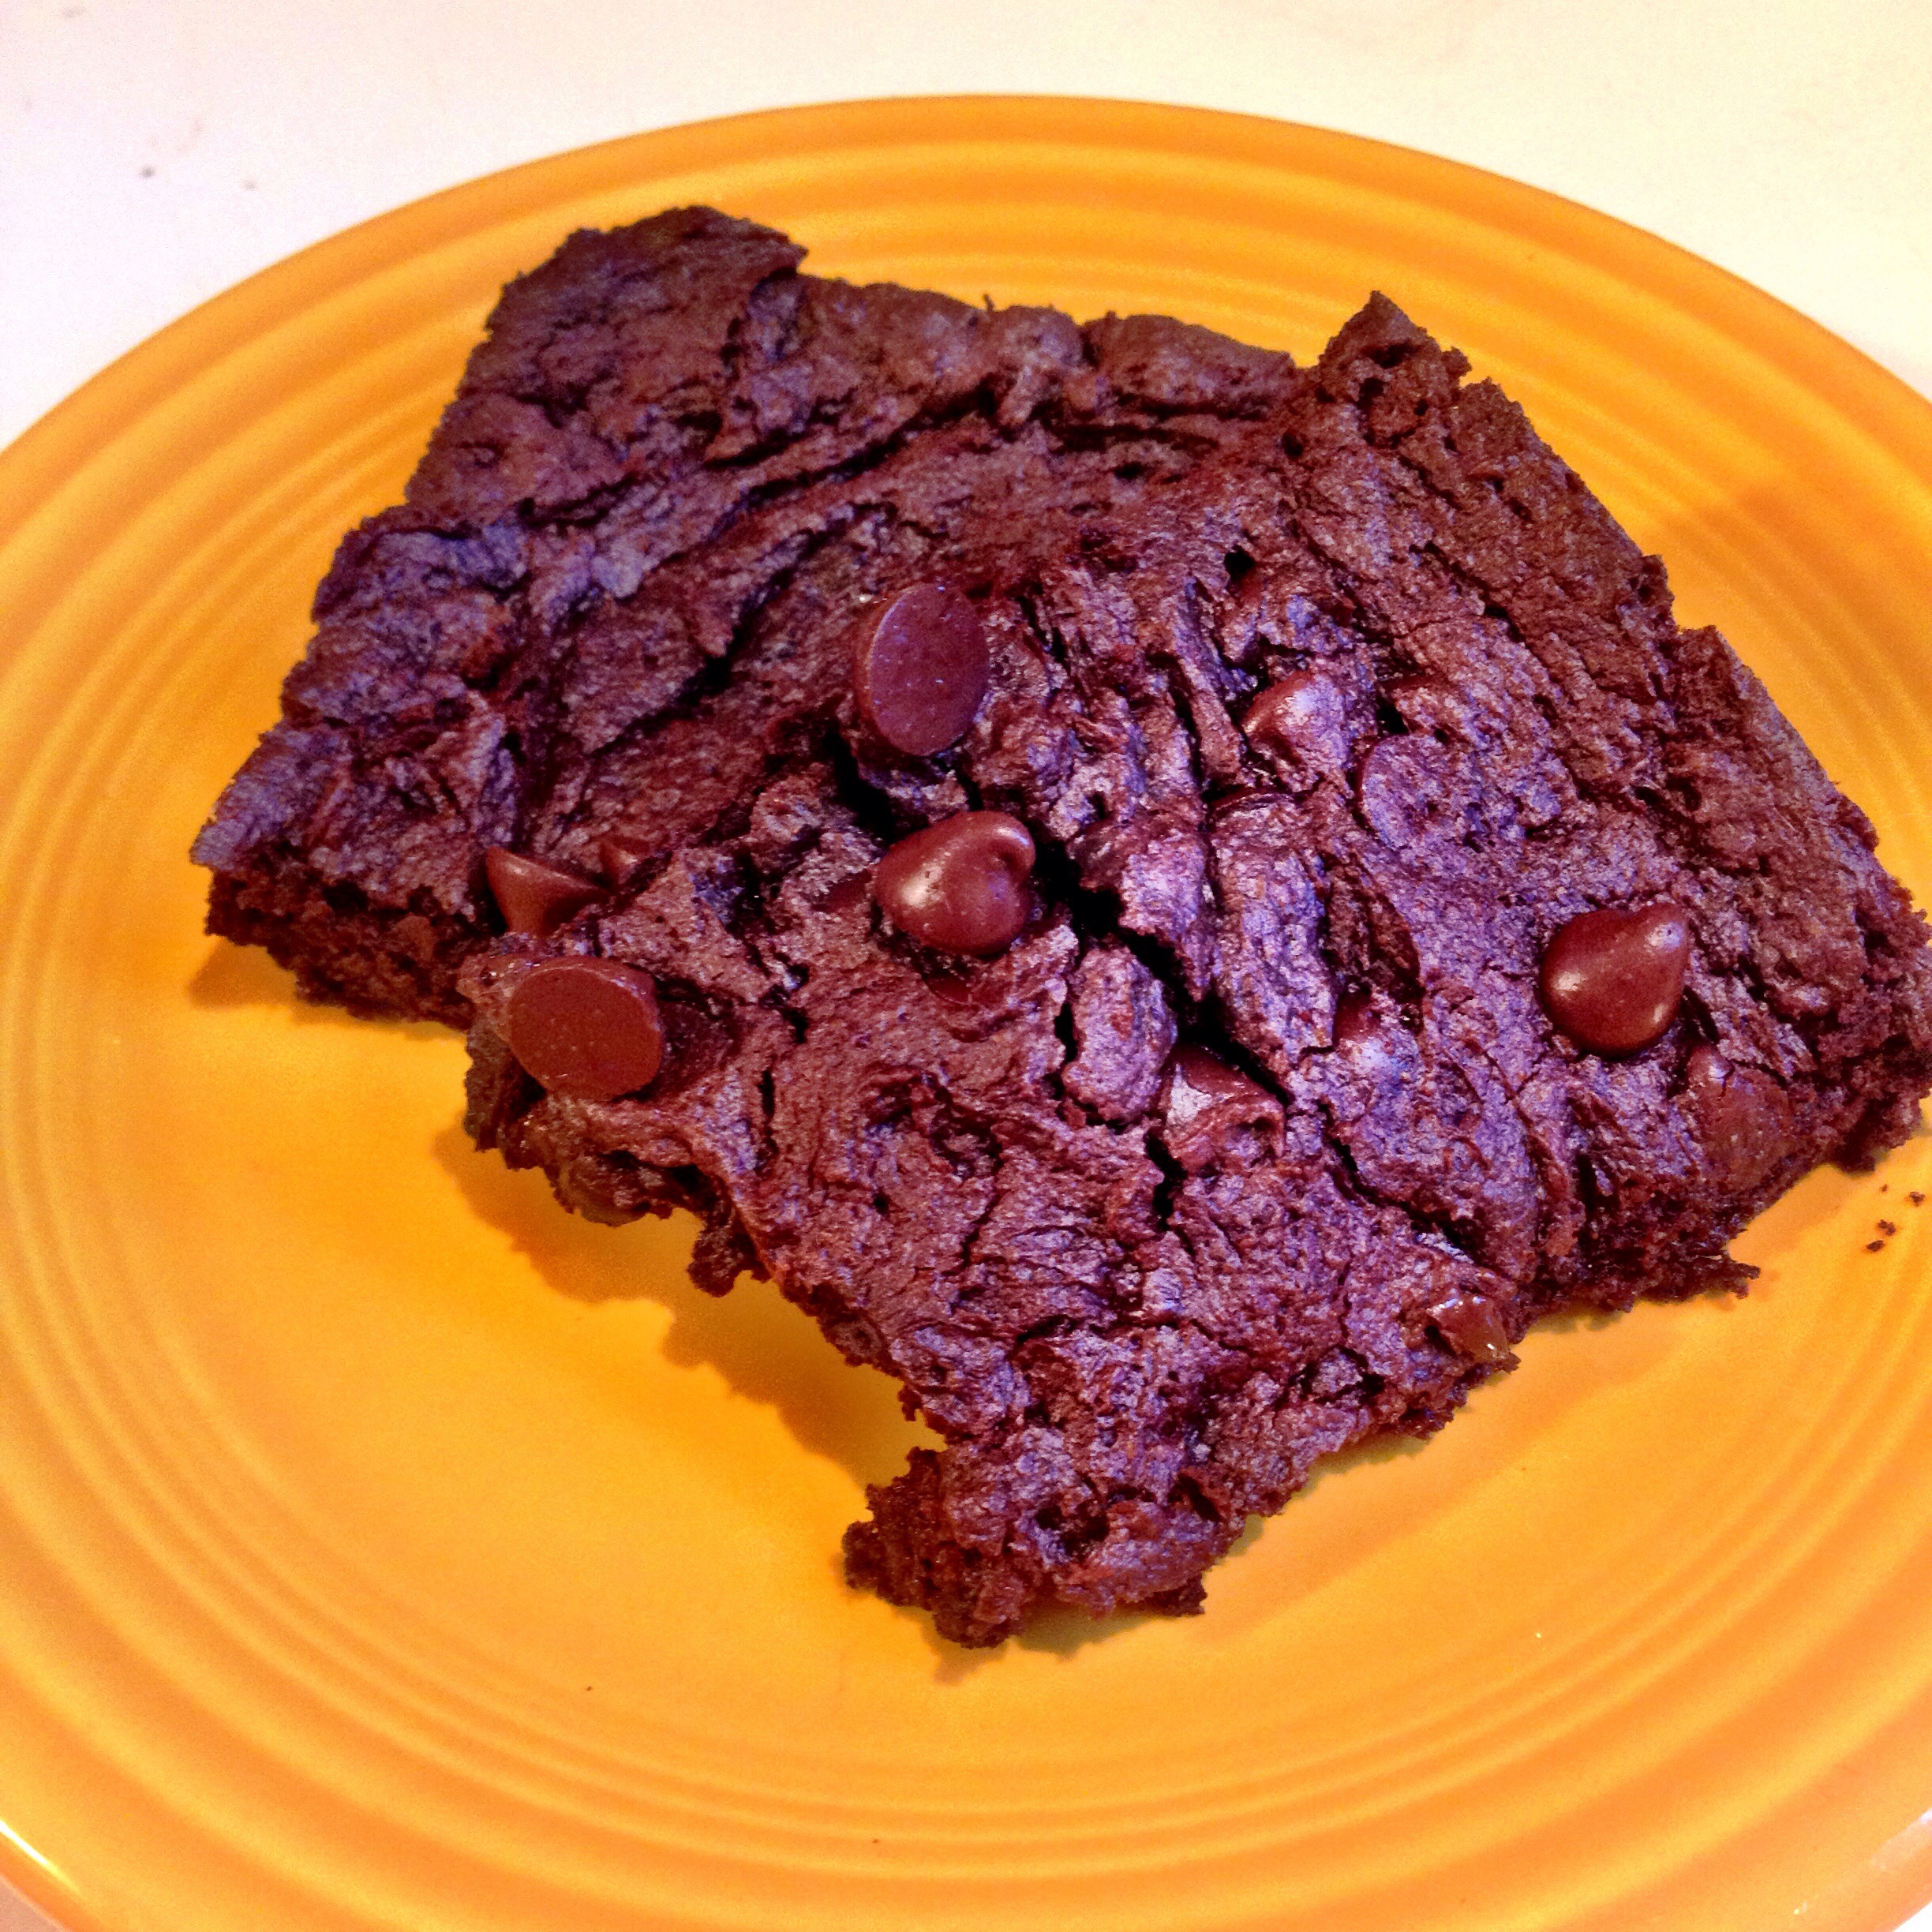
How’s this for a weekend treat? Brownies without flour, oil, eggs, dairy, or added sugar. Yup, you heard me right. And they’re ooey gooey, full of chocolate-y goodness, creamy peanut butter, and a little bit of a kick since I added a dash of cayenne. I was skeptical when I first saw the recipe on Ambitious Kitchen. How could peanut butter, applesauce, and cocoa powder ever bake up into a brownie? I don’t know what kind of mad science is involved, but what I can tell you is that these things are pretty amazing. Drop everything and try them yourself!
You can head on over to Ambitious Kitchen for the recipe. I used maple syrup instead of honey, and I added about 1/2 a teaspoon of cayenne pepper just to give it a bit of spice. If you have a peanut allergy, I’m sure you could substitute almond or cashew butter, or even sunflower butter to make it nut-free. I’m sure there are many things you could stir in to add or change the flavors–peppermint oil and chopped nuts come to mind. Well, what are you waiting for? Get baking!
Note: I started this post almost two weeks ago on the actual first day of class, October 8. See the update below for my delay in posting (i.e. class is HARD!!!).
First day of school!!!!
I mentioned last week that I registered to take an online course from Harvard on Science and Cooking. Today the course opened and I’ve dived in headfirst watching the introductory videos, reading the required text, making my own introductory video, and checking out the labs and homework assignments. It’s not too late for you to join the class if you haven’t already done so. It’s free and whether or not you choose to do any of the homework and labs is entirely up to you — you can choose to audit the course, or if you choose the certificate option and don’t end up doing all the required material, really what do you have to lose?
The first homework and lab assignments aren’t due until November 19, so you have plenty of time to catch up. Here’s a description of the course from the syllabus:
Science and Cooking: From Haute Cuisine to Soft Matter Science
This course will discuss concepts from the physical sciences that underpin both everyday cooking and haute cuisine. Each week we will visit a world-famous chef, who will show us the secrets of some of their remarkable creations. We will use these as inspiration to delve into the basic fundamental science behind food and cooking. The chefs include Joan Roca (El Celler de Can Roca), Bill Yosses (White House Pastry Chef), Enric Rovira (Master Chocolatier), Carme Ruscalleda (Sant Pau), José Andrés (ThinkFoodGroup, Minibar, Jaleo), Wylie Dufresne (wd-50), Joanne Chang (Flour Bakery, Myers and Chang), David Chang (Momofuku), Carles Tejedor (Restaurante Via Veneto), Dan Barber (Blue Hill) and Ferran Adrià (El Bulli). There will also be demos and lectures by other leaders in the field, including America’s Test Kitchen, authors Harold McGee (On Food and Cooking, Keys to Good Cooking) and Nathan Myhrvold (Modernist Cuisine), and food scientist Dave Arnold (Cooking Issues).
At the end of the course, students will be able to explain how a range of cooking techniques and recipes work, in terms of the physical and chemical transformations of food.
Regardless of whether you’re a science or cooking whiz, I think everyone can learn something from this class, and it will be great fun to be a part of a huge community of online learners, most of whom I assume have a love of food. I’m excited that I have a friends both locally and in the blog world that will be taking this class alongside me and I hope that we’ll have time to chat about what we’re learning and our successes (and possible failures) in the weekly labs.
If the technology of taking an online class scares you, there is an introductory class you can take that helps you learn your way around the edX website and courses. It’s a self-paced class (and it’s not graded), and I found it to be extremely helpful in learning what to expect from this class and help me navigate my way through the various materials online.
When else will you have an opportunity to learn from some of the greatest chefs in the world? José Andrés, Ferran Adriá, David Chang, Wylie Dufresne, just to name a few. These are chefs whose restaurants I will probably never be able to get into, but I have been presented with this amazing opportunity to be taught by them in my own home. Here’s a short video of José Andrés introducing the class — seriously, how adorable is he?
I haven’t decided yet what I want my final project to be, but I can’t wait to get started!
And here’s a picture of my first lab project — I calibrated my oven by melting sugar, folks:
Update: I started this post last week when the first class began. And then I got completely stumped in the homework section. The lab was fine — I aced that. But the level of math and science needed to complete the homework was way off what I’m used to, not to mention how many years it’s been since I took math and science in high school. I was really good at math, but it’s been ages since I’ve done formulas like these. Anyway, after watching the lectures several times, taking copious notes, and reading all the discussion below, I was finally able to finish the homework equations and got an A for the week!
Week 2 went much better – I haven’t started the lab yet, but I printed out the homework questions, took a ton of notes during the lectures again, and mostly breezed my way through the homework. I don’t know if the problems were easier this week, or if I was just better prepared, but I’m feeling a lot better about this class now. I was really discouraged the first week because I didn’t even know where to start with some of the problems. My one complaint is that there are inconsistencies between the lecture and homework, and also appear to be some errors in the homework as well, but reading the discussion helps to avoid those mistakes.
So I just stumbled upon something amazing: a free online course from Harvard on science and cooking! Some of the chef instructors include José Andres, David Chang, and Wylie Dufresne (the king of molecular gastronomy)!!! For someone as addicted to Top Chef and other cooking shows as I am, this is a fan girl’s dream come true! I’m super excited about this.
Besides learning what I’m sure will be some really cool cooking techniques, I’m hoping that this will help with my recent foray into plant-based baking, and understanding what substitutions work better than others. And it’s free, so what do I have to lose? Won’t you register with me? Class begins October 8!
An old friend of mine from my high school days in Japan asked me today if I could take an old and familiar Japanese dessert and make it healthier and plant-based. The dessert is what the Japanese call simply “sweet potato” or “su-i-to-po-te-to”, to be precise. It’s a sweet and savory dessert that is full of sugar and butter, and tastes so good! While trying to find examples of this dessert to show you, I stumbled upon this hilarious Japanese cooking demo for the dessert where this lady cooks with her poodle (not literally cooks her dog, but you know what I mean). You can watch it here:
I wish I had found this video earlier because I definitely would have added rum to my recipe when I was trying to make it! Anyway, I had two slightly different recipes my friend and I found and I decided to make both. I used a recipe from Hungry Note for version 1 and a recipe from Kyoto Foodie for version 2. In order to make them plant-based, I would need to make substitutions for the egg yolk, butter, milk, and cream. After much research (i.e. googling), I decided I would use silken tofu, avocado, coconut milk and coconut “cream” as my replacers, in that order.
One thing I was a little uncertain of was how the texture and taste would differ since I wouldn’t be using Japanese sweet potatoes. I can’t find those locally here so I used the regular orange flesh “yams” that I found at the farmer’s market. Japanese sweet potato, or satsumaimo, has a purplish peel and light yellow flesh. It’s a little sweeter than what we call a sweet potato in the States. I found a great article in the Japan Times written by the author of one of my favorite Japanese blogs, Just Hungry, that talks about the history and uses of satsumaimo.
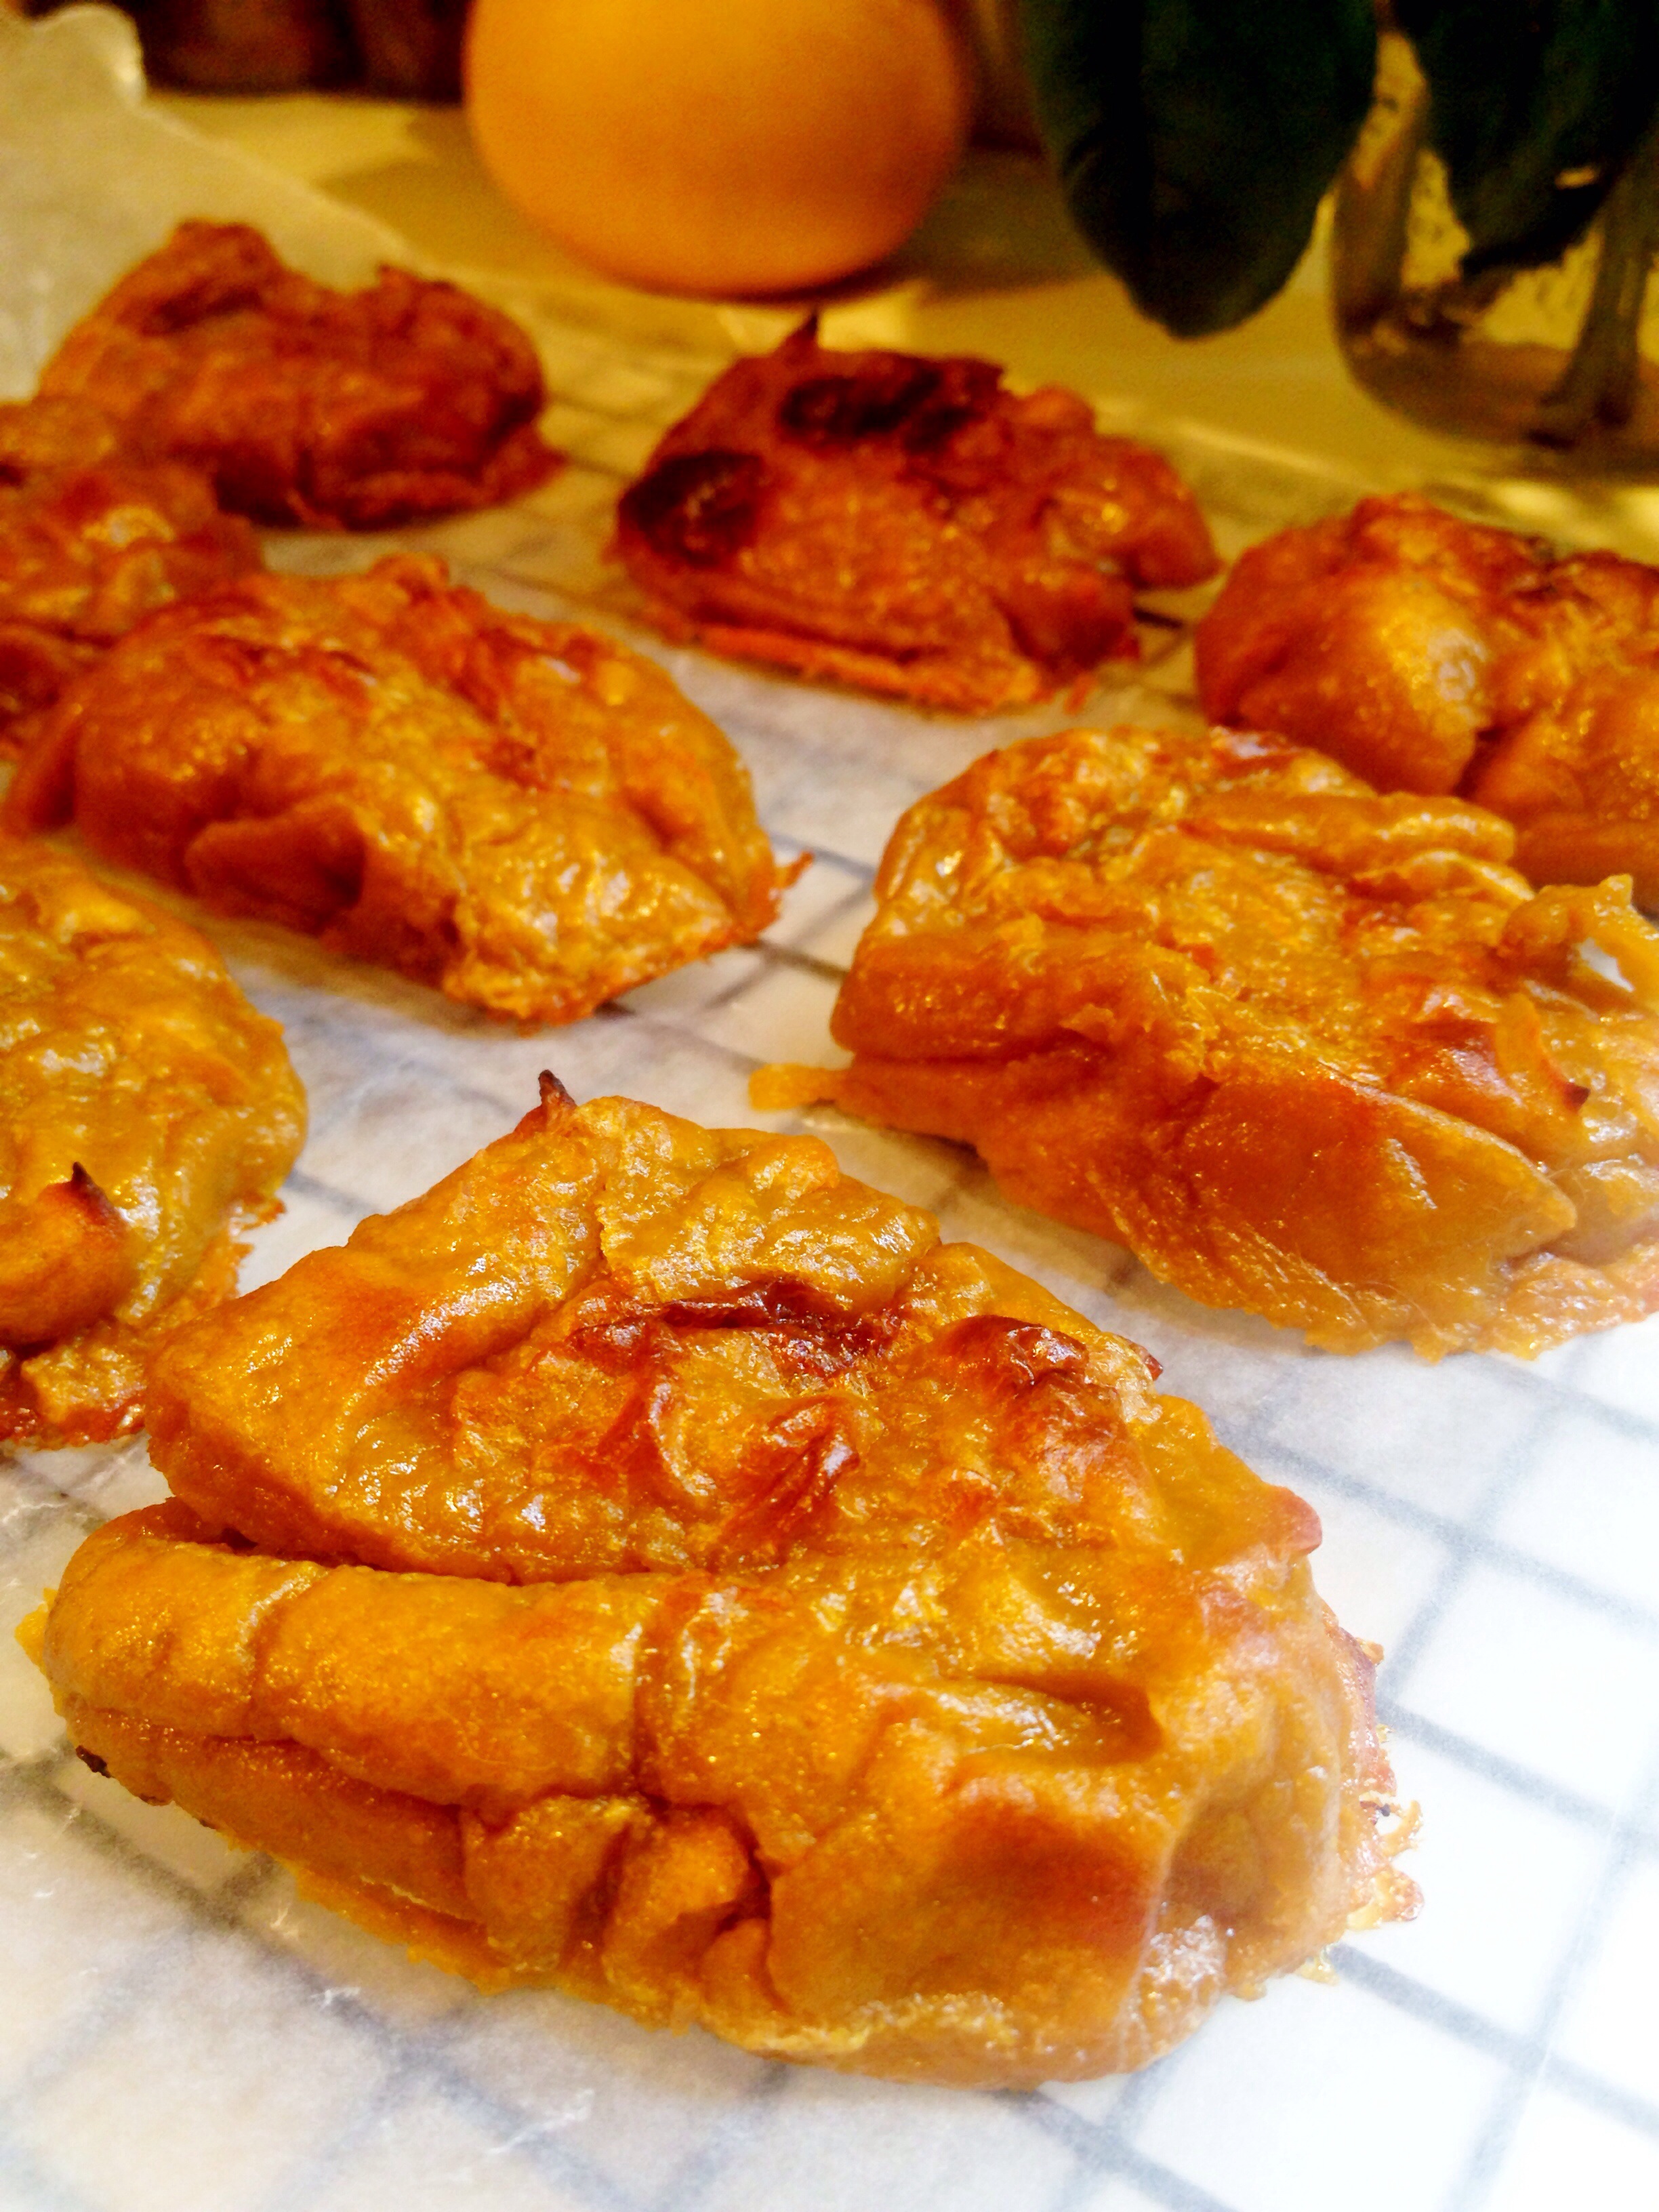
The verdict — both versions of the sweet potato cakes were very good, taste-wise. Not too sweet, a little caramelized on top, and very creamy. Texture-wise, they were definitely too soft. It was a little softer than sweet potato pie filling, and while it did firm up a bit as it cooled, I still think it lacks the traditional texture. Next time, I will probably keep all the ingredients the same but increase the amount of sweet potato. I would definitely add at least one extra sweet potato, maybe even two. I think that would give it the more potato-y texture that is missing. However, this recipe as it stands has really great flavor, both cooked and uncooked. I could eat it raw as a sweet potato pudding as well. And it’s pretty healthy as far as desserts go, so you could use it as a side with your dinner, or even for breakfast if you wanted. I also think it would make a really great pie filling. I might experiment with baking one of these versions in a pie for Thanksgiving this year. I can’t vouch for how close it is to the original since it’s been over 15 years since I’ve eaten suitopoteto, but since I really enjoyed the flavor, I would definitely not call this experiment a failure!
japanese sweet potato cakes “suito poteto”, version 1
ingredients
2 medium sweet potatoes, peeled
1/4 cup coconut “cream” (place can of coconut milk in fridge for 15-20 min. Use the thickened “cream” off the top of the can)
1/4 cup maple syrup
1/2 ripe avocado
1/8 cup silken tofu
1/4 tsp vanilla extract
directions
Preheat the oven to 425˚F. Bring a medium-sized pot of water to boil on the stove top.
Cut the peeled sweet potatoes in 1/4-inch rounds and then halve and quarter them. Boil for 4-5 minutes until fork tender.
Drain the sweet potatoes and return to the pot. Mash them in the pot over low heat to evaporate a bit of the moisture.
Add the avocado, tofu, and maple syrup to the pot and blend with the potatoes using an immersion blender. (Can also spoon into a food processor or blender)
Gradually add the coconut cream and blend until smooth. Add the vanilla extract.
Line a baking tray with parchment paper or foil. Spoon the mixture onto the tray in any shape you want. If it’s too runny, you can use line a muffin tray and use that instead. Mine made 9 little cakes.
Brush the tops with a bit coconut cream.
Bake for 20-30 minutes until set and golden brown. Place tray on a cooling rack for 10 minutes. Place a sheet of wax paper on top of cooling rack and use a spatula to place the cakes on the paper. Cool for another 20-30 minutes. They will firm up more as they cool. Enjoy!
*Notes: Next time, besides increasing the amount of sweet potato, I will also try the following: mash the sweet potatoes by hand, blend everything else in a blender or food processor, then stir the mixture into the hand-mashed sweet potatoes. That may help solve the texture problem and make it less runny.
japanese sweet potato cakes “suito poteto”, version 2 “kyoto-style”
ingredients
2 sweet potatoes, peeled
1/4 cup maple syrup
1/2 avocado
3 tbsp coconut milk (may substitute other non-dairy milk)
1/4 cup silken tofu
1 tsp cinnamon
pinch of salt, optional
sesame seeds
directions
Preheat oven to 425˚F.
Cut the sweet potatoes into 1/4-inch rounds and halve and quarter them. Steam for 10-20 minutes until fork tender.
Place in a bowl and add the maple syrup and avocado and begin mashing.
Add in the coconut milk, tofu, cinnamon, and salt.
Form into balls and place onto a lined baking sheet, or spoon into a lined mini-muffin tray as I did.
Top with white or black sesame seeds and bake for 20-30 minutes until set and golden brown on top.
Cool in muffin tray or on baking sheet for 10 minutes before removing. Allow to cool for 10 minutes more on a wire rack. They will firm up a bit as they cool. Enjoy!
*Notes: Next time, besides increasing the amount of sweet potato, I will also try the following: mash the sweet potatoes by hand, blend everything else in a blender or food processor, then stir the mixture into the hand-mashed sweet potatoes. That may help solve the texture problem and make it less runny.
I love this bridge. I love the way it juts up into the sky like mountains. I love how majestic it is. I love how the sun rises over it brilliantly every morning. I love how the fog and mist rise up from the river below and engulf it. I love everything about it.
I drive a few blocks out of my way almost every morning just so I can take pictures of it and marvel at how beautiful it is. A few weeks ago when the weather was warmer, I walked down along the railroad tracks by the river and was able to see this massive bridge from below. It truly is a majestic bridge.
The official name of the bridge is the Pittsburgh and Lake Erie Railroad Ohio River Bridge. It spans the Ohio River just west of where the Beaver River runs into the Ohio. It turns out that it’s quite a famous bridge. When I first started posting pictures of this bridge on facebook and instagram, I got so many comments from people on how much they love this bridge. I’ve even been told that there’s a bartender in Pittsburgh who has this bridge tattooed on her chest (okay, that’s weird…). But I definitely understand the appeal. I can’t get enough of it.
I would love to put together an photo book of all the different skies above the bridge. I think if I took pictures every morning for a year, I would have 365 completely different photos, each beautiful in their own way.
Last week, I was fortunate enough to be able to capture a picture of the harvest moon over the bridge. It’s a little grainy, but considering I take all of my photographs with my iPhone 4S, I think it’s quite good.
I’ve always been able to take surprisingly good photos with my iPhone. I used to use just the regular camera app and edit the photos in Instagram.
Then one day this summer, I discovered a blog with a really great post on taking photos with the iPhone. Ever since then, I’ve been using the Camera+ app or ProHDR to take all of my sky photos. You can get really great colors, and capture beautiful images in both lowlight and bright sun.
I think that’s enough of me talking now. Please enjoy the rest of my photos of the Ohio River Bridge.
It rained most of the day yesterday. A little on the chilly side, but not cold enough to light the fireplace yet. I’m looking forward to those days — not the colder temperatures so much, but the coziness of sitting in front of my fire curled up in a blanket with a glass of wine. And my cat plastered to my side, no doubt.
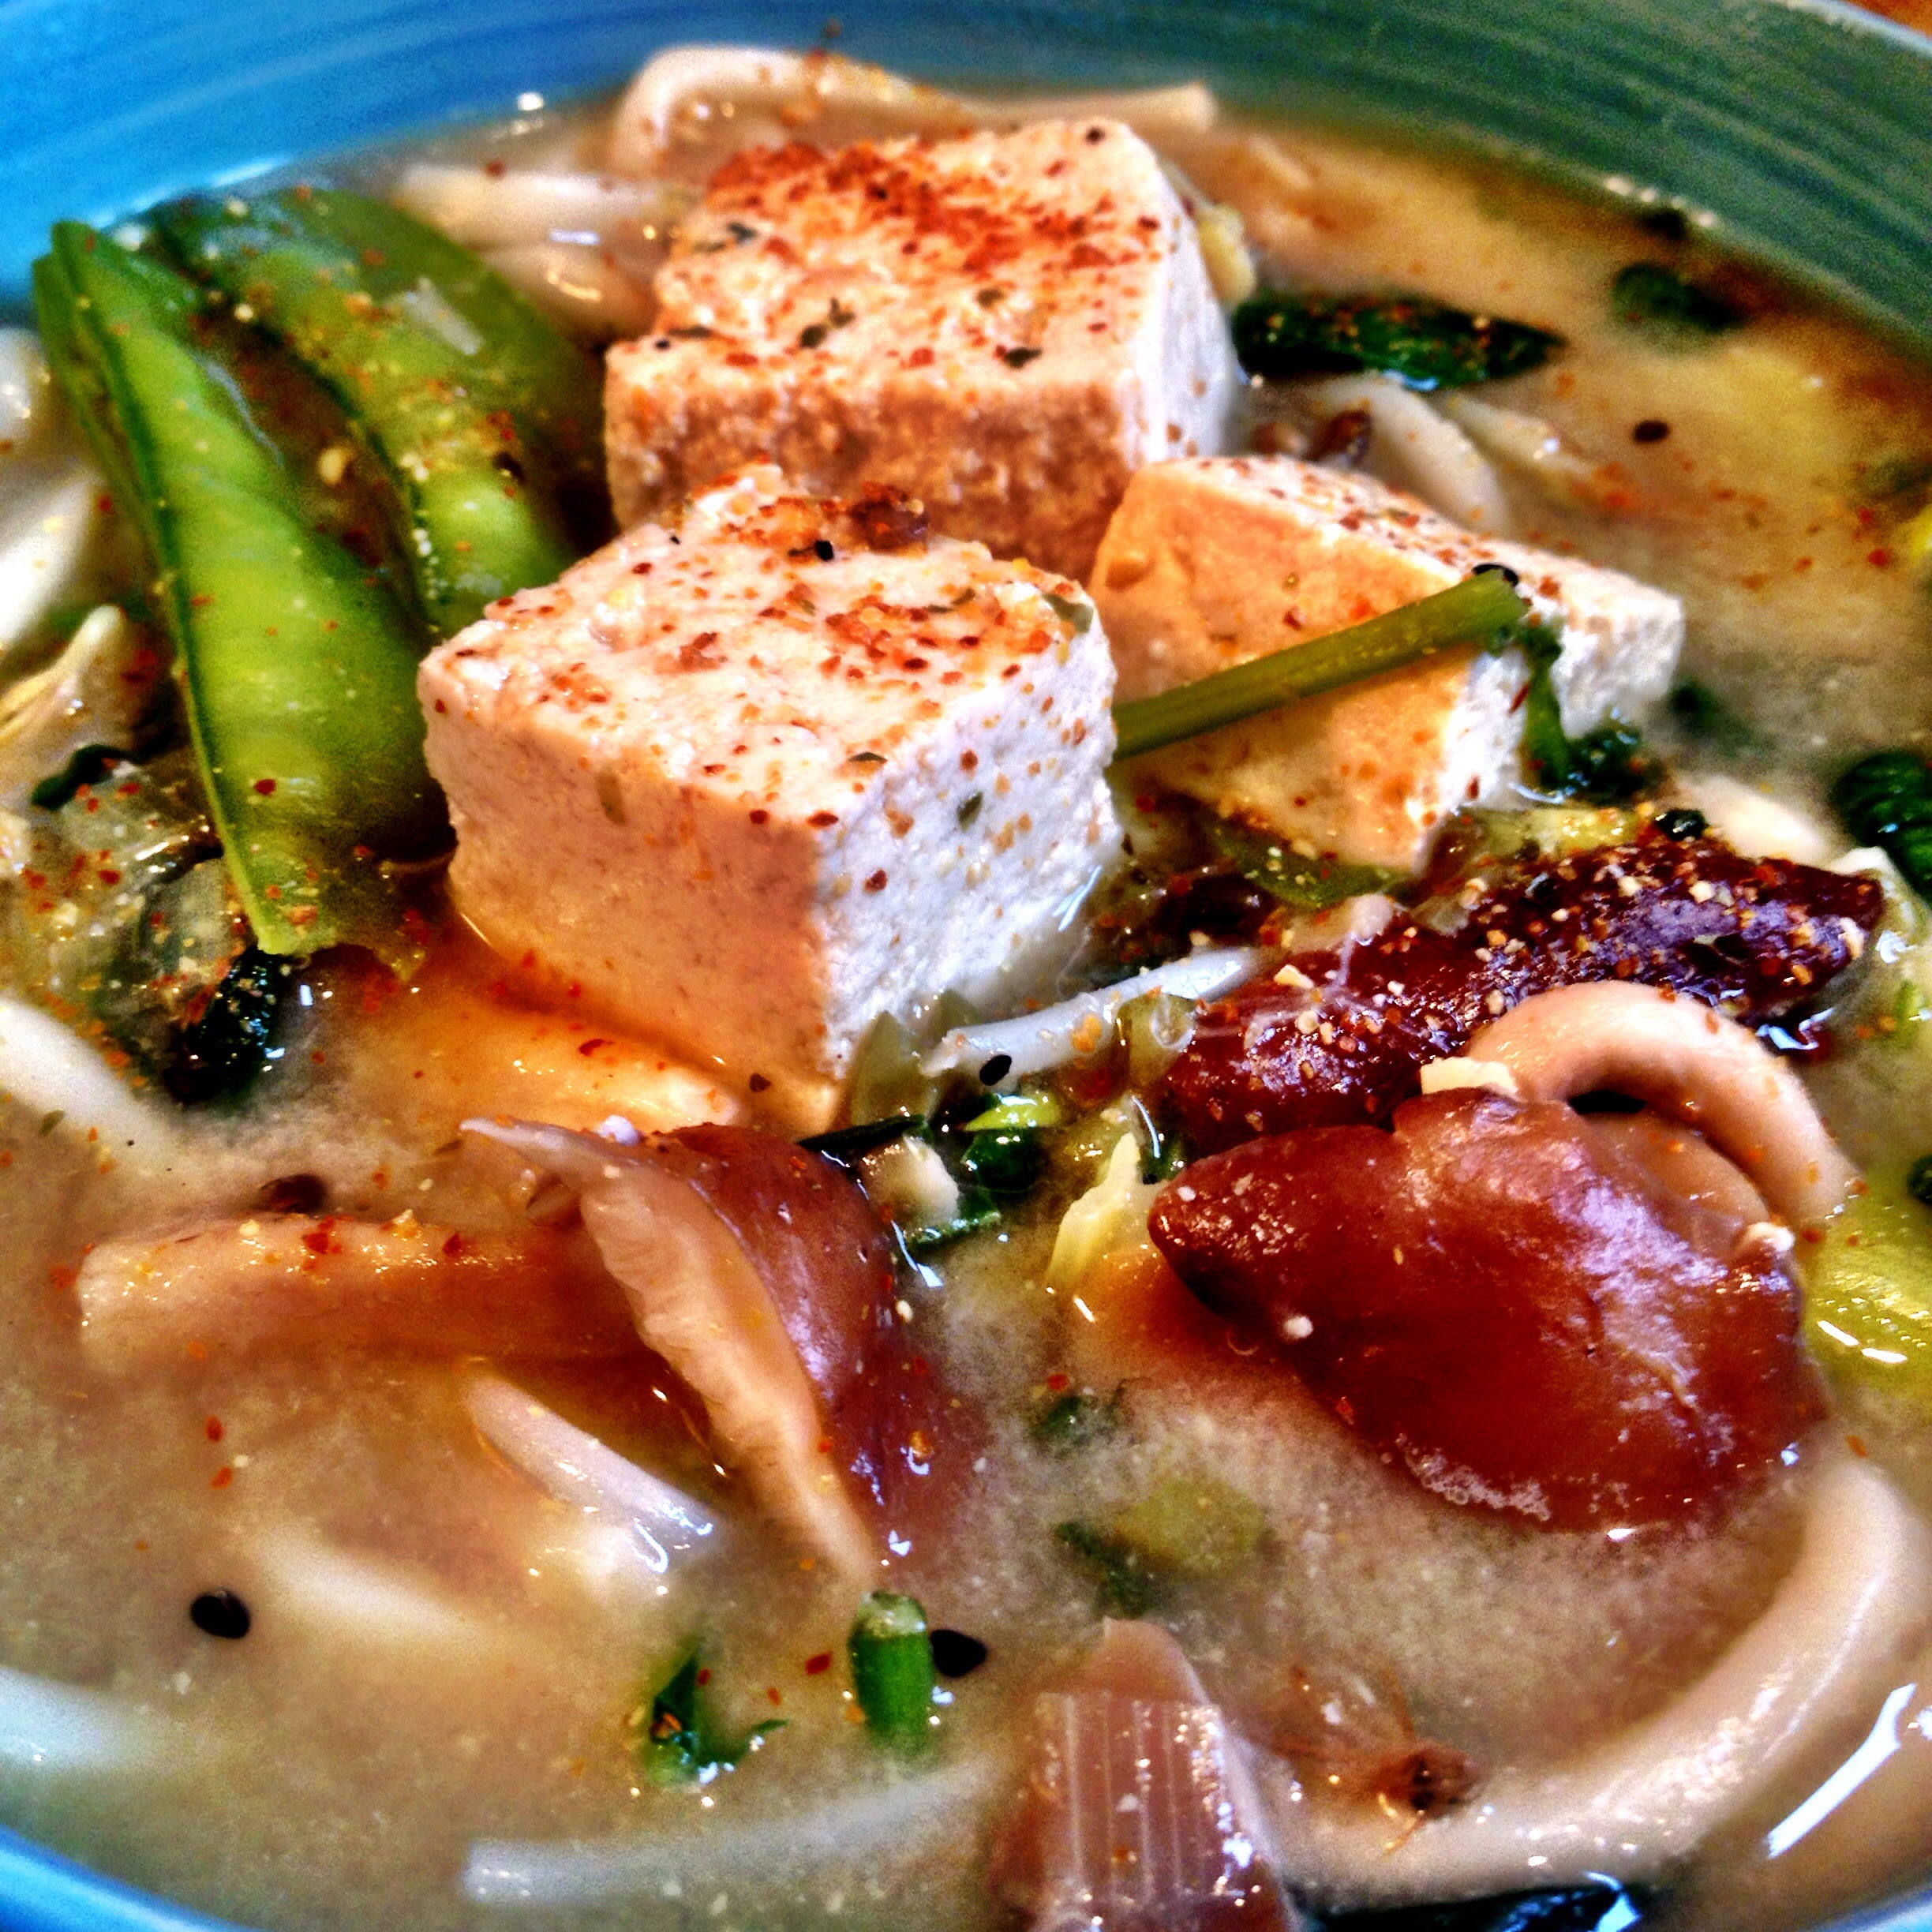
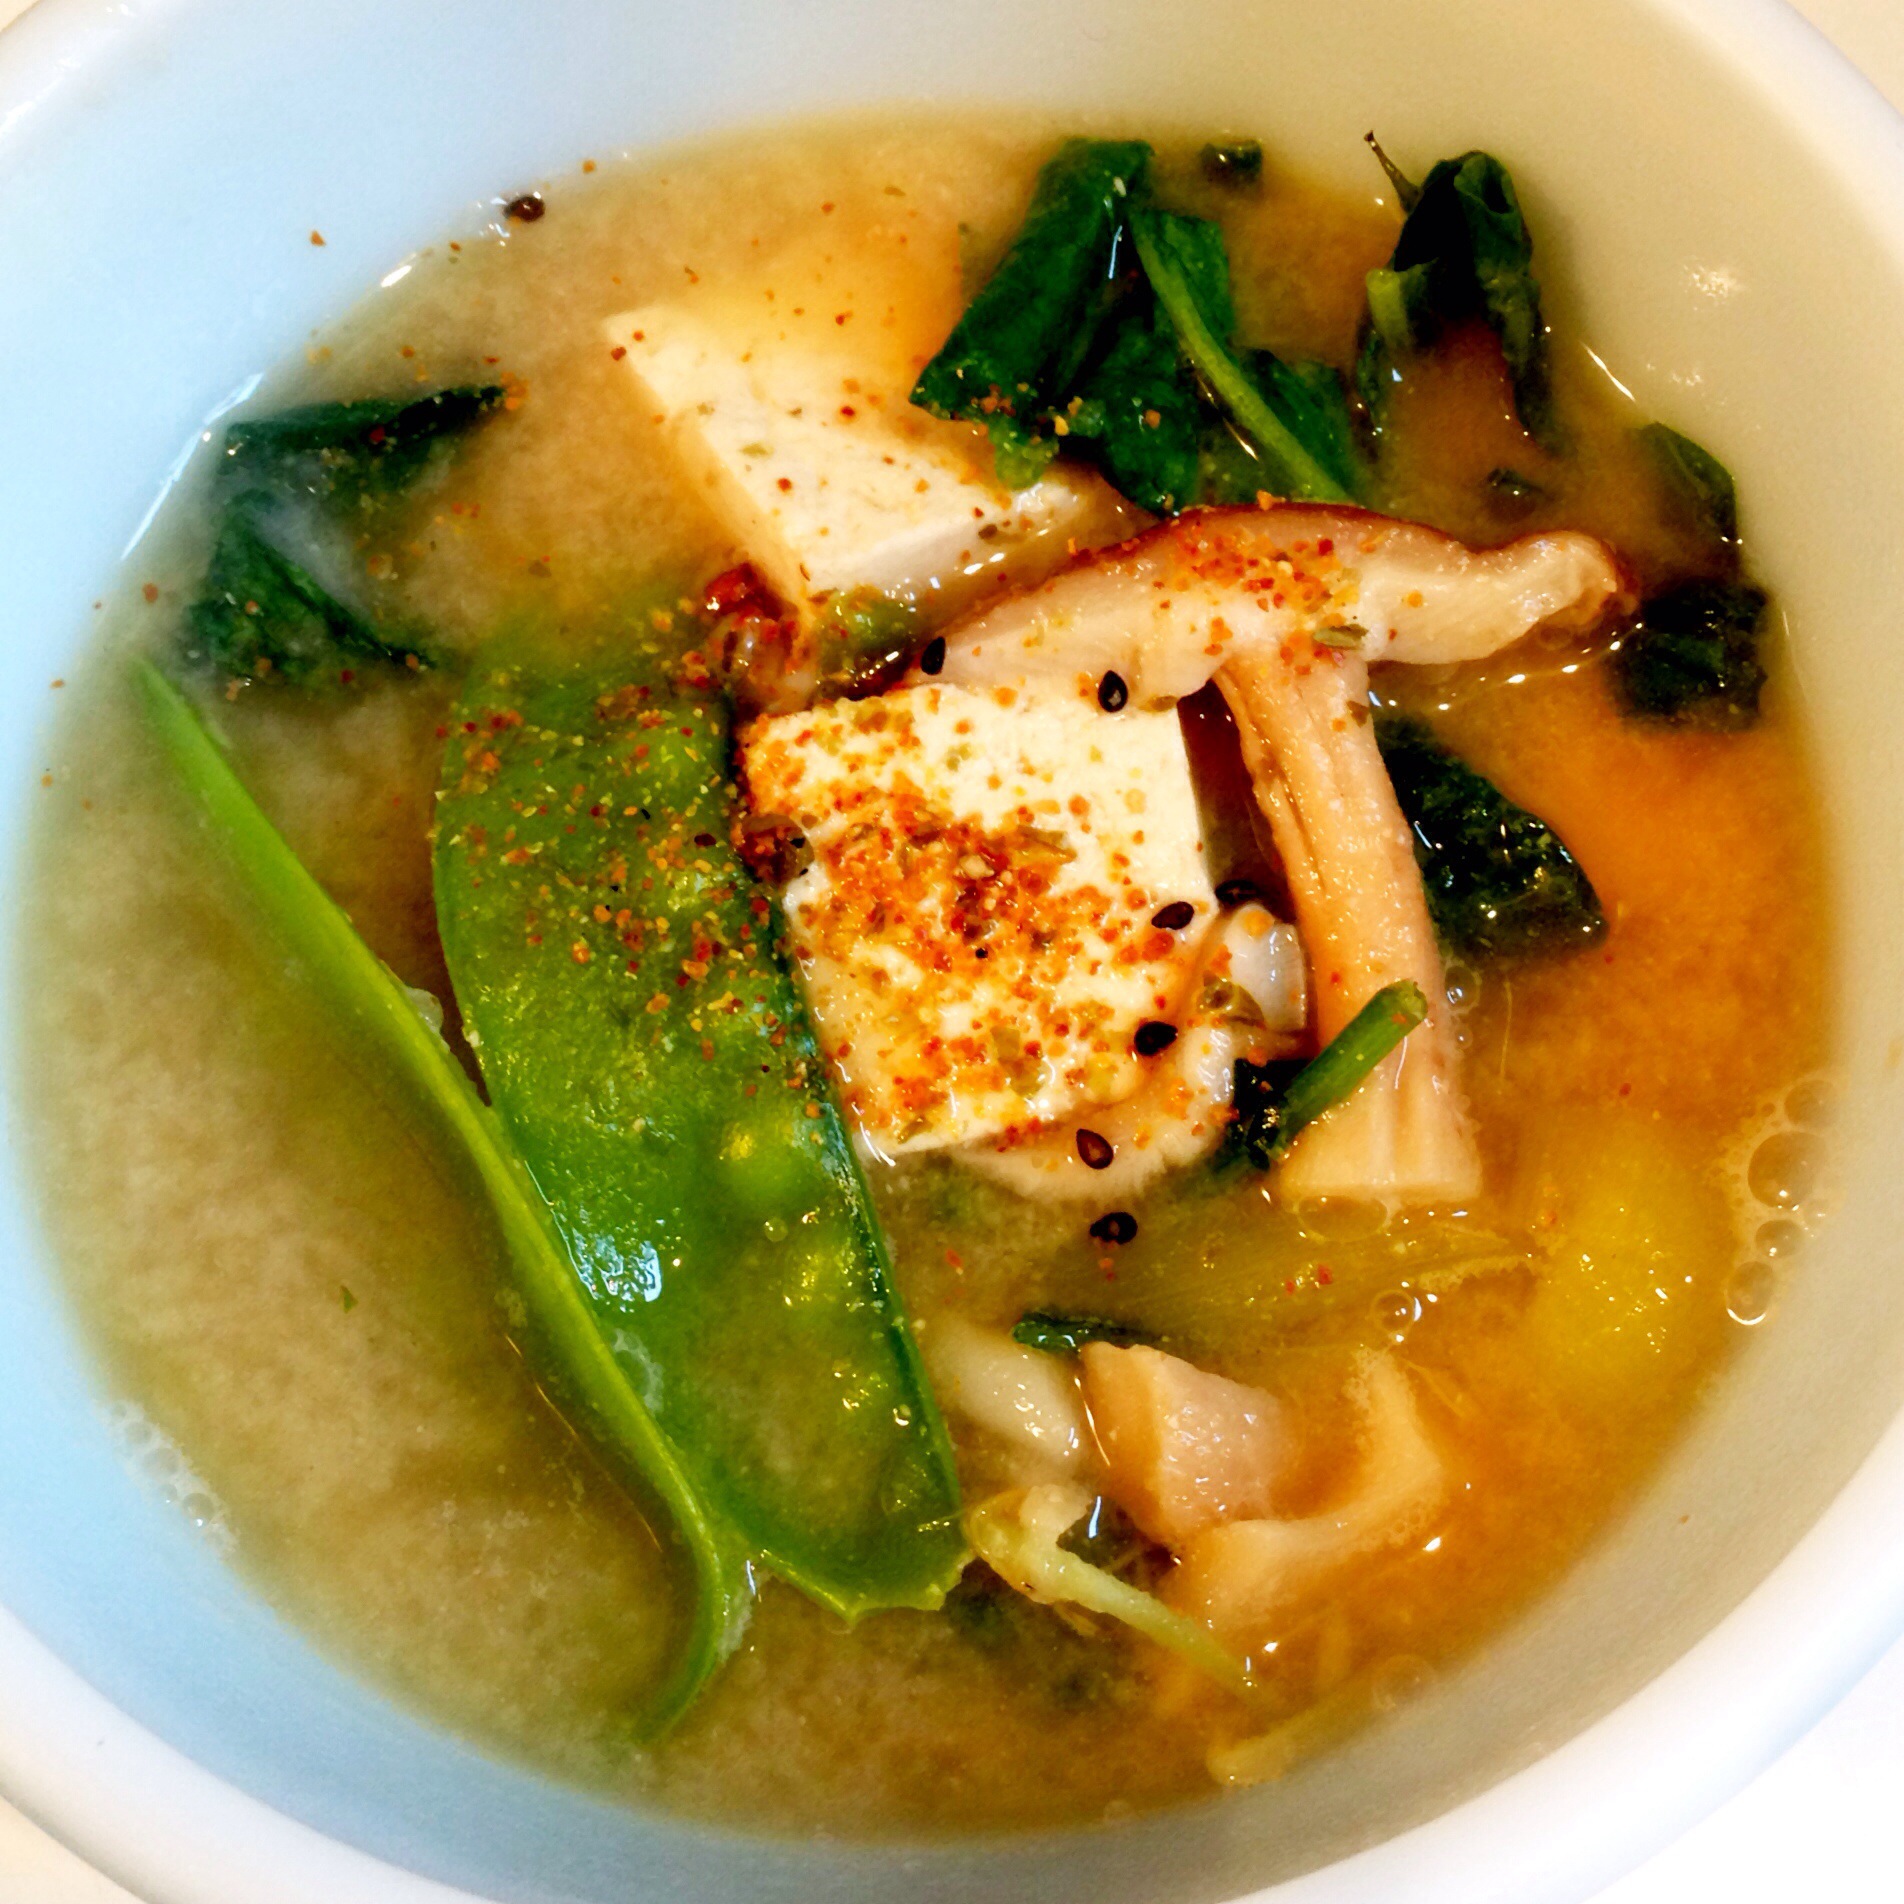
It was still a miserable enough afternoon that some comfort food was in order. I had a lot of spinach to use up and a fresh batch of home-sprouted mung bean sprouts so I thought I would make a vegetarian version of miso chanko-nabe. Chanko-nabe is a one-pot meal that the sumo wrestlers in Japan eat. It’s a hearty meal that consists of broth, vegetables and meat or seafood. There are really no rules to making chanko-nabe. You can put in whatever you want, make the broth however you like.
When we lived in Japan, we would often eat this in the winter months. My mom would cook it on the stove in the kitchen and then transfer it to a pot over a gas burner placed in the middle of the dining room table. Then we could serve ourselves and refill our bowls as needed throughout the meal. There are a lot of Japanese meals that are served in this way, a method of keeping warm in the winter months since most houses are without central heating. Many families sit under a kotatsu together in the evenings for food, television, games, and conversation. A kotatsu is a table covered with a futon, or heavy blanket, with a heat source underneath or built into the table itself. I think this table played a big factor in the creation of much of Japan’s cold-weather cuisine.
For my version of chanko-nabe, I used individually packaged, pre-cooked udon noodles — the kind that cook in 3 minutes. I find mine in the Asian section of my grocery store. If you can only find the dried noodles, you will need to cook them separately before putting them in the pot. Also, if you have leftovers, I recommend storing the noodles separately from the broth, otherwise they will absorb all of the liquid and become very mushy.
I sprinkled some shichimi togarashi over my bowl when serving. Shichimi is a Japanese seasoning blend that literally means “seven flavor chili pepper”. The brand I use contains orange peel, black and white toasted sesame seeds, cayenne, ginger, Szechuan pepper and nori (seaweed). It can be found in most Asian food stores. If you can’t find it, you could probably make your own mix, or just sprinkle a bit of cayenne on top.
3 green onions, the whites sliced into 1 1/-2-inch pieces, the green tops sliced thinly
1 bunch spinach, roughly chopped
2 cups bean sprouts
2-4 tbsp miso paste
dash of shichimi togarashi
In a large pot, bring the stock to a boil. Lower the heat to medium and add the ginger and garlic. Add the leeks, snow peas, tofu and shiitake and cook for 5 minutes.
Add the green onions, spinach and bean sprouts.
Place the miso in a medium bowl and add a ladleful of hot broth. Whisk until the miso is completely dissolved, then stir the mixture back into the soup. I like a strong miso flavor, so I used 4 tablespoons. Start with 2 and taste the broth after you pour the miso back into the pot, and adjust as desired.
Cook for a few minutes and sprinkle with shichimi togarashi, if desired. Serve piping hot.
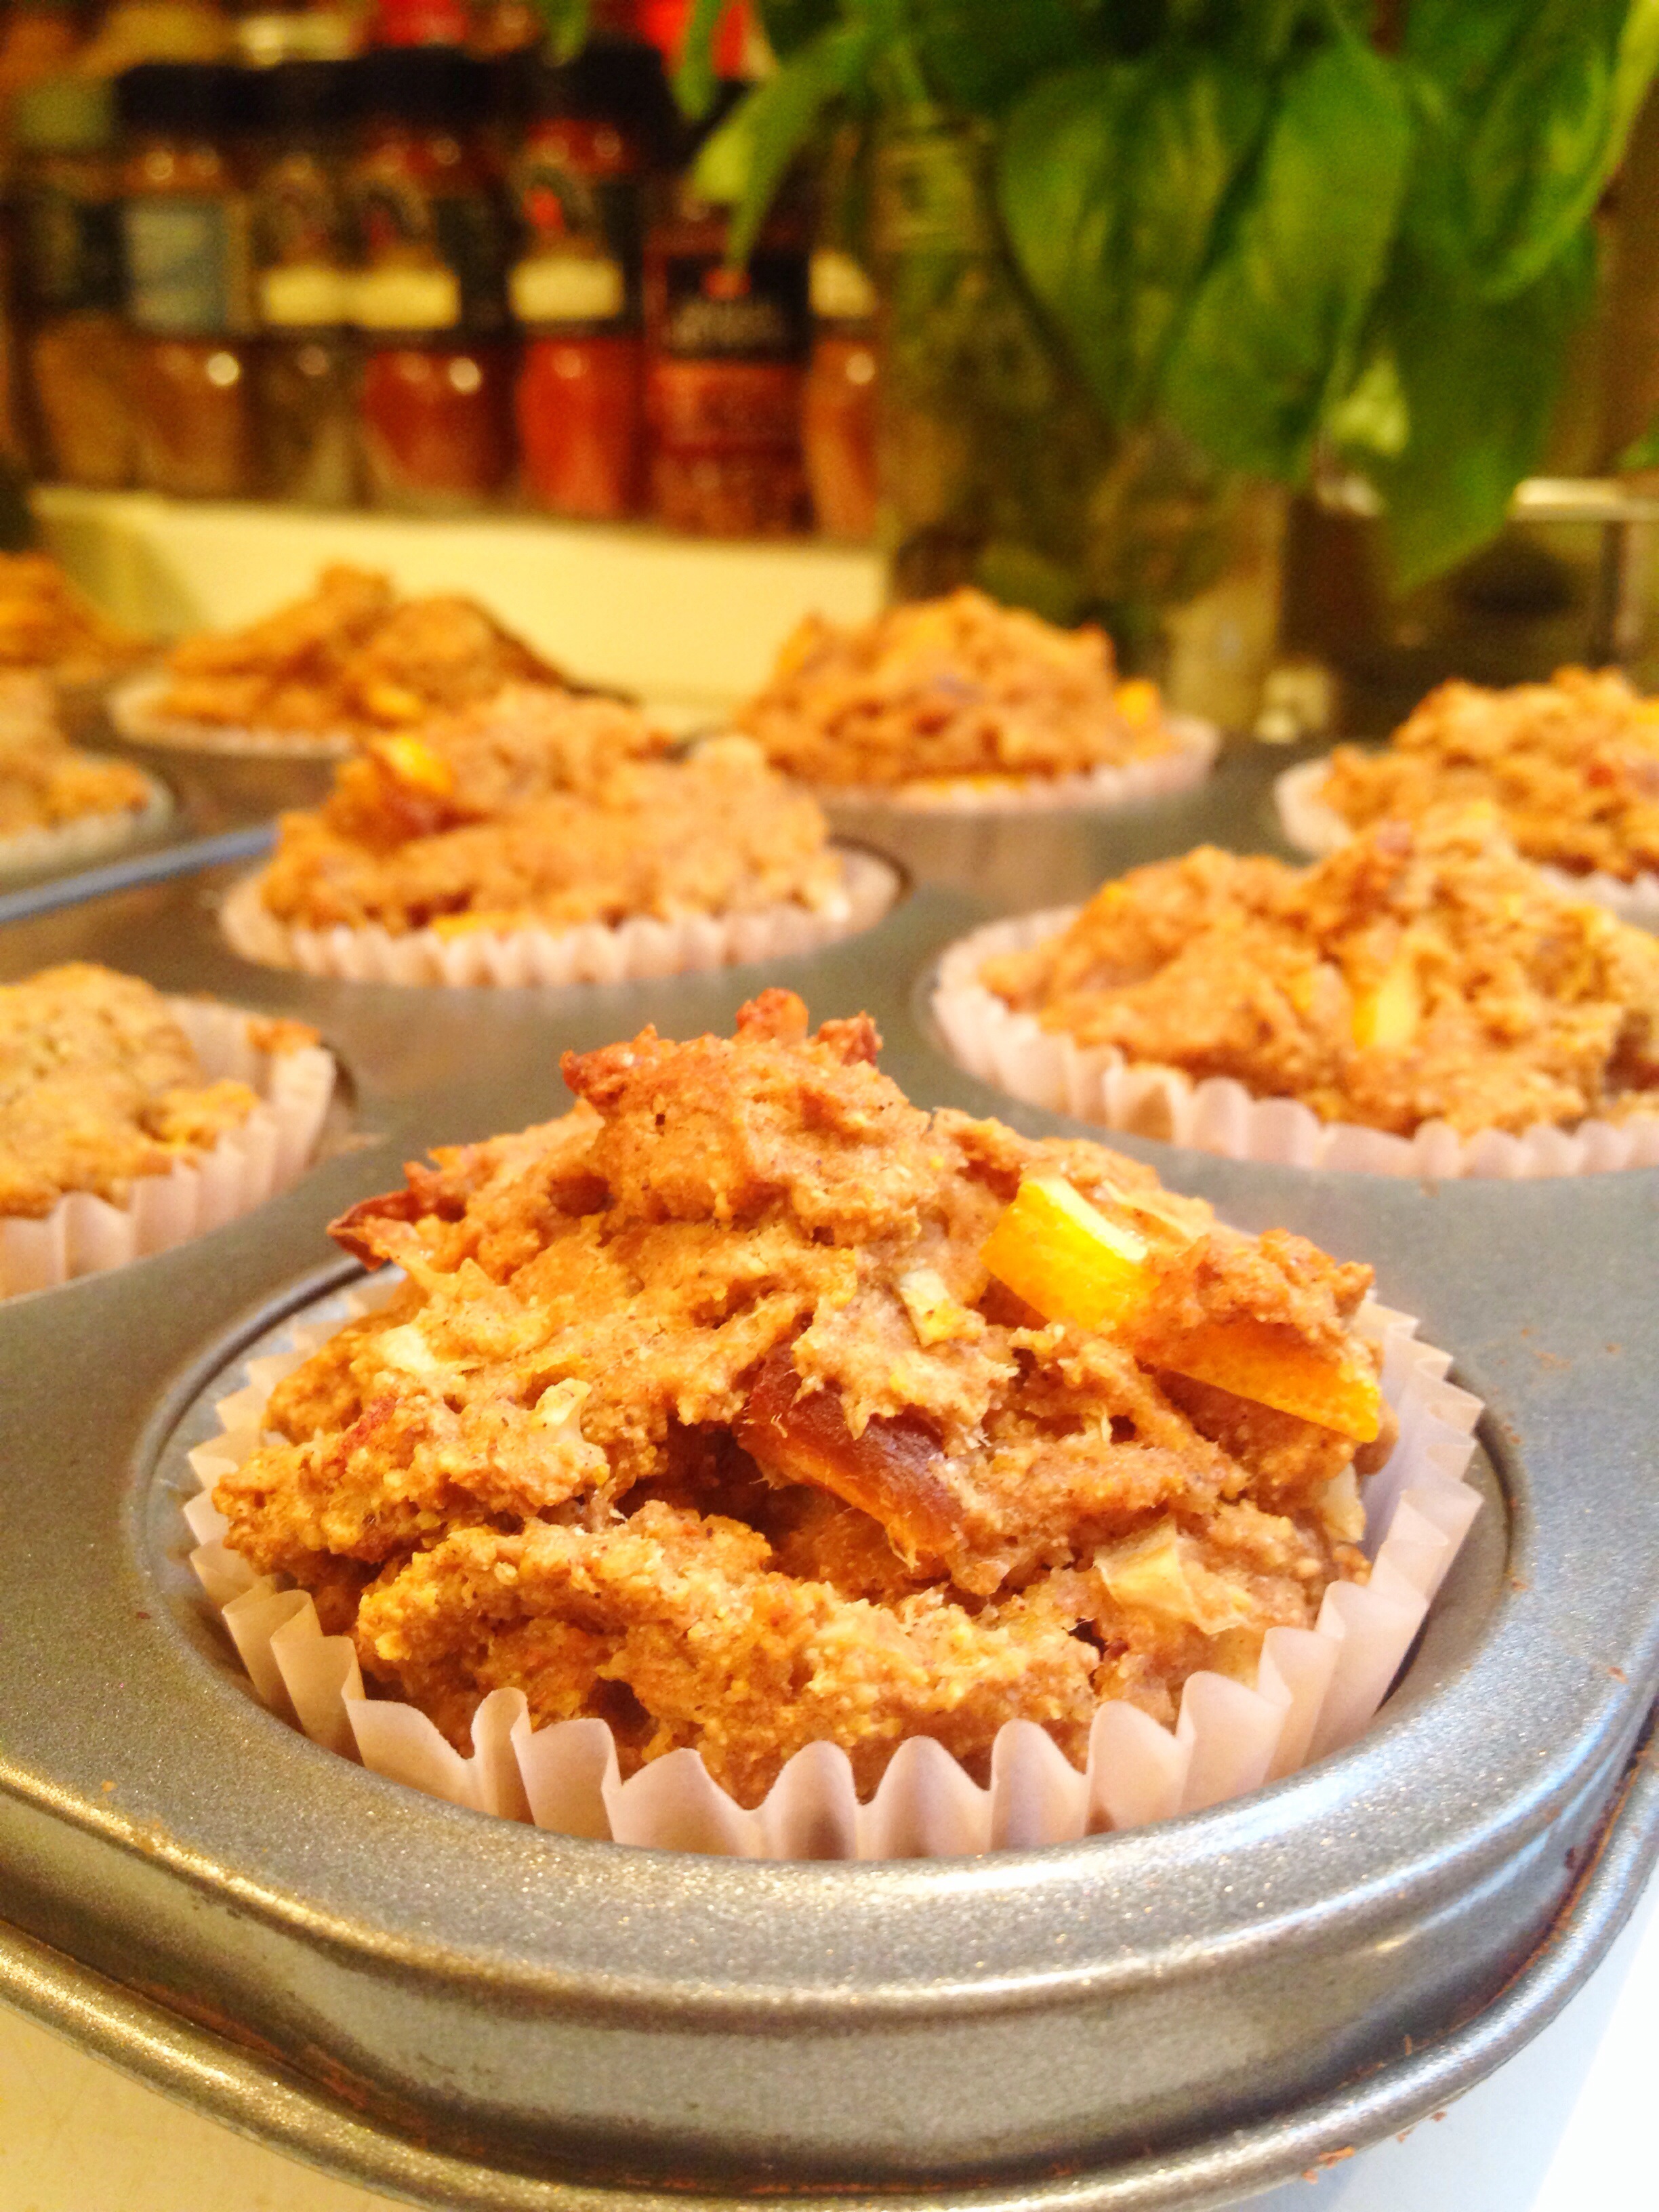
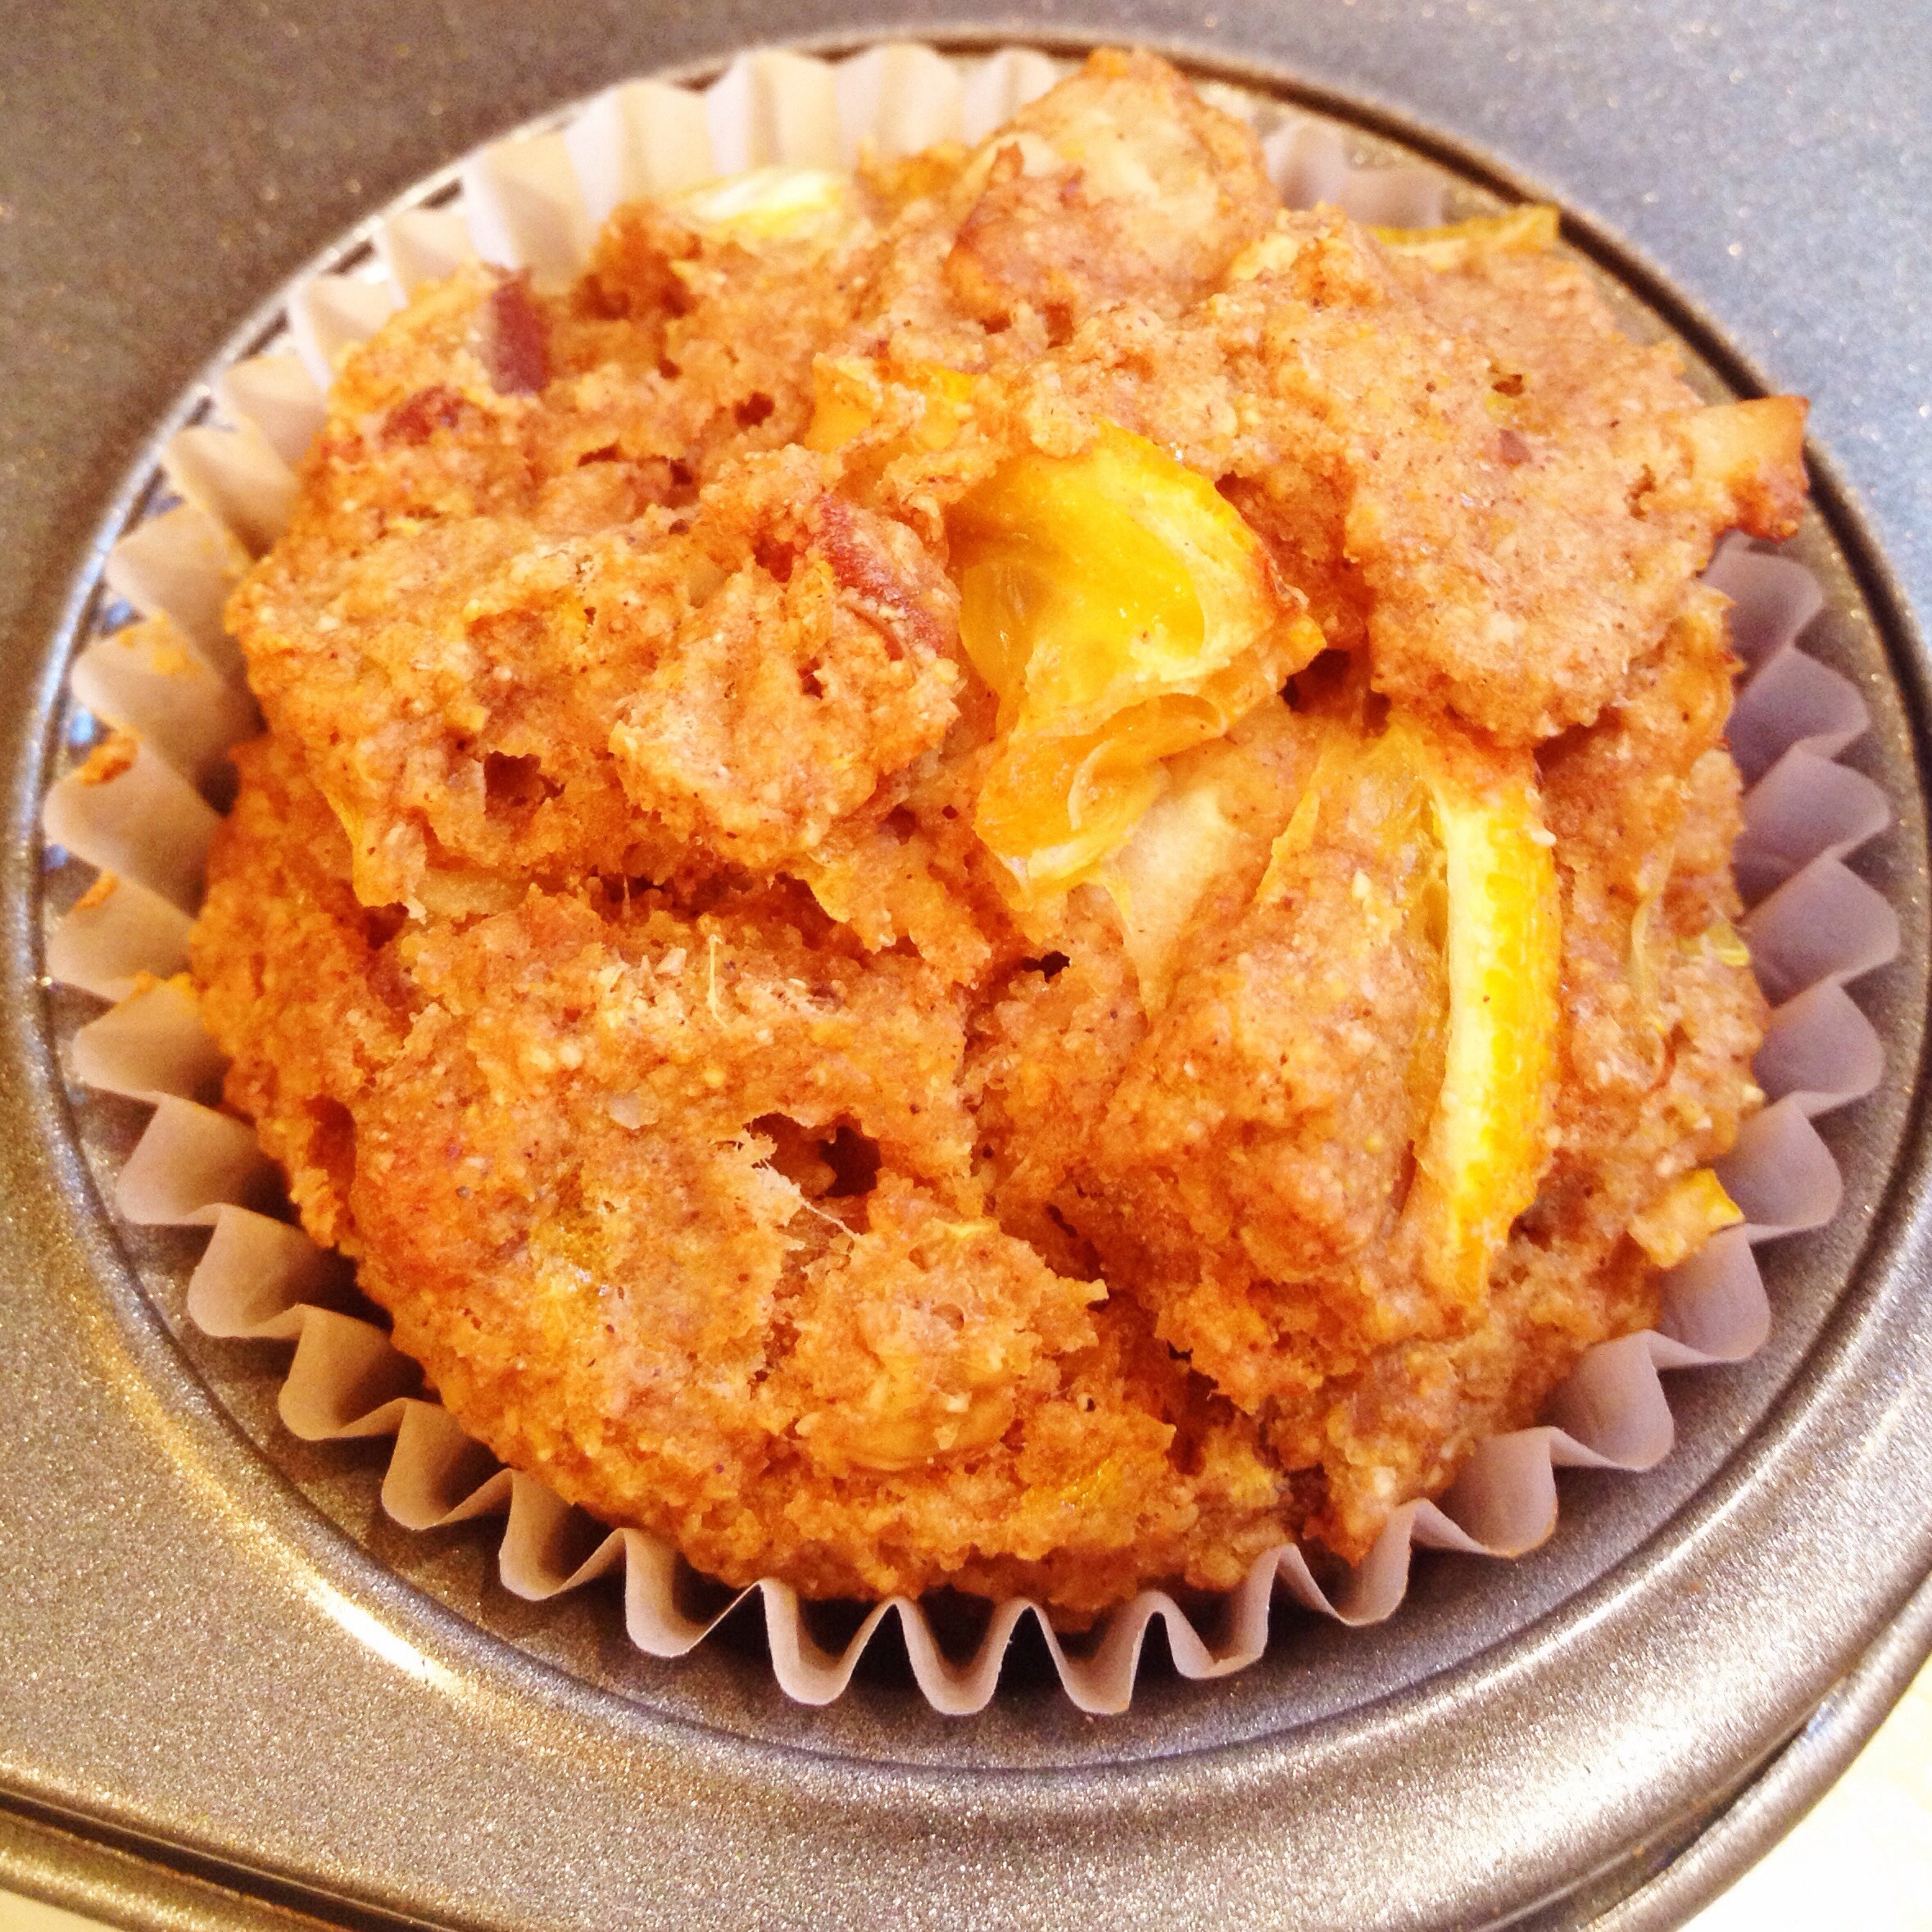
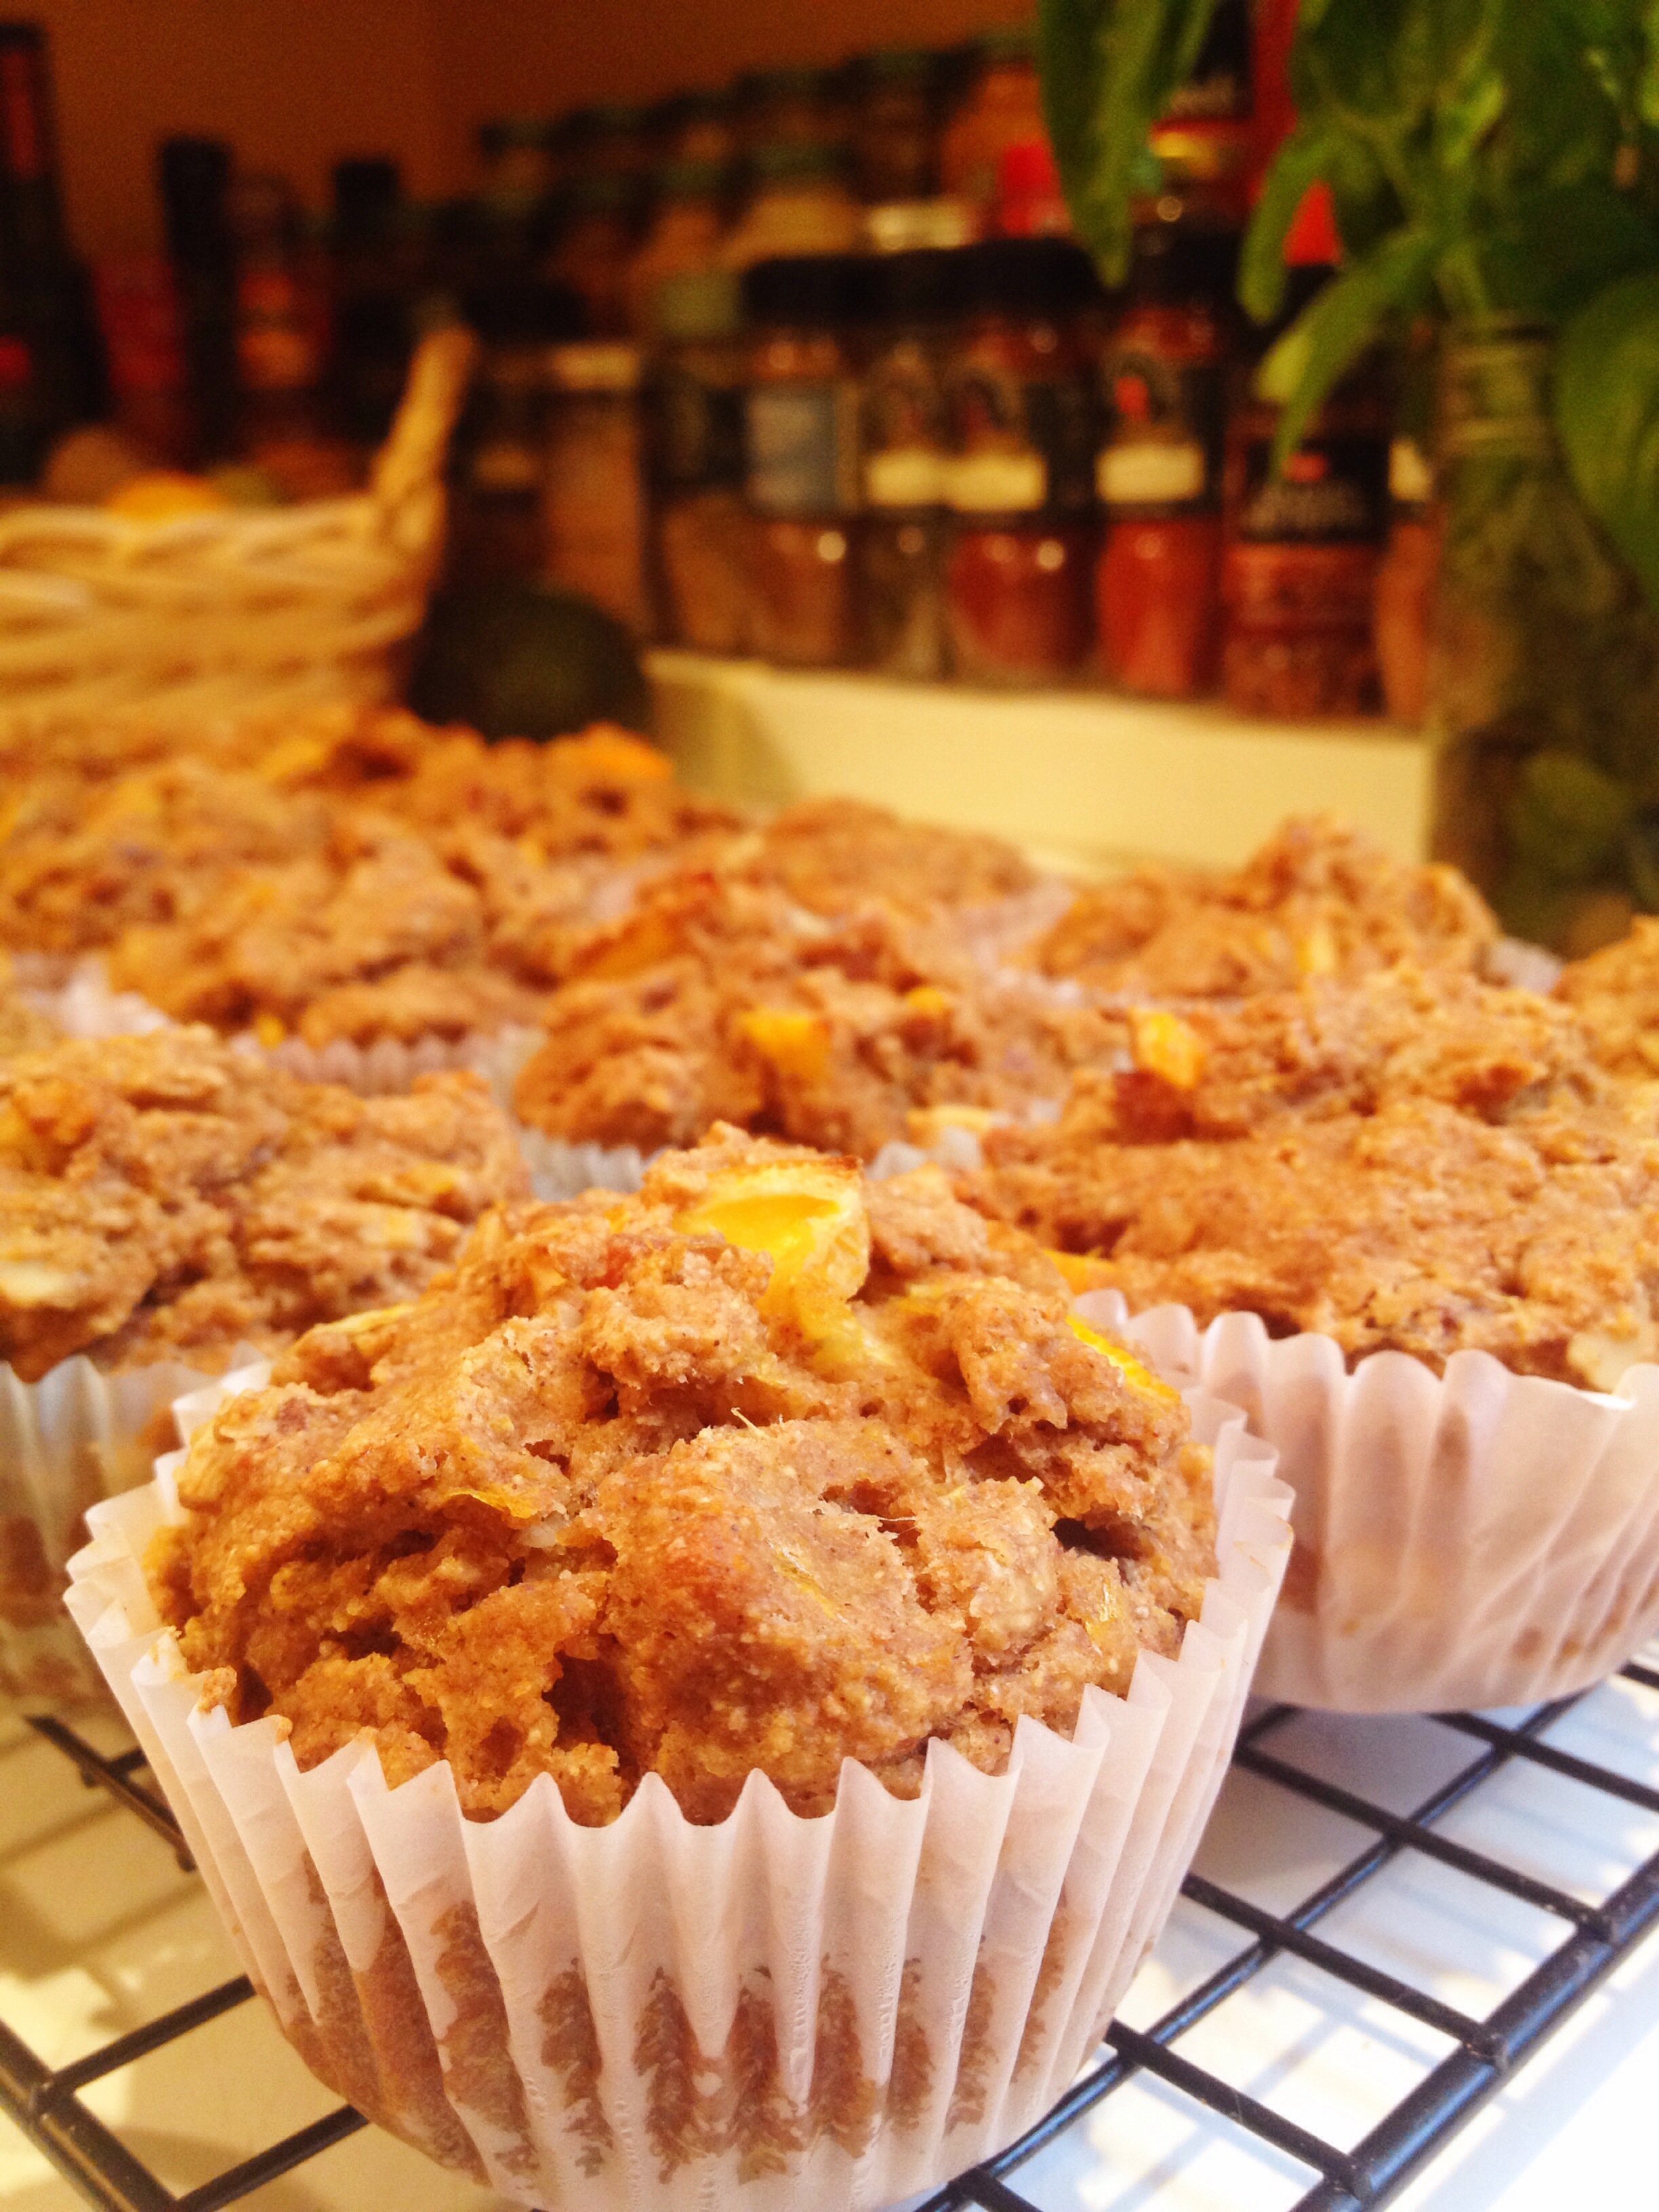
I’m really enjoying these weekend baking sprees I’ve embarked on recently. I finished my last scone for breakfast this morning so I knew this afternoon I’d need to work on something else to get me through my breakfasts next week. I was planning on making those amazing avocado, blueberry, orange muffins again, or modifying my orange, cranberry, ginger, avocado scones, but my avocados weren’t ripe enough yet so I had to scratch that idea. I saw some recipes a while back for polenta cake that I filed away in my head for later use, which got me onto my polenta dinner kick recently. I decided to check google to see if there was such a thing as polenta muffins, and eventually settled on orange polenta muffins.
At this point, I’m not sure it’s possible to go wrong when you bake with oranges — with the scent of the batter while you’re mixing it and the aroma that wafts from the oven while they’re baking, how could they possibly taste anything but amazing? I was a little concerned when I removed them from the oven because they looked like they might be very dry, but they were anything but! They’re slightly sweet, tangy, with a hint of savory from the different spices. Very satisfying and definitely a great breakfast option!
You could easily adapt this to your taste by substituting the spices, fruits, and nuts for almost anything you want (although I think I hit the jackpot with my choice of spices)! I think it could be really good with peaches or blueberries–I’m not sure I’d want to sub out the orange. That’s the major key to the success of this recipe. I may try it using avocado instead of the oil next time, if I have a ripe one on hand. All in all, a successful rainy day baking adventure!
Preheat oven to 395˚F. Line 18 muffin cups with paper or silicone liners.
Mix the brown sugar, coconut oil and almond milk together in a large bowl and let sit while you prepare the other ingredients.
Sift all the dry ingredients into another bowl.
Add the oranges, dates, and walnuts to the wet mixture, then add this to the dry ingredients. Fold together gently until mixed.
Divide between the 18 muffin cups. Bake for 20 minutes until toothpick inserted into the center comes out clean. Leave in the muffin tray for 5 minutes before placing on a wire rack to cool.